: LCD-26L16 26
Contents Remote Control Buttons Remote Control functions Location of controls HDMI Cable Connections Installation Features Panel Features Safety Precautions Before Switching On The TV Power Connection Connections To The Aerial Input Socket How To Connect Other Devices Inserting Batteries In The Remote Control Handset Precautions When Using Batteries Switching the TV ON/OFF To switch the TV on To switch the TV off Operating the TV MENU BUTTON Picture menu Sound menu Tuner menu Function menu PIP menu PC
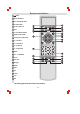
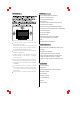
Remote Control Buttons 1 = Power 2 Sleep= Sleep Button 3 SS = Sound System Button 4 PP =Picture Mode 5 Q.View = Quick V iew 6 Mute 7 I/II = Sound Mode Selection 8 Display= Screen Display 9 Hot Key (only in teletext mode) 1 2 5 6 Power Sleep SS PP Q.View Mute / Display 11 10 V+ = Volume Up 11 V- = Volume Down 12 P+ = Program Up 13 P- = Program Down 14 MENU 15 0-9 ,--/---=Digit Button 16 AV/TV 17 TXT=Text 18 Sub.
Remote control functions 1.POWER (STAND BY) BUTTON ( ) Press this button to turn the TV on/stand by. 2.SLEEP BUTTON Press this button to set the sleep timer. When the preset length of time has passed, the TV set Enters standby mode. The sleep timer values are follows: off,15,30,60,90,120. 3.SOUND SYSTEM BUTTON (SS) Set the correct sound system in TV mode.Such as DK,I,M, by pressing this key . 4.
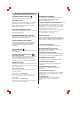
Location of controls 1. ON/OFF Switch 2. Power Indicator 3. Remote Sensor 4. TV / AV 5. MENU 6. VOL.- Button 7. V0L. + Button 8. PROG.- Button 9. PROG. + Button 10. Speakers 11. FULL SCART 12. HALF SCART 10 1 2 10 3 13. HDMI Input 14. VGA Input 15. Y Pb/Cb Pr/Cr 16. AUDIO IN L 17. AUDIO IN R 18. Aerial input socket 19. Power cord input 20. S-Video 21. Video input 22. Audio input (Left & Right) 19 HALF SCART 12 16 17 5 MENU 6 VOL.- 7 VOL.+ 8 PROG.- 9 PROG.
HDMI CABLE CONNECTIONS IMPORTANT INFORMATION Power off both HD player and display before making any connections. Connect the HDMI cable to the HDMI socket of the TV, connect the other end to the HDMI output socket of the HD player source. Connect the HDMI cable to the HDMI socket of the TV. Connect the other end to the HDMI output socket of the HD player source, HDMI cable will carry both Video and audio signals from the HD source to the TV.
Features Installation Up to 200 programme memory. Twin Scart connections. Programme swapping. Sleep timer. 4:3,Zoom1,Zoom2,panorama and Full screen picture modes. When no TV signal is dectected,after 5 minutes the TV switches itself automatically to stand-bymode. CYS: PAL / NTSC SYS: DK / I/ M HDMI Input (support up to 1080i) PC Input (support up to 1080i) PIP NICAM Stereo / AV Stereo Locate the receiver in the room where direct light does not strike the screen.
0-240V AC,50/60Hz -7-
100-240V AC, 50/60Hz only. Precautions when using batteries Do not use old and new batteries together. Do not use different types of batteries (for example, Manganese and Alkaline batteries) together. Note that there are chargeable and nonchargeable batteries. Do not attempt to charge non-chargeable batteries. Remove the batteries from the remote control unit if you do not intend to use the unit for a long time. NOTE: Do not drop the remote control unit.
Sound menu MENU BUTTON 1.Press menu button to display menu ,and press "VOL.+"or "VOL.-" to select sub menu. PICTURE Menu SOUND Menu TUNER Menu FUNCTION Menu PIP Menu Menu button has two functions: First is opening or slosing the menu, and the second is colsing the current menu and then opening the previous menu. The menu will time out automatically after several seconds if it is left on the screen. Press the "MENU" key on the remote control unit to cancel the menu function. 2.
»ù±¾²Ù×÷ Sound System Prog. Sort Press the button to select a new sound standard value in TV. The options are DK,I,M. Press Vol+ to enter. User can set the two channel numbers that want to swap in program 1 and program 2 ,select the " swap " item, press Vol+ button to perform swapping. NOTE: This TV factory set to "I" UK sound. If changed to another setting whilst receiving a UK TV station this will result in loss of sound. Change back to "I" to restore the sound.
»ù±¾²Ù×÷ Brightness Sound menu Press the " VOL.+ " / " VOL.- " button to lighten/ darken the picture in PIP state. Contrast Press the " VOL.+ " / " VOL.- " button to increase/ decrease the contrast of the picture in PIP state. Sub Source The choices are VGA,HDMI,YPbPr. Adjust menu Swap Press " VOL.+ " button to swap the picture between PIP and TV state. PC MODE The monitor comes with a 15-pin PC socket.
(OPTION) HDMI Input Resolutions PIP menu In the PIP menu , the external sources that can be used source are TV,AV, SCART 1,SCART 2,S-Video. HDMI Input typical display modes. The following table is an illustration of some of the typical video display modes. 1 2 3 4 5 6 7 Text 640X480(recommend 60Hz) 800X600(recommend 60Hz) 1024X768(recommend 60Hz) 480p 576p 720p(50/60Hz) 1080i(50/60Hz) YPb Pr Mode(Component input) PROG.+ The menu of YPb Pr mode is exactly same as the menu of HDMI mode.
PROG.+ SIZE PROG.- SIZE SIZE To Cancel TEXT REVEAL Press CANCEL button to clear the TEXT. But the page number is still displayed on the left top of the screen. NOTICE: However, Teletext is playing all the same on the background at the time. Press CANCEL button again to resume the TEXT. REVEAL To Freeze TEXT Press HOLD button to hold a Text page.This means the page will not change and refresh. Press the button again to release the hold state. TEXT SUB.PAGE SUB.
Service Tips BEFORE CALLING FOR SERVICE, HAVE YOU CHECKED ( ) THE FOLLOWING CHART Try diffe rent ch annel, Check if OK, p aerial c robably onnecti station Check ons on aerial fo trouble back o r b f set roken w Re-orie ires nt aeria l (if ind Probab oor typ ly local e) interfere Adjust nce, su fine tun ch a s a in g contr Adjust n appli ol brightn ance e s s control Adjust contras t contro Check l if statio n is bro Adjust adcasti colour ng colo control ur Check if syste m s w Check it c h is if on/off c