
Installation Guide


READ THIS BEFORE YOU BEGIN
• You’ll probably need at least two adults and 2 hours to assemble your trampoline (of course, that depends on
what model you have, and whether or not you’re secretly a superhero)
• We’ve provided some tools to help with assembly, but you’re more than welcome to use your own
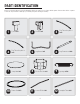
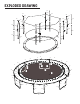
• The assembly steps refer to parts by their descriptions and key numbers (see the part list on page 3)
• The assembly steps are written in a specific order, and if you don’t follow them exactly, you may end up having to
start all over again
• Most importantly, this may not be the easiest thing you’ve ever done, but it will be worth it. Trust us
If you’re a visual learner, check out our assembly videos! They’re pretty great!
And if you’re a visual learner, check out our assembly videos!
ASSEMBLY
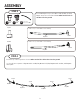
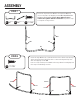
STEP 2
Insert four key no. 1 top tubes (3) into four T-joints, and
two key no. 1 top tubes into two sockets. Make sure the
holes in the tubes face the ground!
Top Tube
(Key NO.1) (x6)
Socket
(x2)
1
2
3
7
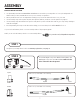
STEP 1
Resgister your trampoline! For info on warranty registration, see page 2.
Visit: youtube.com/c/SkywalkerTrampolines
T-joint
(x4)
T-joint
Socket
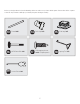
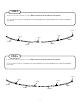
Make sure you have four of the following:
Make sure you have two of the following:
Key NO.1
Key NO.1
T-joint
Socket