
Installation Guide


14
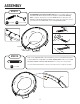
ASSEMBLY
STEP 15
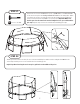
Now, place one spring directly to the left of each spring already placed.
Continuing in a clock-wise direction, attach the remaining springs to the
remaining V-rings and frame holes until all 72 springs have been placed.
Springs (x60)
9
13th
14th
15th
16th
17th
18th
19th
20th
21st
22nd
23rd
24th
25th
26th
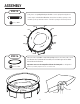
STEP 16
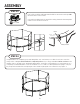
Frame Pad (x1)
10
Place the frame pad (10) on top of the springs. Adjust the frame pad so that
the slits are directly above the T-sockets, and the two logos are on either
side of the enclosure door.
Important: Don’t use the trampoline without the frame pad. It’s designed to
protect your little jumpers! Trust us on this one.
Socket
Slit of Pad
(10)