
Installation Guide


11
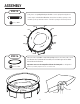
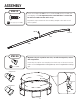
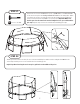
STEP 9
Flip the three frame sections assembled in steps 4-6 so that the frame holes are now facing up and the legs
are supporting the frame. Now, connect all of the frame sections together. Make sure the T-joints and sockets
are alternating! Note: A properly assembled frame fits together as key #1-1-1, followed by key #2-2-2, key #1-1-
1, key #2-2-2 with the T-joints and sockets alternating. Even one part out of place can disrupt the oval shape!
Key NO.2
T-joint
T-joint
T-joint
T-joint
T-joint
T-joint
Socket
Socket
Socket
Socket
Socket
Socket
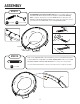
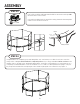
The enclosure net should be pre-installed to the jump mat. Make sure
each V-ring on the mat is threaded through the corresponding hole
on the net. Lay the mat on the ground inside the frame, and make
sure the two warning labels are on top of the mat and centered in
front of a middle key NO.2 top tube. Position the enclosure door so it’s
aligned with the T-joint to the left of the warning label!
STEP 10
Enclosure
Net (x1)
8
Jump Mat (x1)
7
Middle key NO. 2
Enclosure door
Warning label
Warning label
T-joint
T-joint
Key NO. 2
Key NO. 2
Key NO.2
Key NO.2
Key NO.1
Key NO.1
Key NO.1
Key NO.2
Key NO.2
Key NO.2
Key NO.1
Key NO.1
Key NO.1