ASSEMBLY, MAINTENANCE, & USER MANUAL MODEL #SSFG9 WARNING Read all precautions and instructions in this manual before using this equipment. Save this manual for future reference. Skywalker Holdings LLC P.O.
TABLE OF CONTENTS Part List.....................................................................................................................................................................................3 Part Identification........................................................................................................................................................4-5 Exploded Drawing...............................................................................................................
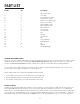
PART LIST Key No. Qty. Description 1 2 3 4 5 6 7 8 9 10 11 12 13 14 15 16 17 18 19 20 2 2 2 2 2 1 1 2 2 2 2 2 2 2 1 2 1 20 1 2 Top Corner Tube Cross Bar Front Side Post (Short) Front Bottom Corner Bottom Cross Bar (Long) Bottom Left Corner Bottom Right Corner Back Top Bent Tube Back Side Post Anchor Tube Ground Stake Bolt Washer Arc washer Net Soccer Banner Middle Banner Clip Wrench Sandbag Weight ORDERING REPLACEMENT PARTS We get it... sometimes things happen.
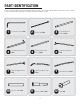
PART IDENTIFICATION Before you begin, take a look at the drawings below to make sure you have all the parts! The numbers in the squares to the left (key numbers) will help you identify the parts during assembly.
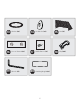
13 Washer (x2) 14 Arc Washer (x2) 15 Net (x1) 16 Soccer Banner (x2) 17 Middle Banner (x1) 18 Clip (x20) 19 Wrench (x1) 20 Sandbag Weight (x2) 5
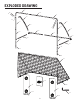
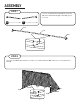
EXPLODED DRAWING (1) (13) (12) (2) (1) (8) (14) (14) (3) (8) (9) (3) (12) (13) (9) (6) (4) (2) (7) (5) (4) (10) (5) (10) (11) (11) (15) (17) (18) (16) (16) (20) (19) (20) 6
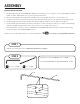
ASSEMBLY READ THIS BEFORE YOU BEGIN • You’ll probably need at least 2 adults and 2 hours to assemble your soccer goal (of course, that depends on what model you have, and whether or not you’re secretly a superhero). • We’ve provided a wrench to help with assembly, but you’re more than welcome to use your own tools. • Use gloves to protect your hands from pinch points during assembly. Plus, it’s an up-and-coming fashion trend.
ASSEMBLY STEP 3 Slide the tube section from step 1 into the left and middle sleeves on the top of the net (15) as shown. 15 Slide the remaining top corner tube (1) through the sleeve on the right side of the net, and insert into the cross bar (2) as shown. Net (x1) (1) (1) (15) STEP 4 3 Front Side Post (Short) (x2) 4 Front Bottom Corner (x2) (3) (4) 8 Locate a front bottom corner tube (4) and a short front side post (3). Insert the front bottom corner tube into the front side post as shown.
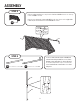
STEP 5 Starting at the bottom of the net, weave the assembled tubes from step 4 in and out of the larger holes in the left side of the net (15) as shown. When you reach the top of the net, insert the assembled tubes into the top corner tube (1). Before connecting the frame pieces together, be sure to also weave the net over the corner of the top corner tube. Repeat this step on the other side of the net.
ASSEMBLY STEP 7 6 Connect the bottom left corner (6), the cross bar (2), and the back bottom right corner (7) together as shown. Bottom Left Corner (x1) 7 Bottom Right Corner (x1) (6) (2) (7) STEP 8 Place the assembled tube section from step 7 on the inside of the net (15), and attach to the bottom cross bars (5).
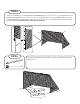
STEP 9 Connect one back top bent tube (8) to one back side post (9). 8 Back Top Bent Tube (x2) 9 Back Side Post (x2) Repeat this step with the remaining back top bent tube and back side post. (8) (9) STEP 10 12 Bolt (x2) 13 Insert the assembled tube sets from step 8 into the bottom left (6) and bottom right (7) corners. Washer (x2) 14 Attach the back tubes to the front side posts (3) with two bolts (12), two washers (13) and two arc washers (14).
ASSEMBLY STEP 11 10 Anchor Tube (x2) 18 Clips (x20) Locate the 20 clips (18). Wrap the net so it lies underneath the bottom of the goal frame and wraps toward the inside. Secure the net (15) to itself by using a clip to attach the excess net on the inside to the outside portion just above the bar. Use the remaining clips to secure the net evenly around the bottom of the goal. Then, insert the anchor tubes (10) into the front bottom corners (4).
STEP 13 To attach the banners, simply zip onto the sleeves. To remove, either zip off or toss over the back of net. 16 Soccer Banner (x2) 17 Note: The sandbag weights are preinstalled in the bottom of the banners. Middle Banner (x1) (17) (16) (16) STEP 14 Congratulations on completing your new soccer goal! (See... we knew you could do it!) So here comes the real question...
LIMITED WARRANTY Skywalker Holdings, LLC warrants its products to be free from defects in material and workmanship under normal use and service conditions. The steel frame is warranted for three (3) years after the date of purchase. All other parts are warranted for one (1) year after the date of purchase. Warranty coverage extends only to the original retail purchaser from the date of original purchase. This warranty is only valid concerning products used for residential use.
NOTE: SKYWALKER HOLDINGS, LLC IS NOT RESPONSIBLE OR LIABLE FOR INDIRECT, SPECIAL OR CONSEQUENTIAL DAMAGES ARISING OUT OF OR IN CONNECTION WITH THE USE OR PERFORMANCE OF THE PRODUCT OR OTHER DAMAGES WITH RESPECT TO ANY ECONOMIC LOSS, LOSS OF PROPERTY, LOSS OF REVENUE OR PROFITS, LOSS OF ENJOYMENT OR USE, COST OF REMOVAL, INSTALLATION OR OTHER CONSEQUENTIAL DAMAGES. SOME STATES DO NOT ALLOW THE EXCLUSION OR LIMITATION OF INCIDENTAL OR CONSEQUENTIAL DAMAGES.