
Installation Guide


REV. 3/19/05 Page 3 of 14
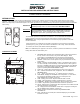
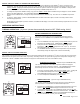
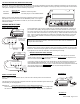
SETTING THE CURRENT HOUR AND MINUTES
1. Following Step 3 on the previous page the HOUR digits will begin flashing in
the TIME frame on the LCD screen.
2. To set the current HOUR, press the UP
or DOWN button setting the HOUR
for the corresponding AM/PM time period.
3. After setting the current HOUR, press the SET
button on the front of the
transmitter, and the MINUTE digits will begin flashing on the LCD screen.
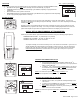
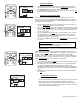
4. To set the current MINUTES, press the UP
or DOWN button setting to the
correct MINUTES.
5. After setting the HOURS and MINUTES, press the SET
button
on the front of the transmitter.
The initial set-up/programming of the transmitter is now complete. Be sure the
slide-on battery cover is reinstalled and proceed to the next step. The LCD
screen will now display in its normal state.
PROGRAM OPERATION OF REMOTE CONTROL
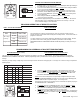
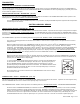
BUILT –IN FACTORY PROGRAM
BUILT-IN PROGRAM
The transmitter has a factory program built in. Each day has been broken into four
periods and each period has its own starting time and temperature. A chart of the built- in
programs is at the left.
You may change any of the factory settings by following the procedures below. Should
you wish to return to the factory program, follow the procedures under heading
PROGRAM REVIEW or PROGRAM CANCELLATION depending on which process you
select.
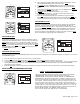
PROGRAMMING DAYS/PERIOD OF DAY/SET TEMPERATURES
CUSTOM PROGRAM
(BY USER) PROGRAMMING THE TRANSMITTER
The user may change the built-in time and temperature programs to suit their personal schedule. Each day is divided into four periods:
MORNING, DAY, EVENING, AND NIGHT. A blank programming chart is provided below to record your customized time and temperature
settings.
If desired, you may change a single day or all seven days that have the built-in factory program. To change one or all seven days, complete the
following steps:
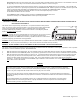
1. Press the PROG
button for 4 seconds. The shaded boxes on the LCD
screen with the words PROGRAM FOR
and START AT will begin to flash.
The current DAY, PERIOD, TIME and SET temperature of the BUILT-IN
FACTORY PROGRAM will also be displayed.
NOTE
: If the above settings were not previously completed during the initial
SET-UP and PROGRAMMING procedure, then the LCD screen will display SU,
MORN, TIME and SET temperature digits. You must go back
and perform the intiial set-up procedure or the remote will not operate properly in
the PROGRAM mode. SEE PAGE 2.
2. To program
the DAY and PERIOD OF DAY, press the AHEAD or BACK
buttons to display the DAY and PERIOD you wish to program.
3. When the DAY and PERIOD being programmed displays, then press the
PROG
button and the TIME will flash on the LCD screen.
4. To program
the START TIME, press the UP or DOWN button. Programmed
start time settings are in 15 minute segments. The new set time will display
on the LCD screen.
DAY
PERIOD
TIME/TEMP
All 7 Days
MORN
6:00 AM 70
Factory-
Programmed
DAY
EVE
NIGHT
8:30 AM 60
3:00 PM 70
11:00 PM 63
PERIOD
DAY
MORN DAY
EVE NITE TIME/TEMP
SU
MO
TU
WE
TH
FR
SAT
3
2
TIME
SU
AM
UP
DOWN
MODE
TIMER
TIME
SET
PROG
AHEAD
BACK
FAN
TIME
SET
AM
START
AT
PROGRAM
FOR
SU
MORN
1,3
2
UP
DOWN
MODE
TIMER
TIME
SET
PROG
AHEAD
BACK
FAN