
User Guide


9
NOTE: Perform the NCG check daily prior to using your machine. The NCG bleed valve
on the upper rear center of the machine allows manual venting of non-
condensable gases that may accumulate during the recovery process.
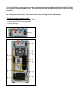
1. With the storage tank vapor port open, compare the readings on the 2 gauges mounted on
the side of the machine. Gauge A indicates the actual System Pressure - Gauge B
indicates virgin Sample Pressure.
2. If gauge A is 5 PSI or more higher than gauge B, open the NCG Bleed Valve and slowly
bleed off pressure until gauge A is within 5 PSI of gauge B then close the NCG Bleed Valve.
EQUIPMENT SERVICE AND MAINTENANCE
WARNING: Before any service operation can be performed, it is necessary to purge the
refrigerant from the machine system. DO NOT open unit components until all
refrigerant has been purged from the system.
PURGE PROCEDURE
1. Drain any recovered oil using the recovered oil drain valve on the side of the machine.
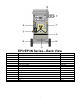
2. Remove the yellow cover from the machine, locate the Backseat Valve mounted just above
the center of the compressor and remove the shaft cover.
3. Open the storage tank vapor valve, connect the machine to power and press the green ON
button.
4. When the compressor stops running, immediately close the Backseat Valve (turn the shaft
counter-clockwise). The valve shaft flats are 1/4” square drive.
5. Press the red OFF button, close the storage tank vapor valve and disconnect power.
YOU CAN NOW SAFELY PERFORM MACHINE MAINTENANCE
FILTER CHANGE PROCEDURE
IMPORTANT: Filter life is 30 hours. Change the filter every 30 hours regardless of the
moisture level shown on the moisture indicator. Use the hour meter
mounted on the control panel to track and determine filter change intervals.
NOTE: Replacement filter (part # FA1) includes new gasket.
1. Purge the system as described above.
2. Remove the 8 bolts from the filter housing cover, remove the cover, remove the old gasket
from the machined groove then remove the old filter core from the housing.
3. Lubricate the new gasket with ESTER oil, install it in the cover groove then install the new
filter core in the housing with the HOLE END DOWN.
4. Replace the filter cover on the housing and tighten the bolts to 15 ft. lbs. torque using a
crossing pattern.
5. Proceed to Compressor Oil Change Procedure.
COMPRESSOR OIL CHANGE PROCEDURE