
User Manual


AirMagic’s lens correction fixes all these issues automatically.
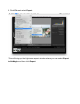
How to enable lens correction in AirMagic
To enable lens correction, click on File, choose Settings, and click on Auto
Lens Correction.
If it’s already checked, that means it’s enabled.
As soon as you upload a photo to AirMagic, lens correction will be applied.
How to disable lens correction
To disable lens correction, click on File, choose Settings, and select
Automatic Lens Correction.
After you disable it, there will be no checkmark next to the Automatic Lens
Correction option.