
User's Manual


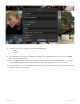


Table Of Contents
- Table of Contents
- 1. Welcome to Luminar 4
- 2. Benefits of Luminar 4
- 2.1. New & Improved features in Luminar 4
- 3. Installing & Activating Luminar
- 3.1. Installing & Activating Luminar for Windows
- 3.2. Installing & Activating Luminar for macOS
- 3.2.1. Installing Luminar from the Mac App Store
- 3.3. Upgrading from Luminar 3
- 4. Technical Requirements
- 5. How Can You Use Luminar?
- 5.1. Supported File Types
- 5.2. Using Luminar as a Single Image editor
- 5.3. Using Luminar with other software
- 5.3.1. Installing Plug-ins
- 5.3.2. Using Luminar with Adobe Photoshop
- 5.3.3. Using Luminar with Adobe Lightroom Classic
- 5.3.4. Using Luminar with Adobe Photoshop Elements
- 5.3.5. Using Luminar as a Photos for macOS Extension
- 5.3.6. Using Luminar with Apple Aperture
- 5.4. Using Luminar as an external editor
- 5.4.1. How to User Skylum’s Luminar 4 with Capture One
- 6. User Interface Overview
- 6.1. Library View
- 6.1.1. Library Toolbar
- 6.1.2. Library Sidebar
- 6.2. Edit View
- 6.2.1. Edit Toolbar
- 6.2.2. Edit Sidebar
- 6.2.2.1. Histogram
- 6.2.2.2. Current Photo Actions
- 6.2.2.3. History
- 6.2.3. Additional Tool Controls
- 6.3. Info View
- 6.4. Filter to Tool Migration
- 7. Opening Images for Editing
- 7.1. Editing a Single Image
- 7.2. Adding a Folder with Images
- 7.3. Importing from a Memory Card
- 8. Working with the Essential Tools
- 8.1. Light Tool
- 8.2. AI Enhance Tool
- 8.3. AI Structure Tool
- 8.4. Color Tool
- 8.5. Black & White Conversion Tool
- 8.6. Details Enhancer Tool
- 8.7. Denoise Tool
- 8.8. Landscape Enhancer Tool
- 8.9. Vignette Tool
- 9. Working with the Creative Tools
- 9.1. AI Sky Replacement Tool
- 9.1.1. AI Sky Replacement Guidelines
- 9.2. AI Augmented Sky Tool
- 9.3. Sunrays Tool
- 9.4. Dramatic Tool
- 9.5. Matte Look Tool
- 9.6. Mystical Tool
- 9.7. Color Styles (LUT) Tool
- 9.8. Texture Overlay Tool
- 9.9. Glow Tool
- 9.10. Film Grain Tool
- 9.11. Fog Tool
- 10. Working with the Portrait Tools
- 10.1. AI Skin Enhancer Tool
- 10.2. AI Portrait Enhancer Tool
- 10.3. High Key Tool
- 10.4. Orton Effect Tool
- 11. Working with the Professional Tools
- 11.1. Advanced Contrast Tool
- 11.2. Adjustable Gradient Tool
- 11.3. Dodge & Burn Tool
- 11.4. Color Enhancer Tool
- 11.5. Photo Filter Tool
- 11.6. Split Toning Tool
- 12. Working with Canvas Tools
- 12.1. Crop & Rotate Tool
- 12.2. Erase Tool
- 12.3. Clone & Stamp Tool
- 12.4. Lens & Geometry Tool
- 13. Luminar Looks
- 13.1. Working With Luminar Looks
- 13.2. Loading Additional Luminar Looks Collections
- 13.3. Customizing Luminar Looks
- 13.4. Adding a Custom Luminar Look Pack
- 14. Working with Layers
- 14.1. An Overview of Layers
- 14.2. Using an Adjustment Layer
- 14.3. Using an Image Layer
- 14.4. Creating a Stamped Layer
- 14.5. Transforming a Layer
- 14.6. Using Blending Modes with Layers
- 15. Masking Options in Luminar
- 15.1. Creating a Layer Mask
- 15.2. Creating a Tool Mask
- 15.3. Using a Brush Mask
- 15.4. Using a Radial Mask
- 15.5. Using a Gradient Mask
- 15.6. Using a Luminosity Mask
- 15.7. Additional Mask Controls
- 16. Rating Images
- 16.1. Understanding Rating Controls
- 16.2. Rating Images in the Library View
- 16.3. Rating Images in the Single View
- 16.4. Useful Keyboard Shortcuts When Rating Images
- 17. Organizing Images
- 17.1. Using Shortcuts to Find Your Photos
- 17.2. Using Folders to Organize Images
- 17.3. Moving Images Between Folders
- 17.4. Reconnecting Missing Folders and Images
- 17.5. Deleting Files from Folders
- 17.6. Using Albums to Organize Images
- 17.7. Moving Images from the Single Image Edits Collection to an Album
- 18. Navigating & Managing Your Library
- 18.1. Filtering the View of Your Images
- 18.2. Handling Raw + JPEG Pairs
- 18.3. Sorting Images
- 18.4. Syncing Adjustments
- 18.5. Revealing Original Images
- 18.6. Working with the Trash folder
- 18.7. Reconnecting Lost Edits
- 19. Working with Catalogs
- 19.1. What is a Catalog?
- 19.2. Working with Multiple Catalogs
- 19.3. Backing Up a Catalog
- 19.4. Backing Up Your Photo Edits
- 20. Saving & Exporting Files
- 20.1. Saving Adjustments in a Catalog
- 20.2. Exporting an Image
- 20.2.1. Saving an Image File
- 20.2.2. Supported File Formats
- 20.3. Sharing an Image
- 20.3.1. Sharing an Image to 500px
- 20.4. Batch Processing Photos
- 21. Keyboard Shortcut Keys
- 21.1. macOS Keyboard Shortcuts
- 21.2. Windows Keyboard Shortcuts
- 22. Keeping Luminar Up To Date

• Last Used. The settings from the previous time using the Batch Process command.
User Settings
This section contains any custom workflows you’ve created. These can be made using the settings on the
right. To store the Batch Process settings for later click the Save Settings button at the bottom of the
window. Be sure to give the preset a descriptive name.
Batch Settings
When you ready to configure the batch process, there are several useful settings to choose from.
• Luminar Look. The preset controls let you choose from any Luminar Look. This includes all bundled
Luminar Looks, installed Luminar Looks, and user-generated ones. First, choose the Category and
then the individual Luminar Look. You can use the Amount slider to refine the Luminar Look’s
strength.
◦ Save to.* This option lets you choose where processed files will be saved. You can save them
in their current location or browse to select another folder. When you’ve made a choice, the file
“path” will be displayed. Note: Because it is possible to overwrite your original files, it is a good
practice to save your batch-processed files into a new folder separate from the original files.
• Naming. Luminar 3 has very flexible file naming options. You can add a prefix and suffix, choose from
Skylum Luminar - 4
©2020 Skylum Page 298 of 309