
User's Manual
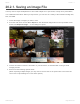


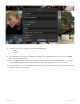
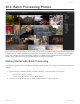


Table Of Contents
- Table of Contents
- 1. Welcome to Luminar 4
- 2. Benefits of Luminar 4
- 2.1. New & Improved features in Luminar 4
- 3. Installing & Activating Luminar
- 3.1. Installing & Activating Luminar for Windows
- 3.2. Installing & Activating Luminar for macOS
- 3.2.1. Installing Luminar from the Mac App Store
- 3.3. Upgrading from Luminar 3
- 4. Technical Requirements
- 5. How Can You Use Luminar?
- 5.1. Supported File Types
- 5.2. Using Luminar as a Single Image editor
- 5.3. Using Luminar with other software
- 5.3.1. Installing Plug-ins
- 5.3.2. Using Luminar with Adobe Photoshop
- 5.3.3. Using Luminar with Adobe Lightroom Classic
- 5.3.4. Using Luminar with Adobe Photoshop Elements
- 5.3.5. Using Luminar as a Photos for macOS Extension
- 5.3.6. Using Luminar with Apple Aperture
- 5.4. Using Luminar as an external editor
- 5.4.1. How to User Skylum’s Luminar 4 with Capture One
- 6. User Interface Overview
- 6.1. Library View
- 6.1.1. Library Toolbar
- 6.1.2. Library Sidebar
- 6.2. Edit View
- 6.2.1. Edit Toolbar
- 6.2.2. Edit Sidebar
- 6.2.2.1. Histogram
- 6.2.2.2. Current Photo Actions
- 6.2.2.3. History
- 6.2.3. Additional Tool Controls
- 6.3. Info View
- 6.4. Filter to Tool Migration
- 7. Opening Images for Editing
- 7.1. Editing a Single Image
- 7.2. Adding a Folder with Images
- 7.3. Importing from a Memory Card
- 8. Working with the Essential Tools
- 8.1. Light Tool
- 8.2. AI Enhance Tool
- 8.3. AI Structure Tool
- 8.4. Color Tool
- 8.5. Black & White Conversion Tool
- 8.6. Details Enhancer Tool
- 8.7. Denoise Tool
- 8.8. Landscape Enhancer Tool
- 8.9. Vignette Tool
- 9. Working with the Creative Tools
- 9.1. AI Sky Replacement Tool
- 9.1.1. AI Sky Replacement Guidelines
- 9.2. AI Augmented Sky Tool
- 9.3. Sunrays Tool
- 9.4. Dramatic Tool
- 9.5. Matte Look Tool
- 9.6. Mystical Tool
- 9.7. Color Styles (LUT) Tool
- 9.8. Texture Overlay Tool
- 9.9. Glow Tool
- 9.10. Film Grain Tool
- 9.11. Fog Tool
- 10. Working with the Portrait Tools
- 10.1. AI Skin Enhancer Tool
- 10.2. AI Portrait Enhancer Tool
- 10.3. High Key Tool
- 10.4. Orton Effect Tool
- 11. Working with the Professional Tools
- 11.1. Advanced Contrast Tool
- 11.2. Adjustable Gradient Tool
- 11.3. Dodge & Burn Tool
- 11.4. Color Enhancer Tool
- 11.5. Photo Filter Tool
- 11.6. Split Toning Tool
- 12. Working with Canvas Tools
- 12.1. Crop & Rotate Tool
- 12.2. Erase Tool
- 12.3. Clone & Stamp Tool
- 12.4. Lens & Geometry Tool
- 13. Luminar Looks
- 13.1. Working With Luminar Looks
- 13.2. Loading Additional Luminar Looks Collections
- 13.3. Customizing Luminar Looks
- 13.4. Adding a Custom Luminar Look Pack
- 14. Working with Layers
- 14.1. An Overview of Layers
- 14.2. Using an Adjustment Layer
- 14.3. Using an Image Layer
- 14.4. Creating a Stamped Layer
- 14.5. Transforming a Layer
- 14.6. Using Blending Modes with Layers
- 15. Masking Options in Luminar
- 15.1. Creating a Layer Mask
- 15.2. Creating a Tool Mask
- 15.3. Using a Brush Mask
- 15.4. Using a Radial Mask
- 15.5. Using a Gradient Mask
- 15.6. Using a Luminosity Mask
- 15.7. Additional Mask Controls
- 16. Rating Images
- 16.1. Understanding Rating Controls
- 16.2. Rating Images in the Library View
- 16.3. Rating Images in the Single View
- 16.4. Useful Keyboard Shortcuts When Rating Images
- 17. Organizing Images
- 17.1. Using Shortcuts to Find Your Photos
- 17.2. Using Folders to Organize Images
- 17.3. Moving Images Between Folders
- 17.4. Reconnecting Missing Folders and Images
- 17.5. Deleting Files from Folders
- 17.6. Using Albums to Organize Images
- 17.7. Moving Images from the Single Image Edits Collection to an Album
- 18. Navigating & Managing Your Library
- 18.1. Filtering the View of Your Images
- 18.2. Handling Raw + JPEG Pairs
- 18.3. Sorting Images
- 18.4. Syncing Adjustments
- 18.5. Revealing Original Images
- 18.6. Working with the Trash folder
- 18.7. Reconnecting Lost Edits
- 19. Working with Catalogs
- 19.1. What is a Catalog?
- 19.2. Working with Multiple Catalogs
- 19.3. Backing Up a Catalog
- 19.4. Backing Up Your Photo Edits
- 20. Saving & Exporting Files
- 20.1. Saving Adjustments in a Catalog
- 20.2. Exporting an Image
- 20.2.1. Saving an Image File
- 20.2.2. Supported File Formats
- 20.3. Sharing an Image
- 20.3.1. Sharing an Image to 500px
- 20.4. Batch Processing Photos
- 21. Keyboard Shortcut Keys
- 21.1. macOS Keyboard Shortcuts
- 21.2. Windows Keyboard Shortcuts
- 22. Keeping Luminar Up To Date

• Format. Choose from eight different file
formats. Some options like TIFF and JPEG
may offer additional settings for control over
compression and bit depth.
• Sharpen. Choose whether you want to
Sharpen the exported file. This can increase
details in the edges of the image and
overcome some of the compression artifacts
of formats like JPEG.
• Resize. You can choose to export at the
original size or to enter a new dimension for
the image to fit its long side or short side.
• Color Space. You can choose from 3 color
spaces for output.
◦ sRGB is the narrowest color gamut, but
most compatible with the web
◦ Adobe RGB is a common color space used in computer graphics and many software
applications.
◦ ProPhoto RGB is the widest gamut and supports the broadest range of colors. ProPhoto
RGB is the only color space that can contain all the colors captured in a raw format
photo.
• Quality. Some formats (like JPEG) allow you to assign a Quality setting which will affect overall
compression and the final file size.
If you are exporting a single file, you can change its name to something more descriptive at the top of the
dialog box. If you are exporting multiple images, you won’t see this option, and the exported files will retain
their original file names.
Tip:
If you need to set your resolution on export, think of it this way. Dots per inch (or more
accurately pixels per inch) describes the effective resolution. So an image that’s 3,000
pixels wide would make a 10-inch print at 300 ppi. You can set the resolution of the
exported image using the Resize option in the Export dialog. If you don’t change this
setting, Luminar will export at maximum quality.
*
Skylum Luminar - 4
©2020 Skylum Page 290 of 309