
User guide


44
APPENDIX II : SYNSCAN SELF-DIAGNOSIS
The SynScan hand control contains a built-in self-diagnosis program. To run a full test, users
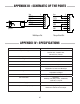
should prepare a “Loop-Test Plug” by referring to Appendix 3 and the following instructions:
• Short the pin-2 (TX_RS232C) and pin-5 (RX_RS232C) of a RJ-12 plug.
Here are the diagnosis steps:
1. Insert the “Loop-Test Plug” to the RJ-12 port of the SynScan hand control.
2. Press “2” and “5” simultaneously and power on the hand control.
3. The hand control will display “SynScan B.I.T.” for a short time.
4. The LCD will display “LCD CONTRAST x-yy“, press ENTER button to continue.
5. The LCD screen will become fully black and then fully clear for a while for the purpose of
checking the LCD display.
6. If there is any problem for the RS-232C function on multi-purpose port (the RJ-12 outlet)
or no Loop-Test Plug connected to the multi-purpose port, the screen will display “COM1
ERROR”. Press ENTER to continue.
7. Ignore “COM2 ERROR” message and press ENTER to continue.
8. If everything is ne, the testing will go to Step 9; Otherwise, the SynScan hand control will
show “EEPROM ERROR” or “Flash ERROR”. Press ENTER to continue in such case.
9. Check keypad and other features:
• The screen will display “Key=” in the top row. If a key is pressed, the name of the key
will be displayed.
• The power voltage will be displayed on the bottom row of the screen.