
Use and Care Guide


-15-
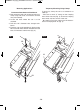
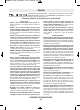
For safety, the power switch lever is designed to pre-
vent accidental starts. To operate safety switch, slide
the switch “Lock-OFF” toggle 2 with either thumb to
disengage the lock, then pull the power switch lever
3 and release the switch “Lock-OFF” toggle 2 (Fig.
10). When the power switch lever is released, the
switch “Lock-OFF” toggle 2 will engage the power
switch lever 3 automatically, and the lever will no
longer operate until either “Lock-Off” toggle is en-
gaged again (Fig. 10)
NOTE: Switch lever 3 has a hole 3A that can ac-
commodate a padlock with a long shackle of up to
1/4" in diameter (not provided with the saw) to pre-
vent unauthorized use.
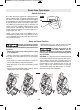
Position your body and hands
properly to make cutting easier
and safer. Observe the following instructions (See
Figure 11).
• Never place hands near cutting area on table
or on workpiece.
• Always use clamp to hold workpiece against the
base and fence when making cuts. Do not support
by hand.
• Keep hands in position until trigger has been re-
leased and blade has stopped completely.
• Keep feet firmly on the floor and maintain proper
balance.
• Follow the head assembly when mitering. Stand
slightly to the side of the saw blade.
• Before making any cut, with the power off, lower
the blade to preview the blade path - dry run.
Be aware of the path of the
saw blade. Make a dry run
with the saw OFF by conducting a simulated
cutting cycle, and observe the projected path of
the saw blade.
DRY RUN—It is important to know where the blade
will intersect with the workpiece during cutting oper-
ations. Always perform the simulated cutting se-
quence with the power tool switched OFF to gain an
understanding of the projected path of the saw
blade. Adjust your clamp and fence so that the
smooth lower guard and cutting action is not inter-
fered with during cutting operation.
Basic Saw Operations
3
3A
2
FIG. 10
Body and Hand Position
Switch Activation
FIG. 11
1609B00427 eng.qxp_SPT62MTC 5/12/15 1:53 PM Page 15