
Use and Care Guide


-14-
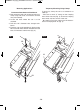
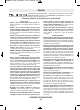
Mounting Applications
Permanent Attachment to Workbench
1. Both mounting holes 12 should be bolted se-
curely using 5/16" bolts, lock washers and hex
nuts (not included).
2. Locate and mark where the saw is to be
mounted.
3. Drill two 5/16" diameter holes through work-
bench.
4. Place the saw on the workbench, aligning holes
12 in base with holes drilled in workbench. Install
bolts, lock washers and hex nuts (Fig. 8).
Temporary Mounting Using Clamps
If necessary, clamp the saw to a workbench or
table top.
• Place two or more “C” clamps on the clamping
areas 12 and secure (Fig. 9). There are clamping
areas 12 at only two corners of the saw.
• Be careful not to place clamps over the base ex-
tension clamping lever 11 (Fig. 9).
12
12
FIG. 8 FIG. 9
11
12
12
1609B00427 eng.qxp_SPT62MTC 5/12/15 1:53 PM Page 14