
Use and Care Guide


-10-
Unpacking And Checking Contents
Never carry the tool by the
cord or head assembly power
switch handle.
The SPT62MTC Saw is shipped complete in one box.
Separate tool from packing materials and examine
the tool.
If any parts are missing, do
not plug in power cord or turn
the switch on until the missing parts are ob-
tained and are installed correctly.
To avoid possible injury dis-
connect plug from power
source before performing any assembly, adjust-
ment or repairs.
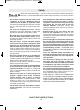
Moving Guard Assembly
1. Position the saw in the UP position. If the saw is
locked in the DOWN position, press down slightly
on the saw head assembly and pull out the head
assembly lock pin 19 (Fig. 1, page 8); then allow
the saw head to come up to its highest position .
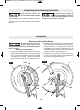
2. Loosen the forward cover plate screw 25 with the
Philips head end of the blade wrench 7 approxi-
mately six rotations - enough for the cover plate
stop 24A to pass under the screw head. Do not
completely remove the front screw. Do not loosen
or remove the rear screw 30. (Fig. 3).
3. Rotate the lower guard 5 clockwise until it rests
on top of the upper guard 9 and the blade bolt
and washers are exposed (Fig. 4).
Removing and Installing Blades
Assembly
FIG. 3
FIG. 4
24
24
25
24A
5
5
9
9
30
6A
6
6B
8
1609B00427 eng.qxp_SPT62MTC 5/12/15 1:53 PM Page 10