
Operating Guide

14
OPERATING INSTRUCTIONS
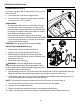
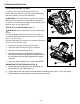
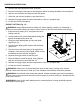
CROSS-CUTTING/RIP CUTTING (Fig. 10-11)
When making a cross-cut or a rip cut, align the guideline
with the blade-guide notch (
T
) on the base, as shown
in Fig. 10. The distance from the saw blade to the saw
base is approximately 1-1/2 in. (3.8 cm) on the left side of
the saw and 4-1/4 in. (10.8 cm) on the right side. Blade
thicknesses vary, so you should always make a trial cut in
scrap material along a guideline to determine how much
the guideline must be offset from the guide to produce an
accurate cut.
NOTE: The distance from the cutting line to the guideline
is the amount by which the guide should be offset. Use a
guide when making long or wide rip cuts.
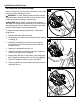
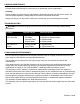
RIP CUTTING USING A STRAIGHT EDGE:
1. Secure the workpiece.
2. Clamp a straight edge to the workpiece using
C-clamps (not included).
NOTE: Position the C-clamps so that they will not
interfere with the saw housing during the cut.
3. Depress the trigger switch to start the saw.
4. Allow the blade to reach full speed, then guide the saw
into the workpiece and make the cut.
5. Saw along the straight edge to achieve a straight rip cut.
6. Release the trigger switch and allow the blade to come
to a complete stop.
7. Lift the saw from the workpiece.
NOTE: Do not bind the blade in the cut.
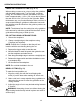
BEVEL CUTTING (Fig. 12)
To make the best possible cut:
1. Align the cutting line with the bevel blade-guide
notch (X) on the base when making 45° bevel cuts.
2. Make a trial cut in scrap material along a guideline to
determine the amount to offset the guideline on the
cutting material.
3. Adjust the angle of cut to any desired setting between
0° and 56°.
WARNING: Attempting a bevel cut without having the
angle-locking knob securely locked in place can result in
serious injury.
10
12
11
T
X
B