
Operating Guide

10
OPERATING INSTRUCTIONS
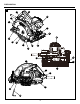
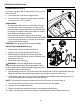
TRIGGER SWITCH (Fig. 2)
Your saw is equipped with a trigger switch (A) to turn the
saw on and off.
1. To start the saw, squeeze the trigger switch.
2. To stop the saw, release the trigger switch and allow
it to return to the “OFF” position.
SAW BLADES
• The best saw blades will not cut efciently if they are
not kept clean, sharp, and properly set. Using a dull
blade will place a heavy load on the saw and increase
the danger of kickback. Keep extra blades on hand so
sharp blades are always available.
• Gum and resin on blades will slow the saw down.
Follow the instructions for REMOVING A SAW BLADE,
use gum and resin remover, hot water, or kerosene to
remove these accumulations.
WARNING: Do not use gasoline to clean the blade.
INSTALLING A SAW BLADE (Fig. 3)
1. Disconnect the plug from the power source.
2. Depress and hold the spindle-lock button (
O
).
3. While keeping the spindle-lock button depressed,
remove the blade bolt (
Q
) by turning it clockwise with
the blade wrench (W).
4. Remove the outer ange (
R
).
WARNING: If the inner ange has been removed,
replace it before placing the blade on the spindle. Failure
to do so will prevent the blade from tightening properly and
could result in serious personal injury.
5. Use the blade guard lever (
H
) to retract the lower blade guard (
I
) into the upper blade guard (
K
).
Make sure that the lower guard works properly and allows the guard to move freely.
6. Verify that the saw teeth, the arrow on the saw blade and the blade-rotation indicator arrow (V)
on the lower guard are all pointing in the same direction.
NOTE: The saw teeth should point upward at the front of the saw, as shown in Fig. 3.
7. Fit the saw blade (
P
) inside the lower blade guard (
I
) and onto the spindle.
8. Replace the outer blade ange (R).
9. Depress and hold the spindle-lock button, and replace the blade screw.
10. Tighten the blade bolt securely by turning it counterclockwise with the blade wrench (W).
3
2
A
H
P
R
Q
O
K
I
V