
Manual


6
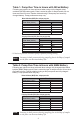
De-activating the Regulator
To ensure the pump is set for high fl ow,
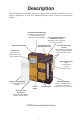
remove the cap screw (Figure 1, #14)
covering the regulator valve and turn the
exposed screw clockwise until it stops.
(Do not overtighten.)
Replace the cap screw. The pump is now
set for high fl ow.
Setting or Verifying Flow Rate
Before use, allow pump to
equilibrate after moving
it from one temperature
extreme to another.
Ensure pump has run for
fi ve minutes before proceed-
ing with calibration.
Using 1/4-inch Tygon
®
tubing, connect the
sampling medium to the
pump intake (Figure 1,
#9).
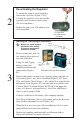
Remove the tamper-resistant cover. Start the pump using the on/
off switch (Figure 1, #4). Press Start/Hold (Figure 1, #3). Press
Flow and Battery Check (Figure 1, #2). Adjust fl ow using the fl ow
adjustment screw (Figure 1, #7) until the built-in rotameter reads
2 L/min. The LCD should indicate BATT OK in the upper left
corner (if it doesn’t, recharge battery). Press Flow and Battery
Check to place pump in Hold.
Connect a calibrator to the intake of the sampling medium.
Press Flow and Battery Check to start pump, and set the fl ow rate
using the fl ow adjustment screw (Figure 1, #7).
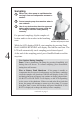
When the fl ow rate is set, press Flow and Battery Check to place
pump in Hold. Disconnect the calibrator.
Replace the sampling medium used for calibration with an
unexposed medium for sample collection.
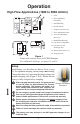
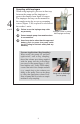
For high fl ow,
turn valve screw
clockwise.
On/Off
switch
Flow
adjustment
screw
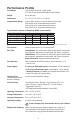
Calibrator
Sample
medium
Tubing
Calibration train with fi lter cassette
2
3