
User Manual


11
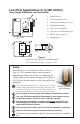
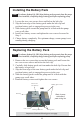
Loosen the brass fl ow adjust screw (Figure
3, #1) on the low fl ow holder. Activate the
pump by using the on/off switch (Figure
2, #1). Adjust the fl ow rate by turning the
fl ow adjust screw (Figure 3, #1) on the
holder until the calibrator indicates the
desired fl ow.
Do not adjust the fl ow on the pump.
Adjust the fl ow only by using the
fl ow adjust screw on the low fl ow holder.
Turn off the pump and disconnect the calibrator.
Replace the sorbent tube used for setting the fl ow with a new
unexposed sorbent tube for sample collection.
Place the appropriate size tube cover over the tube, and screw it into
place on the low fl ow holder.
Sampling
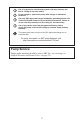
For personal sampling, clip the low fl ow
holder to the worker in the breathing zone.
Before use, allow pump to equilibrate
after moving it from one temperature
extreme to another.
Protect sample pump from weather when
in use outdoors.
Use of any device other than the approved
battery pack to power the pump voids
the UL Listing for intrinsic safety and any
warranty.
Start the sampling period by turning on the
pump using the on/off switch (Figure 2, #1),
and record the start time.
At the end of the sampling period, turn off the pump and record the
stop time.
To return to high fl ow, remove the low fl ow holder and deactivate the
regulator. See page 6.
3
cont’d
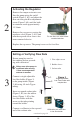
Turn screw to
adjust fl ow.
Flow adjust
screw
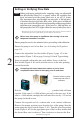
4
Clip holder to
worker and pump
to belt.