
Operation Manual

18
19
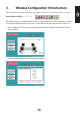
4. File and Printersharing
Windows 98/ME
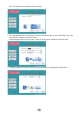
To enable File and Printersharing on your network, Right click the icon ‘Network Neighbourhood’ on
the desktop, choose ‘properties’. Click the ‘le and printersharing” button. Simply click the two boxes
you see in the resulting dialog box, then click OK. But before you reboot your computer, you’ll need to
check a few other settings.
• Click the Identication tab in the Network Control Panel. Enter a unique COMPUTERNAME, and a
brief description of your computer in the Computer Description slot. The WORKGROUP name you
assign to each computer must be exactly the same for every computer on your network.
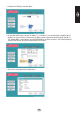
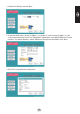
• Sharing Files and folders:
When you want to share a hard drive (or any other storage device) on one machine with all of the
other machines on the network, simply right-click the drive letter or folder you wish to share, then
select Sharing from the pop-up menu. After you select Sharing, you’ll be presented with a dialog
box containing several options. Type in the Share Name, add a comment, and set the access type.
If you choose Read Only, other computers on the network will be prevented from copying les into
the shared drive or folder. If you select Full, any machine on the network will be able to write to
them as well.
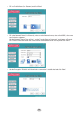
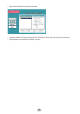
• Sharing printers:
Click ‘start’, ‘settings’, and ‘printers’. Right click the printer you want to share on the network and
choose “sharing”. In the following screen enable sharing and ll in a sharename, the printer is now
shared. To use the network printer on other PCs in the network, it has to be installed on the other
PCs rst. Click ‘start’, ‘settings’, and ‘printers’. Click the ‘Add New Printer’ icon. The ‘New Printer
Wizard’ starts. Choose ‘network printer’. In the following screen browse to the correct printer via
network environment. The printer will now be installed. Repeat this steps for all PC’s in the network.
The printer can now be used from every PC in the network.
Windows 2000/XP
File and Printer sharing will be installed automatically under Windows 2000/XP. Sharing les, folders
and printers is the same as under Windows 98/ME, however assigning the computer and workgroup
name as in step one is different.
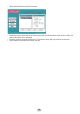
Windows 2000
Right click the ‘My Computer’ icon on the desktop, choose ‘properties’. Click the ‘computer name’ tab.
Fill in the computername and the workgroupname by the same specications as Windows 98/ME
Windows XP
Click ‘start’. Right click the ‘My Computer’ icon, choose ‘properties’. Click the ‘computer name’ tab.
Fill in the computername and the workgroupname by the same specications as Windows 98/ME.