
Owner's Manual


Table Of Contents
- Quick Start Guide
- User Guide (Downloaded from SiriusXM Website)
- Warranty
6 7
*The phone number shown above
may differ from the one shown on
your Onyx Plus. All numbers are valid.
Decide on one of the following in-box audio connection options. You can also refer to “Connect the Audio”
in the Onyx Plus User Guide (with Vehicle Kit) for additional audio connection options, such as a cassette
adapter or the FM Direct Adapter (FMDA) (both sold separately). Go to www.siriusxm.com/guides for the
User Guide.
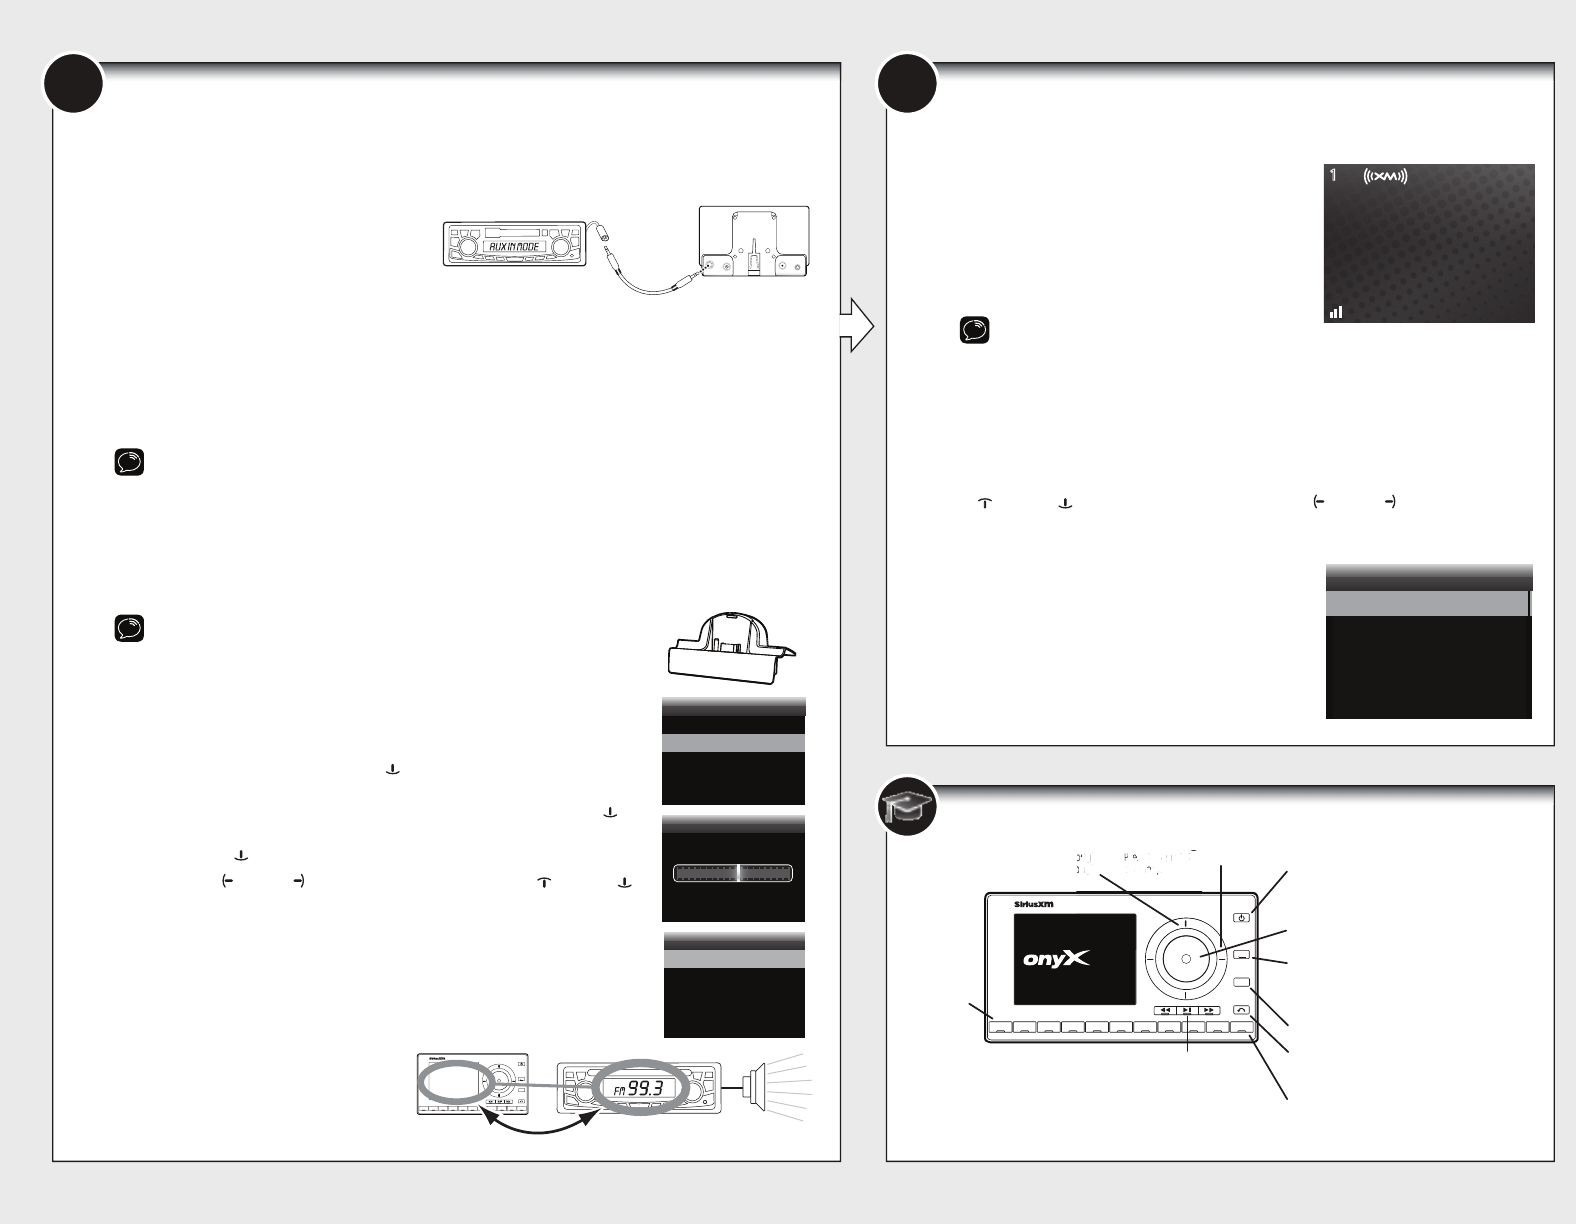
Option 1: Best: Use the provided Aux In Cable,
if your vehicle’s stereo system has an auxiliary
input jack.
A. Plug one end of the cable into the green
AUDIO connector on the
Power
Connect
Vehicle Dock and the other end into the auxiliary input jack on the vehicle’s stereo system.
B. Turn on your vehicle’s stereo system and set it to play from the auxiliary input source.
C. You should hear XM channel 1 through your vehicle’s stereo system.
D. Go back to Step 1 “Find a Location for Onyx Plus and Mount It” on the opposite side and finish
installing the Dash or Vent Mount. Then the installation is complete.
TIP! Refer to your vehicle’s owner’s manual to find the location of the auxiliary input jack, or consult the vehicle
dealer.
Option 2: Good: Use the PowerConnect feature of Onyx Plus.
Power
Connect plays the XM audio through
your vehicle’s FM radio.
A. Find and make a list of all available FM channels in your area that are not being used by an FM radio
station.
B. Pick the first FM channel on your list. Tune your vehicle’s FM radio to this FM channel.
NOTE! If you are using the Vehicle Dock from the Universal Xpress Car Kit instead
of the
Power
Connect Vehicle Dock which came with your Onyx Plus, you will have
to disable AUX Detect. Refer to “Using the Vehicle Dock From the Universal Xpress
Car Kit” of the Onyx Plus User Guide (with Vehicle Kit), and complete the additional
instructions before continuing with the next step.
Go to www.siriusxm.com/guides.
The audio connection will be through your vehicle’s FM radio, but it is not
Power
Connect.
C. Set your Onyx Plus to transmit on the same FM channel that you have
selected on your vehicle’s FM radio:
i. Press menu and then press
down to scroll to and highlight FM
Settings. Press the Select button.
ii.
FM Channels will be highlighted. If it is not highlighted, press
down
to
scroll to and highlight FM Channels. Press the Select button.
iii. Press
down
to scroll to and highlight FM2. Press the Select button.
iv. Press left or right to tune in steps of .2, or press up or down
to tune in steps of 1 to select the available FM channel you have chosen.
Press the Select button to select the FM channel.
v. Start Using will be highlighted. P
ress the Select button.
vi. The selected FM channel will be confirmed on the display screen. Press
and hold menu to return to the main display screen.
D. You should hear XM channel 1 through your vehicle’s FM radio. If you are
satisfied with the sound quality, go back to Step 1 “Find a Location for Onyx
Plus and Mount It” on the opposite side and finish installing the Dash or Vent
Mount. Then the installation is complete.
E. If you are not satisfied, move to the
next FM channel on your list and repeat
the process. Continue until you have
found an FM channel with which you are
satisfied.
AUDIO ANT PWR FM
2
34567890
b / #
alerts
twx
FM
menu
t-mix
t-scn
1
99.3
MATCH FM CHANNELS
Edit FM Channel 2
99.3 FM
and Select to confirm
Press arrow keys to tune
FM Channel 2
Start Using
Edit Channel
FM Channels
current
FM 1
FM 2
FM 3
FM 4
FM 5
97.9
_ _ _
_ _ _
_ _ _
_ _ _
Connect the Audio
Subscribe
You can follow either the general activation and subscription process or use the on-board
activation guide to activate your Onyx Plus and subscribe to the XM service.
General activation and subscription process:
A. Make sure your Onyx Plus is turned on, receiving
the XM signal, and tuned to XM channel 1 so that
you can hear XM audio.
B. Make a note of your XM Radio ID. You can find it
by selecting Radio ID in menu items, by tuning to
channel 0, on a label on the bottom of the gift box,
and on the label on the back of your Onyx Plus.
NOTE! The XM Radio ID does not use
the letters I, O, S, or F.
C. To subscribe:
~Online: Go to www.siriusxm.com/activatenow to access or set up an online
account, subscribe to the service, and activate your Radio.
OR
~By phone: Call 1-866-635-2349.
Activation usually takes 10 to 15 minutes after you have completed the subscription process,
but may take up to an hour. We recommend that your Radio remain on until subscribed. Once
subscribed, the Radio will receive and you can tune to the channels in your subscription plan.
Press up
or down to tune to other channels, and left or right to browse the
different categories of channels. Learn what all the buttons do in the panel below.
Activation guide:
For your convenience, Onyx Plus has an on-board activation
guide. You can activate your radio and subscribe to the XM
service by using this guide, where you will be guided step-by-
step through the subscription process. To access and use the
guide, simply follow these steps:
A. Turn Onyx Plus on and press the menu button.
B. Activate Radio will be highlighted. Press the Select
button.
C. Follow the directions on each successive screen
until you complete the subscription process.
866-635-2349
siriusxm.com
preview
1
b
A
Activate Radio
Radio ID
Channel Tuning
FM Settings
Brightness
Menu
2
34567890
b / #
alerts
twx
FM
menu
t-mix
t-scn
1
PL US
Onyx Plus Button Functions
Power/FM Button
Press to turn Radio on and off; Press and hold to quickly
access FM channel presets.
Left and Right Buttons
Press to search for channels by
category.
Up and Down Buttons
Press to preview and tune to channels through
the channel lineup; also press to scroll through
lists and highlight items in lists.
Menu/Alerts Button
Press to access advanced features and configuration options;
when in configuration options, press and hold to return to
main display screen; Press and hold to save a Song, Artist,
or Game alert.
Select Button
When in a menu or list, press to confirm selection of
highlighted item; when in TuneMix or TuneScan, press to
end TuneMix/Scan and continue playing the currently tuned
channel, or press and hold to end Tune Mix/Scan and return
to the previously tuned channel.
TuneMix/TuneScan Button
Press to begin TuneMix; Press and hold to begin TuneScan.
Jump/Traffic Weather Button
Press to go back to the previous channel to which you were
listening; Press and hold to directly access traffic and weather
for the city of your choice.
Banks/Direct Button
Press to switch between favorite channel banks (A/B); Press
and hold to enter a channel number using the number
buttons and directly tune to the channel.
Number
Buttons
0-9
Press to tune to
a stored favorite
channel; Press
and hold to
store a favorite
channel. Also
used to enter
channel numbers when the Direct button
is pressed.
Channels stored in buttons 1 - 9 in banks A
& B are smart favorites used for enhanced
pause and replay, and for advanced music
features TuneStart, TuneMix, and TuneScan.
Channels stored in button 0 in banks A & B
are regular favorites.
Left and Righ
Le
Lef
ef
ft
a
and
d
Ri
Ri
ig
gh
Pr
to search for
P
P
Pr
Pr
r
r
e
e
es
es
s
s
o searc
to
to
se
se
ea
arc
rc
h
ch
fo
fo
or
cate
ca
t
ca
ate
te
e
go
go
o
ry
ry
o
o
r
r
ry
ry
y
y
.
o
o
o
o
u
u
ug
h
gh
g
o
o
oug
ug
h
gh
Pause and Replay Buttons
Pause, rewind, and replay live radio
and smart favorite channels.