Owner's Manual
Table Of Contents
- Quick Start Guide
- User Guide (Downloaded from SiriusXM Website)
- Warranty

2
45
3
6
7
A. Be sure the vehicle is outside and the antenna has a clear view of the sky.
B. Verify that you are receiving the XM signal. The Onyx Plus Radio should be tuned to XM channel 1, the XM
Preview channel. There should at least be two bars on the lower left corner of the screen that denotes
antenna signal strength. If not, be sure that you have mounted the antenna on the outside of the vehicle, as
shown in step 2, and that the vehicle is parked outdoors with a clear view of the sky. Move the vehicle away
from any obstructed area, for example, if you are parked in a garage, or parked near a large structure.
C. You can also press menu and then press down
to scroll to and highlight Signal Indicator. Press the
Select button. The Satellite and Terrestrial bars show the strength of the signal being received. If the signal
reception is good, press and hold menu to return to XM channel 1, the XM Preview channel.
Verify Signal Reception
Signal Indicator
S
ATELLITE
TERRESTRIAL
Press menu to exit
866-635-2349
siriusxm.com
preview
1
b
A
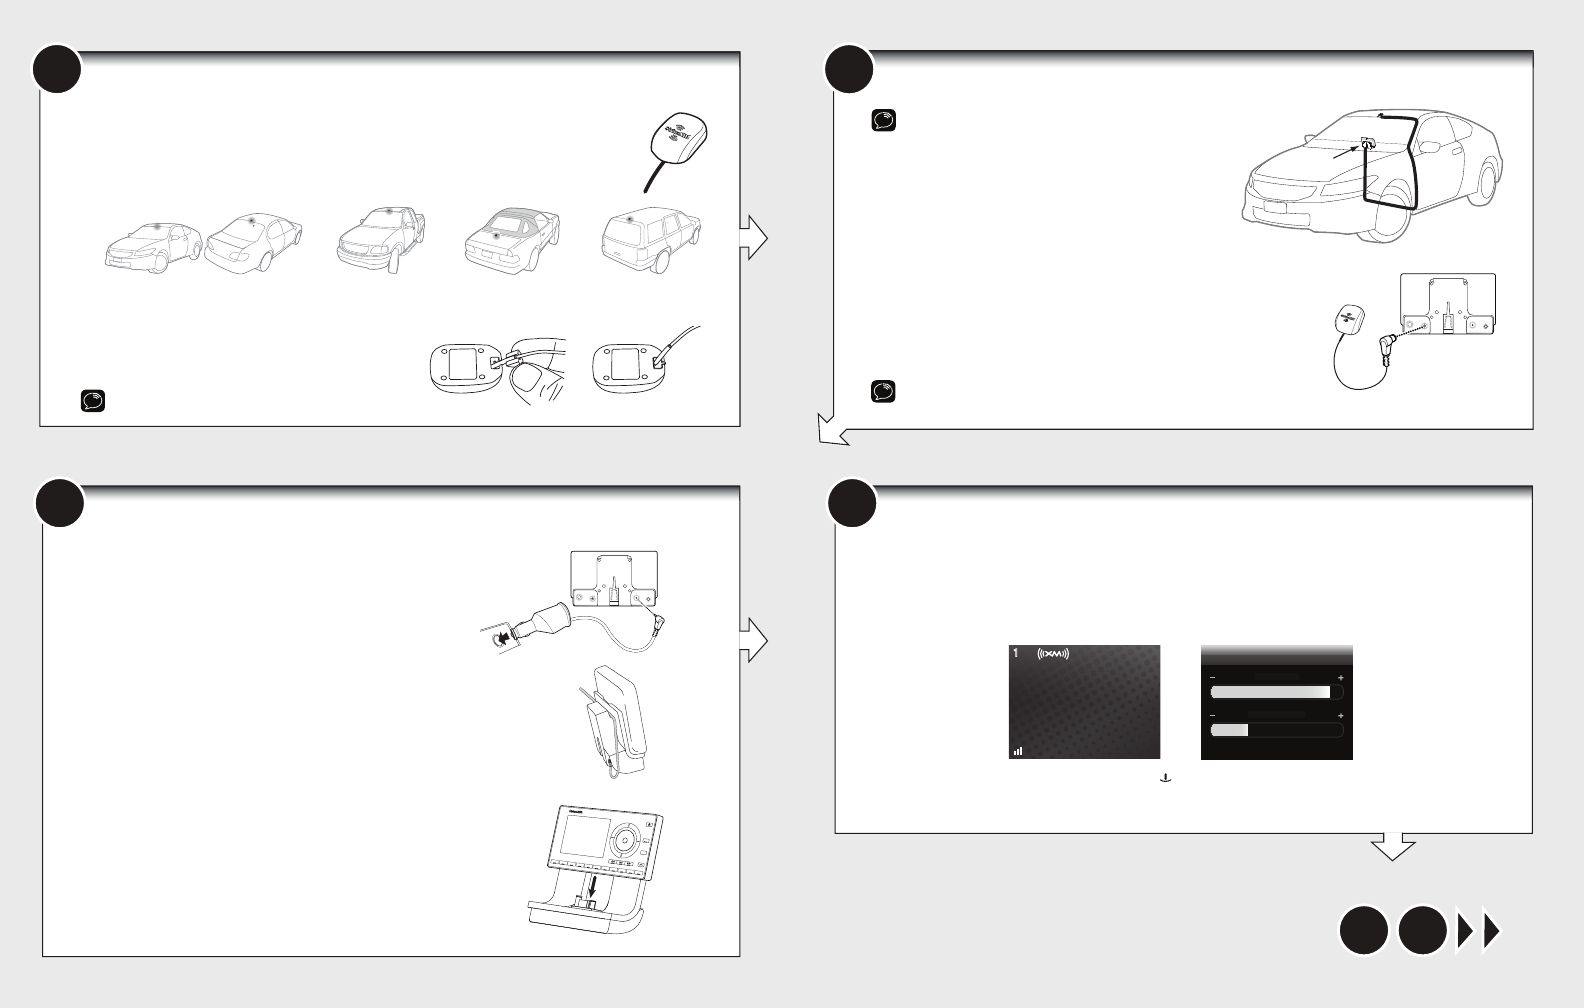
A. Mount the Magnetic Mount Antenna outside your vehicle, on a clean and dry horizontal surface
that will always face the sky.
B. Choose the location for the antenna according to your type of vehicle. Center it between the
left and right sides, and away from other antennas.
C. Install the Cable Routing Adapter to direct the antenna
cable downward, if mounting on an edge.
TIP: Use the Alcohol Prep Pad to clean the surface.
Sedans and Coupes
(above front windshield or rear window)
Pickups
(above front windshield)
SUVs
(rear of roof)
Convertibles
(leading edge of trunk)
Route the Antenna Cable
NOTE:
These instructions are for a sedan or coupe where the
antenna is mounted above the front windshield. The Onyx Plus User
Guide (with Vehicle Kit) has detailed antenna cable routing
instructions for all types of vehicles. Go to www.siriusxm.com/
guides for the User Guide.
A. Tuck the antenna cable under the windshield rubber
molding and run it to the nearest corner.
B. Route the cable out of the molding and into the rubber
weather stripping around the door opening.
C. Lift the weather stripping. Tuck and run the cable inside it to the bottom of
the door opening. Replace the weather stripping.
D. Pull the cable out and route it to Onyx Plus.
E. Plug the Magnetic Mount Antenna connector into the silver ANT connector
at the rear the PowerConnect Vehicle Dock.
TIP: Include enough slack in your routing to accommodate open doors or the hood
lid. Coil any excess cable in a hidden location and keep it away from any vehicle
pedals or controls.
Radio
Location
AUDIO ANT PWR FM
A. Insert the PowerConnect Power Adapter into your
vehicle’s cigarette lighter or power adapter socket. Plug the
other end into the red PWR connector on the rear of the
PowerConnect Vehicle Dock.
B. Use the wire guide on the top of the dock to organize the
wires connected to the dock.
C. Place Onyx Plus into the dock and press the Power button.
AUDIO ANT PWR FM
Mount the Magnetic Mount Antenna
Connect the PowerConnect Power Adapter
2
3
4
5
6
7
8
9
0
b / #
alerts
twx
FM
menu
t-mix
t-scn
1


