
Quick Guide
1
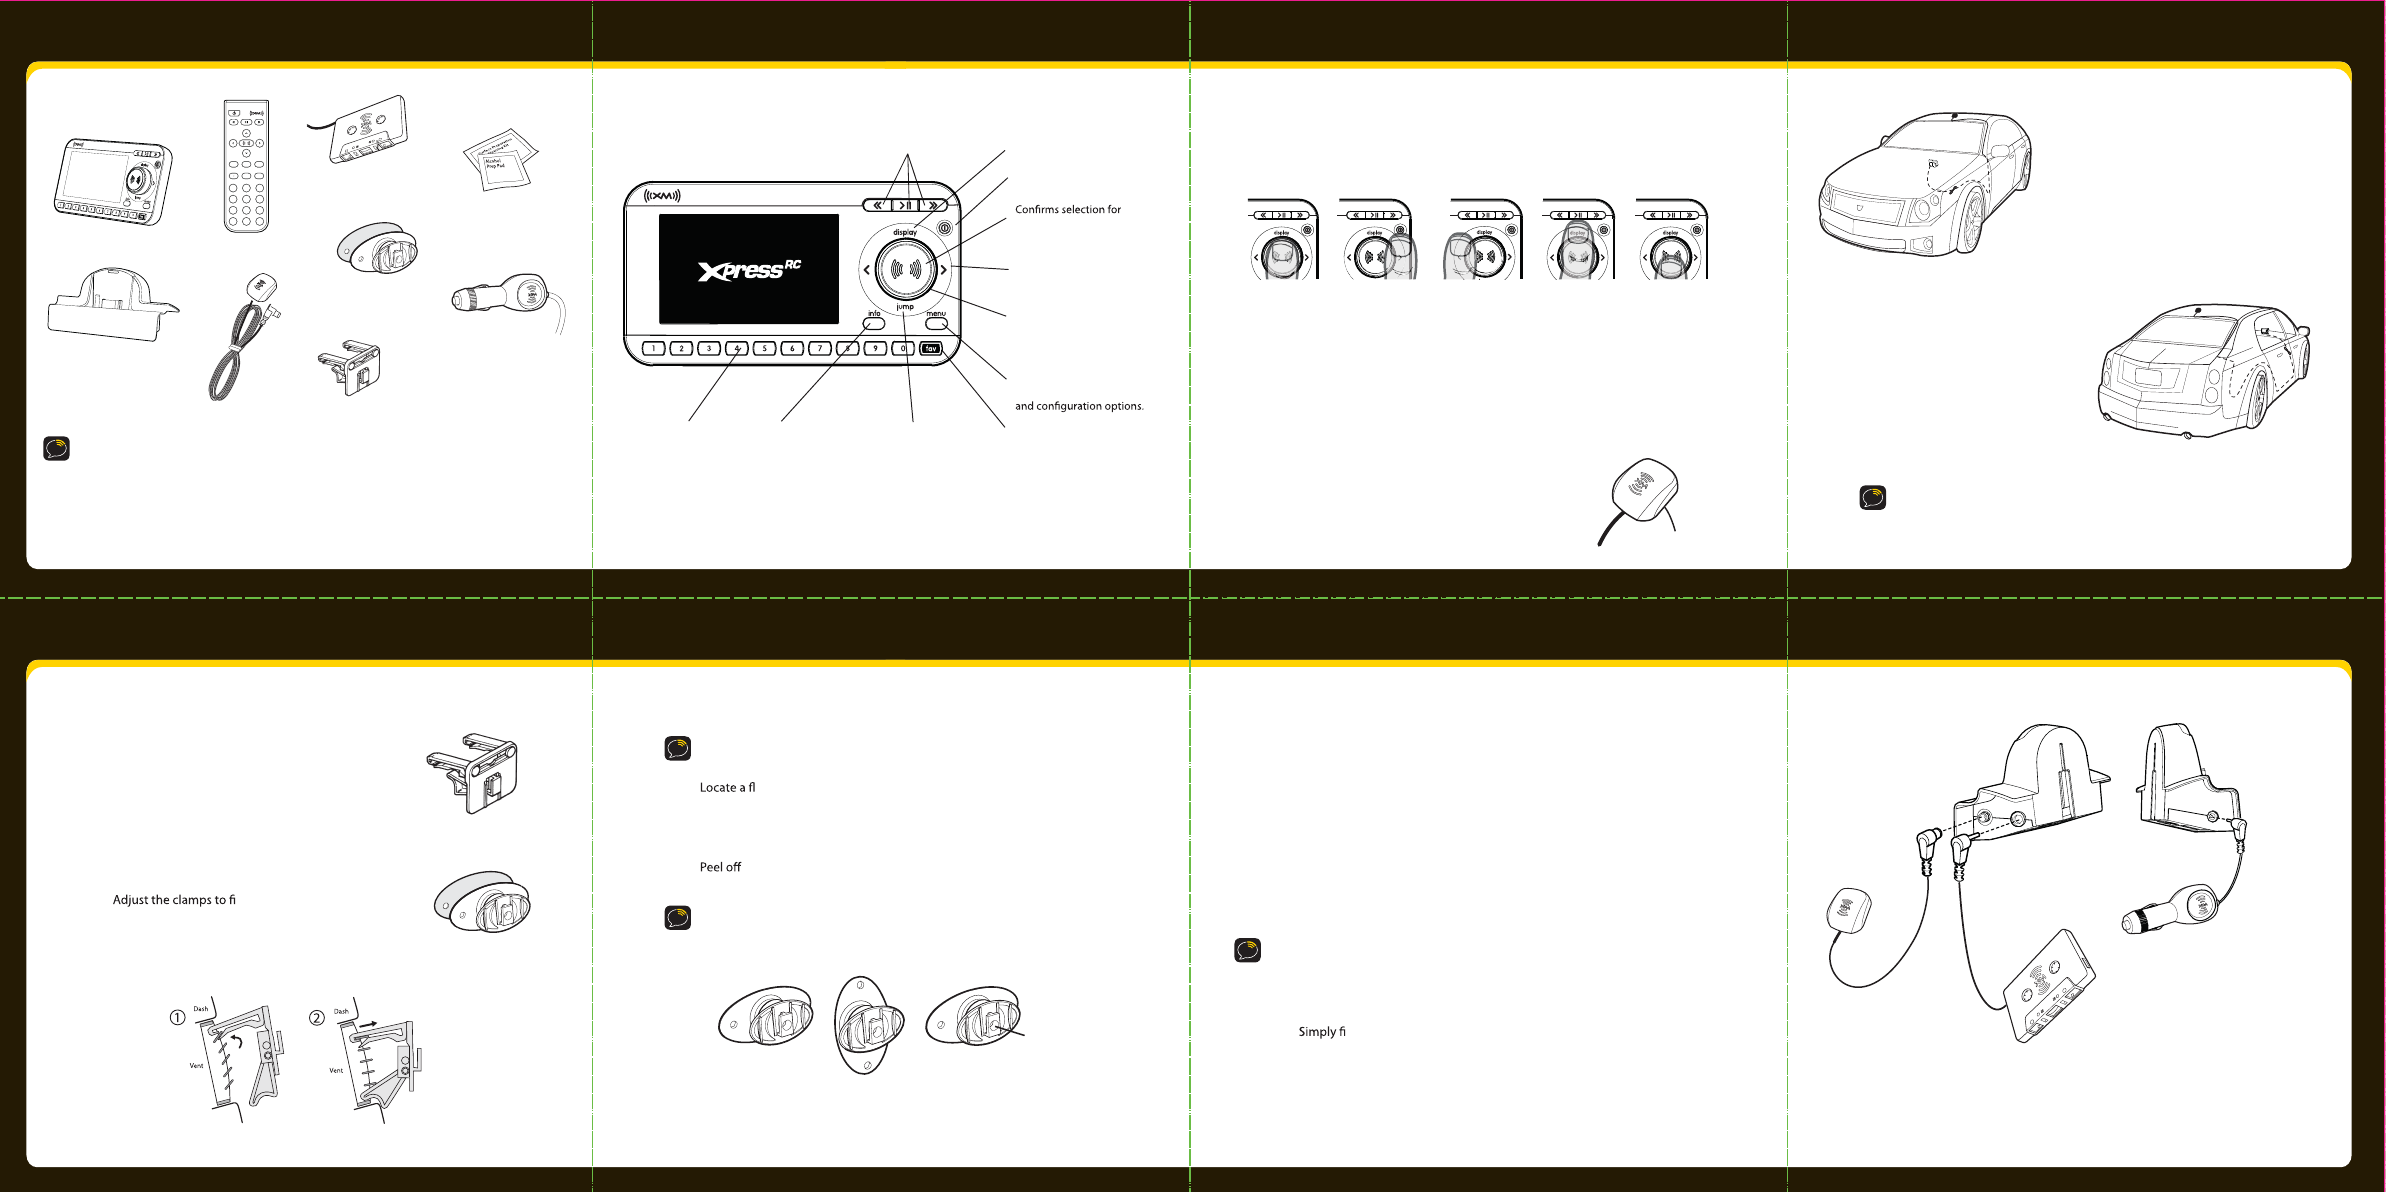
What’s in the box
2 34
56 78
Car Cradle
8
5
2
7
4
1
9
6
3
mute
info
menu
display
0
jump fav
+
Remote Control
XM Car Antenna
Cassette Adapter
Swivel Mount
Vent Mount
Swivel Mount
Preparation Kit
Car Power Adapter
Xpress
RC
sserpX
RC
functions
60-Minute Replay Buttons
Pause and replay up to 60
minutes of live XM broadcast.
Jump
Switches between
current channel and
previous channel.
Info
Displays either your
personal stock or info
extras information.
Number Keys
Enter a channel
directly, select your
favorite channels, or
access songs saved
in SongSaver.
Power Button
Display
Changes the way content is
viewed on the display.
Left and Right Arrows
Search for channels by
category.
5-way Navigation
Knob
Previews channels; also selects
various menu options.
Menu
Access advanced features
XM Button
channel and menu items, also
press and hold to save a song
to SongSaver or TuneSelect.
Fav
Selects between direct
channel entry, favorite
channels, and SongSaver
mode.
Warnings
- When using this product it is always important to keep your eyes on the road and hands on the wheel.
Not doing so could result in personal injury, death, and/or damage to your XpressR Receiver,
accessories, and/or to your vehicle or other property.
- XpressR should be placed in your vehicle where it will not interfere with the function of safety features,
e.g., deployment of airbags. Failure to correctly place XpressR may result in injury to you or others if
the unit becomes detached during an accident and/or obstructs the deployment of an airbag.
5-way navigation knob
Turn the knob to scroll through a list.
Press the center of the XM button to make a selection
Press the edge of the knob to select display, jump, < or>
Toggle right Toggle left Toggle up Toggle down
Press center button
(XM button)
Vehicle Installation
Step 1: Mount the XM Antenna
The XM antenna contains a strong magnet which
will stick to any metal parts of your vehicle.
1
Magnet
Choose the best location for your XM antenna considering your own personal situation.
Pay particular attention to any accessories that you may have like luggage racks and
how frequently you may use them.
If you placed the XM antenna on the front of
the vehicle, route the cable across the top of
the windshield. Gently pry up the rubber
weather seal and tuck the cable underneath.
Follow the weather seal down to the door
jam. Tuck the cable into the door jam and up
to the dash or under the carpet to the car
cradle as shown.
If you placed the XM antenna on the rear of
the vehicle, route the cable under the
weather seal of the rear window. Route it
into the trunk and through any existing
wire passages or cargo passages to the rear
passenger compartment. Tuck the cable
under the door jam trim or under the
carpet to the radio as shown.
TIP! Always be careful to include enough slack in your cable to accommodate
open doors or trunk lids. Use things typically found around the home, like
electrical tape, to secure cables in areas so that hinges do not pinch the cable
with the door. Hide any excess cable in the trim.
Swivel Mount
Vent Mount
Step 2: Install the vent or swivel mount
You can use either the vent mount or the swivel
mount for your Xpress
RC
depending on your
particular situation.
Installing the vent mount
1 Locate a vent with horizontal slats
sturdy enough to hold your XM cradle and radio.
2 t your vent.
3 Snap the mount onto the vent.
To remove, push the mount into the vent, then lift up.
Installing the swivel mount
1 at surface for the mount. Make sure there is ample room
for the XM cradle and radio when installed.
2 Clean the surface with the preparation kit and let it dry thoroughly.
the adhesive liner. Position, press, and hold the swivel mount
in place for 30 seconds.
IMPORTANT! Let the adhesive cure for 24 hours before attaching the XM
cradle and radio to the mount.
You can adjust this screw
to adjust the tension of the
mount with a screwdriver.
ANT
IN
A
UDIO OUT
DC I
N
XM Antenna
Power Adapter
Cassette Adapter
Xpress
RC
Car Cradle
Step 3: Connect your Xpress
RC
.
Plug the antenna into ANT IN on the cradle.
2
1
3
Plug the power adapter into DC IN on the cradle.
Plug the audio adapter into AUDIO OUT on the cradle.
• Use the Cassette Adapter if your vehicle has a built-in cassette player.
• Use a mini audio cable (sold separately) if your vehicle has
an audio input jack.
Insert the cradle into the mount.
Insert your Xpress
RC
into the cradle.
NOTE!
If your car does not contain a cassette player or an audio input, you will
need to use either the XM SureConnect (sold separately) or the FM Direct
adapter (sold separately).
CAUTION! The adhesive used with the swivel mount may make it dicult t o remove. Do not
install this mount on leather surfaces and make sure the air temperature is at least 60°F (15°C).
Turn the swivel to accommodate the XM cradle and radio. Adjust the tension via
the center screw.
To remove, carefully lift the adhesive pad with your ngers or a spoon. Warming the pad with a
hairdryer for several minutes will help soften the adhesive.
You can reinstall the swivel mount using the extra adhesive pad.
• XM SureConnect (sold separately): You can listen to your Xpress
RC
through your
car stereo by using Xpress
RC
’s built-in FM modulator and the XM SureConnect.
nd an unused FM frequency on the stereo and set your Xpress
RC
to transmit on that same frequency. Refer to Set the FM frequency page
in your
user guide for more information
• FM Direct Adapter (sold separately): This option directly connects the Xpress
RC
to your car’s audio system and antenna. A professional installation is recommended
if you choose to use this method