SIR-JVC1 JVC COMPATIBLE SIRIUS SATELLITE RADIO TUNER Installation Guide
Congratulations on your purchase of the SIR-JVC1– the JVC Compatible SIRIUS Satellite Radio Tuner! Your new SIRIUS Tuner is designed to work with JVC headunits that are designated to be “SIRIUS READY”. Contact JVC or SIRIUS for model compatibility. What is SIRIUS Satellite Radio? Over 120 channels of the best entertainment and completely commercial-free music for your car, home or office. Only SIRIUS has more than 65 original music channels, from today’s hits to R&B oldies to classical masterpieces.
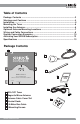
Table of Contents Package Contents .............................................................................................. 3 Warnings and Cautions ..................................................................................... 4 Installation .......................................................................................................... 6 Mounting the Tuner ............................................................................................ 6 Installing the Antenna ...........
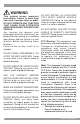
WARNING This symbol means important instructions. Failure to heed them can result in serious injury or death. DO NOT OPERATE ANY FUNCTION THAT TAKES YOUR ATTENTION AWAY FROM SAFELY DRIVING YOUR VEHICLE. Any function that requires your prolonged attention should only be performed after coming to a complete stop. Always stop the vehicle in a safe location before performing these functions. Failure to do so may result in an accident. DO NOT OPEN, DISASSEMBLE OR ALTER THE UNIT IN ANY WAY.
CAUTION This symbol means important instructions. Failure to heed them can result in injury or material property damage. HALT USE IMMEDIATELY IF A PROBLEM APPEARS. Failure to do so may cause personal injury or damage to the product. Return the unit to your authorized retailer or nearest service center for repairing. INSTALL THE WIRING SO THAT IT IS NOT CRIMPED OR PINCHED BY SCREWS OR SHARP METAL EDGES. Route the cables away from moving parts or sharp pointed edges.
Installation It is recommended that prior to starting the installation, you thoroughly read this manual and follow the guidelines listed below: Consider the mounting location carefully. You should make sure that you avoid the following: • Any location where the tuner is exposed to moisture. • Any location where the unit is exposed to extreme heat. • Any location that would interfere with moving parts on the vehicle or hamper driving.
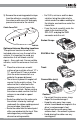
3) Remove the remaining protective tape from the adhesive, carefully position the antenna with cover/tail and apply pressure to secure to the vehicle. Cable Cover/Tail • For SUVs, minivans and five-door vehicles, bring the cable into the vehicle under the rubber molding for the tailgate, and continue under the interior trim. • From the trunk, carefully route the cable to the location of the SIR-JVC1 and plug the SMB connector onto the unit.
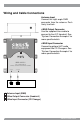
Wiring and Cable Connections Antenna Input Connect the right-angle SMB connector from the antenna. Push firmly to attach. J-BUS Output Connector Use the supplied J-bus cable to connect to the JVC Headunit. See “System Connection Examples” for more specific details. J-BUS Input Connector Connect to optional JVC audio equipment like CD Changers. See “System Connection Examples” for more specific details.
Right-angle SMB Connector Antenna (21’ cable) - Mount on Roof of Vehicle SIR-JVC1 JVC COMPATIBLE SIRIUS SATELLITE RADIO TUNER HEADUNIT CD CHANGER Right-angle J-Bus Connector 2.
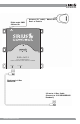
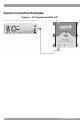
System Connection Examples System 1: JVC Headunit and SIR-JVC1 SIR-JVC1 JVC COMPATIBLE SIRIUS SATELLITE RADIO TUNER HEADUNIT 10 CD CHANGER SIR-JVC1 Installation Guide
System 2: JVC Headunit, DVD/CD Changer and SIR-JVC1 SIR-JVC1 JVC COMPATIBLE SIRIUS SATELLITE RADIO TUNER HEADUNIT SIR-JVC1 Installation Operation and Guide Installation Guide CD CHANGER 11 11
Activating Your SIRIUS Subscription You must activate SIR-JVC1 before you can start to receive the SIRIUS Satellite Radio broadcast. 1. Make sure that the SIR-JVC1 is properly connected and that its antenna is oriented to receive the SIRIUS satellite signal. 2. Turn on the headunit. 3. Press and release the SOURCE button on the head unit to select SIRIUS as the source. (Each press of the SOURCE button will change to a different audio source.) 4.
Specifications Operational Frequencies Satellite ......................................................................... 2322.293/2330.207 MHz Terrestrial ....................................................................................... 2326.250MHz Power Requirements .................................................................. 11-16 Volts DC Chassis Size ............................. 126.75mm x 125.75mm x 34.75mm (WxHxD) Antenna Type ............................................................
SIRIUS Satellite Radio 1221 Avenue of the Americas New York, NY 10020 (888) 539-7474 www.sirius.com © 2004 SIRIUS Satellite Radio Inc.