SHUTTLE BOOM BOX SIR-BB3 User Guide AUDIO OX Released 9-15-04. Revision A: 10-28-04. Changed front cover and added Sirius Legal Stament (page 2).
Congratulations You are one step closer to experiencing the latest innovation in Sirius Satellite Radio. Sirius will revolutionize your portable in-home, vehicle and family entertainment, such as camping trips and beach excursions, using the Sirius Model SIR-BB3 Boom Box as the base receptacle for your Shuttle Receiver.
FCC Regulations This unit complies with the interference limits relative to a Class B digital device, applicable under Part 15 of the FCC Rules regarding installation in a residential environment. If the unit is not installed in accordance with these instructions, it could cause harmful interference to audio or television reception. If this condition persists after corrective action, consult your dealer or experienced installation facility. Cautions and Warnings 1.
Contents SIR-BB3 Users Guide P/N 128-7266A 1 pc. Installation/Wiring Precautions 1. If using the adapter, make sure the adapter cable is not connected to an AC wall outlet until all interconnections have been made and verified. The adapter power cable should be connected last. 2. Incorrect installation may cause damage to the system. 3. For antenna positioning, refer to the Antenna Aiming procedure outlined in the Shuttle User Guide, SIR-PNP3 (128-7193A).
Boom Box SIR-BB3 Controls The Audiovox Sirius® Boom Box SIR-BB3 provides Power ON/OFF and VOLUME +/- pushbuttons, and a MODE pushbutton to toggle between Satellite Radio or an auxiliary audio input signal. A power-on/low battery LED is also located on the front panel. 1. MODE Pushbutton: This pushbutton toggles between Satellite Radio and an external audio input signal (MP3, CD, etc.) present at the AUX input jack. 2. AUX Jack: Accepts an audio input signal from an external audio device.
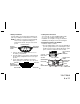
1. Battery Installation Your Boom Box can operate independently of AC power by installing 8 D-Cell batteries as follows: NOTE: The batteries are bypassed automatically whenever the supplied AC Adapter is plugged into the DC 12V jack on the back panel. 2. Cabling Interconnections You can begin to enjoy Sirius® Satellite Radio as soon as the Shuttle and Boom Box Kit installation are complete. Set up your Audiovox SIR-BB3 by following the interconnect diagram. 3.
2. After making sure the connectors are properly lined up, gently press down on the shuttle to mate the connectors together. The shuttle should now be nestled securely in the Boom Box compartment. Lower the PNP cover into position over the Shuttle; This will prevent accidental Shuttle disconnect. Apply power to the SIR-BB3 by pressing the Power ON/OFF button; the LED indicator lights green.
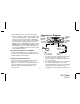
time. In most cases however, the signal should be available continuously. If you experience a loss of signal or audio, reposition the antenna inside the home or outside as necessary. 6. Antenna Placement Considerations The antenna should be placed on a relatively flat surface whenever possible. When outdoors, the antenna may be left in its mount atop the Boom Box provided no overhead obstructions are present. To mount the antenna: a. Plug the antenna into the ANT connector on the back of the SIR-BB3. b.
Specifications Nominal Output Power per Channel 5.0 Watts Rms Total Harmonic Distortion (THD) 0.3% at 1 Watt Frequency Response 30Hz to 20kHz Signal-to-Noise Ratio >65dB Maximum Speaker Impedance 8 Ohms Nominal Headphone Output Impedance 32 Ohms Headphone Output Level 500 mV (Maximum) Headphone Connector Type 3.5 mm Stereo Jack Auxiliary Input Impedance 6K-Ohms Nominal Auxiliary Input Level 2.0 Volts (Maximum) Auxiliary Connector Type 3.
Maintenance Periodic Inspection The SIR-BB3 Boom Box should be inspected periodically for external damage. At least once every 30 days of use, perform the following checks: 1. Inspect the 20-pin Shuttle connector for loose, bent or broken pins, misalignment, etc.; make sure the SAT connector is intact and exhibits no apparent damage. 2. Check the VOL control for freedom of motion without binding of any kind. 3.
Troubleshooting FA U LT S ystem does not turn on P R OB A B L E C AU SE R E ME D Y S huttle power i s set to off Turn S huttle power on usi ng the S huttle P ower on/off button B atteri es not i nstalled or i nstalled i ncorrectly Install batteri es observi ng correct polari ty S IR-B B 3 does not operate usi ng batteri es A s long as the A C power connector i s attached to the rear panel of the S IR-B B 3, battery operati on i s di sabled Remove power connector from rear panel of S IR-B B 3 Inter
MONTH LIMITED WARRANTY AUDIOVOX CORPORATION (the Company) warrants to the original retail purchaser of this product that should this product or any part thereof, under normal use and conditions, be proven defective in material or workmanship within 12 months from the date of original purchase, such defect(s) will be repaired or replaced with new or reconditioned product (at the Company's option) without charge for parts and repair labor.