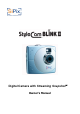
Digital Camera with Streaming Snapshot Owner’s Manual
About this manual This manual is designed to assist you in using the StyleCam Blink II digital camera. Information in this document has been carefully checked for accuracy; however, no guarantee is given to the correctness of the contents. The information in this document is subject to change without notice. Edition First Edition, January 2003 Copyright © Copyright 2003 This document contains proprietary information protected by copyright. All rights are reserved.
Declaration of Conformity This device complies with part 15 of the FCC rules. Operation is subject to the following conditions: This device may not cause harmful interference. This device must accept any interference received, including interference that may cause undesired operation. Canadian Department of Communications This class B digital apparatus meets all requirements of the Canadian Interference-causing Equipment Regulations.
Table of Contents GETTING STARTED .....................................................................................................................................................1 ABOUT THE STYLECAM BLINK II....................................................................................................................................1 Unpacking the StyleCam Blink II................................................................................................................
TRANSFER IMAGES WITH ARCSOFT PHOTOIMPRESSION................................................................................................14 Save Images using ArcSoft PhotoImpression.......................................................................................... 14 TRANSFER AND SAVE VIDEOS USING SIPIX CAMEXPLORER .........................................................................................15 USING THE STYLECAM BLINK II AS A PC CAMERA ..................................................
GETTING STARTED About the StyleCam Blink II Congratulations on your purchase of the StyleCam Blink II digital camera. Your StyleCam Blink II camera has been ergonomically designed to allow you to quickly and easily take digital pictures and video without the trouble of buying and developing film. With a 1/3-inch VGA CMOS image sensor you are assured of vivid pictures. The VGA CMOS image sensor is capable of capturing digital still images and streaming snapshots.
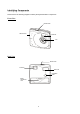
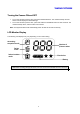
Identifying Components Please refer to the following diagram to identify the StyleCam Blink II components: Front View Shutter button USB connector Viewfinder Lens Back View Shutter button Viewfinder Status LCD Power/Mode button Battery compartment cover 2
Inserting the Battery Please follow the instructions below to insert the battery into your StyleCam Blink II digital camera: 1. Turn the camera’s power to OFF. 2. Open the battery compartment cover located on the bottom of the camera by sliding the cover off the camera. 3. Note the battery polarity inside the battery compartment, insert one new AAA alkaline battery, and then replace and close the battery compartment door by sliding it completely shut.
TAKING PICTURES Turning the Camera ON and OFF • • To turn the camera’s power to ON, press the Power/Mode button. The camera will beep and the status LCD will display the default settings. To turn the camera’s power to OFF, press and hold the Power/Mode button for three seconds. The camera will beep twice, and the status LCD will clear. Note: The StyleCam Blink II will automatically power off after 30 seconds of inactivity.
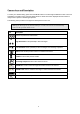
Camera Icon and Description To select your desired setting, press the Power/Mode button to scroll through the different modes. The icons will display in the status LCD; press the Shutter button to select the function displayed and the camera is ready to take a picture or Streaming Snapshots. The following chart provides icon images and descriptions for each icon. Note: If you do not press any button within five seconds, the LCD screen automatically returns to the operation mode screen.
How to Take Digital Still Pictures 1. Press the Power/Mode button once to turn the camera on. Default Setting 2. Press the Power/Mode button again to scroll to the setting you want: 640 x 480 pixels 320 x 240 pixels Press the Shutter button to save the setting and return to the main screen. 3. Press the Power/Mode button to scroll to indoor/outdoor: Indoor: select when inside a building or when ambient light is low. Outdoor: select when taking pictures outdoors.
How to Erase Images and Video The ERASE function allows you to erase the images or videos saved on the internal memory of your digital camera. Press the Power/Mode button to scroll to Erase mode To erase All images and videos, select ALL. Press and hold down the Shutter button until you hear two short beeps then a long beep. This will erase all images and videos saved on your StyleCam Blink II. To erase the LAST image or video taken, select LSE.
SOFTWARE INSTALLATION Software Overview & Features The StyleCam Blink II includes the following software and applications to enhance your digital imaging experience. The SiPix Picture Manager (TWAIN), CamWizard and CamExplorer are utility software that will help you download the images and video from your StyleCam Blink II to your computer. The Adobe Acrobat Reader allows you to view files that are in PDF format.
Installing the Software Follow these instructions to install the camera driver and application software on your PC system. Note: (For Windows 98SE users ONLY!) You may encounter a message during the installation that says you have an outdated version of DirectX installed on your computer. It will ask you if want to install the current version of Direct X, you may select “No” and continue with the installation. This will not affect the operation of you computer. Installing the StyleCam Blink II TWAIN 1.
Automatic Installation Please follow the instructions below to complete the installation of your software. 1. ArcSoft PhotoImpression and VideoImpression license agreements will appear. Click “Yes” to accept the license agreements to continue installation. The installation of these programs will take up to 5 minutes to complete. 2. After the ArcSoft programs install, the license agreement for the StyleCam Blink II Driver will appear. Click “Yes” to accept the terms of the agreement. 3.
Custom Installation Please follow the instructions below to complete the installation of your software. 1. Select “Custom Installation” from the Installer Menu shown above, and click “Continue”. The following screen will appear on your computer screen. 2. Check the application/driver software that you want to install on your computer, and click “Install”. 3. Follow the on-screen instructions to complete installing each software that you chose. The installation will be in the order of the menu above. 4.
CONNECTING TO YOUR PC How to Connect the StyleCam Blink II to Your PC Note: Before you connect the StyleCam Blink II to your PC, you must install the SiPix software drivers. 1. Press the Power/Mode button to turn the camera to OFF. 2. Open the connector cover. 3. Using the supplied USB cable, plug-in the smaller connector to the camera, and then plug-in the larger connector to your PC. 4.
DOWNLOADING FILES TO YOUR PC Transfer Images & Videos with the StyleCam Blink II CamWizard Use the StyleCam Blink II CamWizard to transfer and save your pictures and videos, view a slideshow of pictures, play your digital video, or open folders to view files. Connect the StyleCam Blink II with the supplied USB cable to your PC; the following screen appears.
Your pictures will appear in thumbnail format and the videos will display as video icons as shown in the above screen capture. To save these files to your PC, click “OK”. (Click “Browse“ to designate the location of where you want to save the files.) Play Image Slideshow You can also view your pictures in a slideshow. Choose “View slideshow of the images” from the CamWizard, and click “OK”. A slideshow will begin to play.
1. Click “Save” on the left panel of the screen, and then click “Save As” at the bottom of the screen. 2. When the Save window opens, select a directory where you want to save your pictures, type a name for the image file, and click “Save”. Transfer and Save Videos Using SiPix CamExplorer You can also use the StyleCam Blink II Camera Explorer to save the images and videos to your computer. Follow the instructions below: 1. Go to “My Computer”; double-click on the “My Camera” icon .
USING THE STYLECAM BLINK II AS A PC CAMERA How to Use the StyleCam Blink II as a PC Camera The SiPix StyleCam Blink II allows you to connect to your computer with the supplied USB cable and use it as a PC camera. Please read the instructions below carefully. Connecting the StyleCam Blink II to a PC 1. Set your StyleCam Blink II on the tilt base (included) and place it on a flat surface. The tilt base will also attach to a laptop as shown on the right. 2.
VIDEO CONFERENCING WITH NETMEETING How to Use the StyleCam Blink II with Microsoft NetMeeting The StyleCam Blink II can be used with Microsoft NetMeeting software for video conferencing. Please follow the instructions below: 1. Connect the StyleCam Blink II to your computer with the supplied USB cable. The camera will power on automatically. 2. Launch NetMeeting. Go to Start → Programs → Accessories → Communications → NetMeeting. 3.
STYLECAM BLINK II QUICK TIPS Taking Pictures Indoors – General Do’s • • Try to take pictures in an area where there are a lot of colors and patterns. If taking a portrait picture of a person, make sure the clothing does not have a high contrast to the background (e.g. white shirt against black background). Depending on the subject and the indoor conditions, it is generally better to have the light source at an angle (e.g.
PRODUCT SPECIFICATIONS Image sensor 1/3-inch VGA CMOS sensor Image resolution 640x480 320x240 Image capacity 70 images 300 images Image format JPEG Streaming snapshots 320x240 160x120 80 seconds 160 seconds Video format * AVI Video frame rate Up to 5 fps PC camera Up to 15 fps (320x240) Built-in memory 8MB SDRAM Exposure control Auto White balance control Auto Lens focal length 6mm (equivalent to 43mm on a 35mm camera) Focusing range 19.7-inch (0.
TROUBLESHOOTING Problem Possible cause Solution The camera has no power. The batteries are discharged. Replace the batteries with freshly charged ones. The batteries are inserted incorrectly. Check the battery orientation. Is the camera connected to a computer? The camera’s buttons are not functional when connected to a PC. Disconnect the camera to take more pictures. Is the camera’s power on? The camera powers off automatically after 30 seconds.
ONE YEAR LIMITED WARRANTY – USA & CANADA SiPix, a Foxlink Peripherals, Inc. brand, warrants this hardware product against defects in material and workmanship for a period of one year from the original date of purchase as identified on the proof of purchase (your receipt). It is the end-user’s responsibility to make certain this product is in working condition with the intended computer system within the one-year warranty period.
WARRANTY SERVICES – USA & CANADA If your SiPix product needs to be returned for repair, you must contact SiPix technical support prior to shipment for an RMA number before sending in the product. The RMA number is a Return Merchandise Authorization number. SiPix will refuse all shipments without a proper RMA number. The RMA number MUST be printed on the outside of the original shipping carton in large print written in black ink next to the shipping label.
TECHNICAL SUPPORT – USA & CANADA SiPix provides technical support at no cost during the one-year warranty period. Users with questions or concerns of a technical nature should first refer to the product manual, as usage and troubleshooting information is provided in detail. For additional information or assistance, users should visit the SiPix Website, as tutorials, updated drivers, frequently asked questions and news updates are available. www.sipixdigital.
24
TECHNICAL SUPPORT & WARRANTY - EUROPE Technical Support SiPix provides technical support at no cost during the two-year European warranty period. Users with questions or concerns of a technical nature should first refer to the product manual, as usage and troubleshooting information is provided in detail. For additional information or assistance, users should visit the SiPix Website, as tutorials, updated drivers, frequently asked questions and news updates are available at www.sipixdigital.
TECHNICAL SUPPORT & WARRANTY – ASIA PACIFIC Technical Support Upon receipt of this SiPix product you are immediately eligible for Technical Support during the warranty period of ONE YEAR from the purchase date. Users with questions or concerns of a technical nature should first refer to the product manual, as usage and troubleshooting information is provided in detail.