
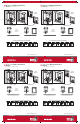
Install Instructions

• Boxes mount securely to stud
• Durable ABS stands up to job site abuse
• Available with Mini-Rester water hammer arrester
• High-quality, quarter-turn ball valve
• Replaces all other commodity outlet boxes
• Boxes mount securely to stud
• Durable ABS stands up to job site abuse
• Available with Mini-Rester water hammer arrester
• High-quality, quarter-turn ball valve
• Replaces all other commodity outlet boxes
• Boxes mount securely to stud
• Durable ABS stands up to job site abuse
• Available with Mini-Rester water hammer arrester
• High-quality, quarter-turn ball valve
• Replaces all other commodity outlet boxes
• Boxes mount securely to stud
• Durable ABS stands up to job site abuse
• Available with Mini-Rester water hammer arrester
• High-quality, quarter-turn ball valve
• Replaces all other commodity outlet boxes
Determine Conguration of BoxDetermine Conguration of Box
Determine Conguration of BoxDetermine Conguration of Box
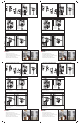
Slide bar into top channel.
Secure bar to studs. Add bar
to bottom as desired.
Slide bar into top channel.
Secure bar to studs. Add bar
to bottom as desired.
Slide bar into top channel.
Secure bar to studs. Add bar
to bottom as desired.
Slide bar into top channel.
Secure bar to studs. Add bar
to bottom as desired.
Screw box to bracket
(screw through bracket rst).
Screw box to bracket
(screw through bracket rst).
Screw box to bracket
(screw through bracket rst).
Screw box to bracket
(screw through bracket rst).
Installation – Between StudsInstallation – Between Studs
Installation – Between StudsInstallation – Between Studs
Plumb the supply line in the typical
manner. Open valve before soldering.
Plumb the supply line in the typical
manner. Open valve before soldering.
Plumb the supply line in the typical
manner. Open valve before soldering.
Plumb the supply line in the typical
manner. Open valve before soldering.
DO NOT allow
ame to come
into contact
with the box.
DO NOT allow
ame to come
into contact
with the box.
DO NOT allow
ame to come
into contact
with the box.
DO NOT allow
ame to come
into contact
with the box.
Nail to stud using the top nailway
and front two nailway tabs.
Nail to stud using the top nailway
and front two nailway tabs.
Nail to stud using the top nailway
and front two nailway tabs.
Nail to stud using the top nailway
and front two nailway tabs.
Installation – On StudInstallation – On Stud
Installation – On StudInstallation – On Stud
SS
SS
SS
SS
SS
SS
SS
SS
Washing Machine Outlet BoxWashing Machine Outlet Box
Washing Machine Outlet BoxWashing Machine Outlet Box
Also AvailableAlso Available
Also AvailableAlso Available
AA
AA
AA
AA
11
11
3.13.1
3.13.1
3.23.2
3.23.2
BB
BB
BB
BB
Determine Placement of Box
Against Stud
(strongest installation)
Floating
1
Determine Placement of Box
Against Stud
(strongest installation)
Floating
1
Determine Placement of Box
Against Stud
(strongest installation)
Floating
1
Determine Placement of Box
Against Stud
(strongest installation)
Floating
1