
Mounting Methods


SINGLETACT MOUNTING METHODS
3. Mounting the SingleTact Sensor
The SingleTact sensor is the first and most critical component to position and mount, due to its
orientation requirements. Before beginning, now is the time to consider whether the selected
sensor properly suits your application, or if some modifications are required. Visit SingleTact’s
Sensor Selector page and click on the “What size should I get?” button for more information. If
your load distribution is awkward or uneven, you may need to consider designing a custom load
distributor for your application before moving on to mounting.
Another consideration is moisture - if your application will be exposed to moisture or
perspiration, use or create some sort of polyurethane sheath to encase the sensor in
beforehand. This could be as simple as using a sandwich bag or a trading card sleeve. You
could also use a heat sealer to develop a custom encasement solution.
Double-Sided Tape
There are a number of methods for mounting the SingleTact sensor: double-sided tape,
single-sided tape, and glue. Custom enclosures and other fastening methods are also possible,
but will not be discussed here. Double-sided tape is a good solution for easily mounting a
sensor to a project. It is best to use a thin but strong tape, as a more spongy tape will interfere
with sensor performance.
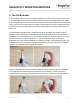
1. Begin by connecting the SingleTact sensor to the SingleTact electronics.
2. Cut a small piece of double-sided tape (just enough to cover the head of the sensor) and
place it on the sensor head, bottom side.
3. Remove the protective backing from the double-sided tape, and mount the sensor. Take
into consideration where the electronics will be mounted afterwards.
www.SingleTact.com ST_AN_003 Page 2