
Quick Start Guide
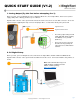

QUICK START GUIDE (V1.2)
pg. 2
Copyright © 2017 - www.SingleTact.com
2.1 Configuring an Arduino
2.2 Running Digital Acquisition Software
Download and install the Arduino Software from:
https://goo.gl/hhQIOK
Download the SingleTact Arduino firmware
(ExampleArduinoInterface) from: https://goo.gl/mZ03Uu
Connect the Arduino to the PC using the supplied USB cable.
Open the Arduino IDE software.
In the Arduino Software:
1. Go to File --->Open and open “SingleTact Demo.ino”
2. Go to Sketch --->Include Library --->Add .zip Library and
select “Timer1.zip”
3. Go to Sketch --->Verify/Compile.
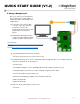
4. Go to Sketch --- > Upload. You should see “Done
uploading” in the green bar, as shown on the right.
(If you receive an error make sure the Arduino is selected under Tools
--->Port.). (*Note: USB communication may need additional driver
installation from the Arduino software package.)
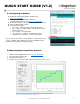
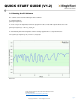
1. Download the PC DAQ binary from: https://goo.gl/40CqZB
2. Open the PCExecutable folder.
3. Run SingleTact Demo.exe.
4. The blue trace shown below will change when pressing on the sensor.
Please check the SingleTact Manual for trouble shooting and more detailed information.
http://www.singletact.com/SingleTact_Manual.pdf