TM SML625BTBK / SML625BTW INSTRUCTION MANUAL / MANUAL DE INSTRUCCIONES / MODE D’EMPLOI www.singingmachine.com The Singing Machine® is a registered trademark of The Singing Machine Co., Inc. The Singing Machine® es una marca registrada de The Singing Machine Co., Inc. The Singing Machine® est une marque déposée de The Singing Machine Co., Inc.
Warnings CAUTION RISK OF ELECTRIC SHOCK DO NOT OPEN CAUTION: TO REDUCE THE RISK OF ELECTRIC SHOCK, DO NOT REMOVE COVER (OR BACK). NO USER-SERVICEABLE PARTS INSIDE. REFER SERVICING TO QUALIFIED SERVICE PERSONNEL. The Caution marking is located on the bottom panel.
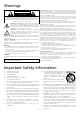
Included What’s in the box.
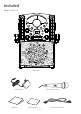
Location of Controls (Front) al am u w y V v an x ao ap aq ar as U W bt at bl X bk bm ak bn bp bq bo br bs Display Lense 1. CDG/USB/BT Button 2. PROGRAM/REPEAT Button 3. Skip Back 9 Button 4. AUTO VOICE CONTROL Button 5. BLUETOOTH PAIRING Button 6. BLUETOOTH indicator 7. ON/OFF Button 8. SKIP 10- Button (MP3) 9. BALANCE Control 10. USB Port 11. LINE IN Jack 12. MASTER VOLUME Control 13. Play/Pause Button 14. Stop < Button 15. Skip Forward : Button 16. MIC VOLUME control 17.
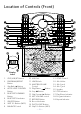
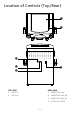
Location of Controls (Top/Rear) u v w x y U TOP VIEW 1. CD Door 2. CD open REAR VIEW 3. VIDEO OUT Jack 4. AUDIO OUT Jack (R) 5. AUDIO OUT Jack (L) 6. DC IN Jack (5.
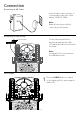
Connection Connecting the Microphone(s) Microphones: Connect a microphone into MIC jack 1 as well as MIC jack 2 (when desired). Note: Do not drop or tap the Mic as damage to the Mic or speakers may occur. Do not twirl the microphone cord as it will cause damage to the encased wiring.
Connection Connecting to AC Power Insert the AC power cord into a conveniently located AC outlet having 120V AC, 60Hz. Note: Make all connections before connecting to AC power. Connecting to LINE IN Jack Connect an external device by using an appropriate cable (3.5mm audio cable not included) as shown. To External Unit AUDIO OUTPUT / HEADPHONE JACK Note: See page E17 to select and use the LINE IN function.
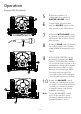
Operation Playing a CDG 1 u Connect the unit as described previously; if using a CD+G, it is recommended to connect to a TV (see page E5). Press the power ON/ OFF button to turn the unit on. 2 Lift open the CD door and insert a CD or a CD+G by gently pressing it on the center spindle. Then close the CD door. Note: • What is a CD+G? A CD+G (CD+Graphics) is the standard format for most karaoke discs that will display the words on the screen.
Operation Playing a CDG (Continued) y U V 5 Adjust the volume to a comfortable level using the MASTER VOLUME control. 6 Connect microphone(s) and slide the ON/OFF switch on the microphone to the ON position. 7 Adjust the MIC VOLUME control as desired. Increasing this control will increase the volume of both microphones. 8 Rotate the ECHO control to add an echo effect to your voice. Rotate towards MAX to increase the echo effect. 9 AUTO VOICE CONTROL can be activated by rotating the AVC control.
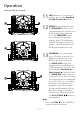
Operation Playing a CDG (Continued) ak ak 11 SKIP: Advance or go back one track by pressing the Skip Back 9/Skip Forward : buttons. 12 REPEAT: During playback, press the PROG/REP button once to repeatedly play the selected song; the Repeat indicator will blink. Press the PROG/REP button a second time to repeatedly play the whole CD; the Repeat indicator will light solid. Press it again to cancel Repeat function, the Repeat indicator turns off.
Operation Playing a CDG (Continued) 14 PAUSE: During playback, if you wish to pause the disc momentarily, press the PLAY/ PAUSE button; the PLAY/ PAUSE indicator will blink. Press again to resume normal playback. 15 Press the STOP < button to stop playback. 16 Press the power ON/OFF button to turn the unit off.
Operation Playing Songs from the USB u 1 Connect the unit as described previously. Press the power ON/ OFF button to turn the unit on. 2 Insert a USB flash drive into the USB port on the unit so it faces upward. Make sure to download music from the Karaoke store, see page E21. 3 Repeatedly press the CDG/USB/ BT button to select the USB mode; “usb” will appear when searching the drive and then the total number of files will appear. Note: The USB mode cannot be accessed until a flash drive is inserted.
Operation Playing Songs from the USB (Continued) U X V at W 6 Connect microphone(s) and slide the ON/OFF switch on the microphone to the ON position. 7 Adjust the MIC VOLUME control as desired. Increasing this control will increase the volume of both microphones. 8 Rotate the ECHO control to add an echo effect to your voice. Rotate towards MAX to increase the echo effect. 9 AUTO VOICE CONTROL can be activated by rotating the AVC control.
Operation Playing Songs from the USB (Continued) al 11 SKIP: Advance or go back one track by pressing the 9 or : buttons. You can also skip ahead 10 files/ tracks using the Skip10+ button and skip back 10 files/tracks by Skip 10- button. SEARCH: When playing any audio from the USB, press and hold the 9 or : buttons. The USB will search at high speed in the forward or backward direction. Normal play will continue when you release the button.
Operation Playing Songs from the USB (Continued) 13 an ao am ap PROGRAM: You can program up to 20 tracks for playback in any desired order. While in Stop mode, press the REP/PROG button; Program indicator will blink and “P00”appear. Select the first track using 9 or : buttons, then press the REP/PROG button. Repeat to set up to 20 tracks into memory. When done, press the PLAY/PAUSE button to start playback. Note: Press the STOP < button TWICE to stop and clear the program.
Operation Using a Bluetooth Device 1 v Connect the unit as described previously. Press the power ON/OFF button to turn the unit on. 2 Please connect your Music Device u Your Music Device is connected Repeatedly press the CDG/USB/BT button to select the Bluetooth mode; “bt” will blink in the display as the unit automatically searches for and pairs a previously paired Bluetooth device (if previously paired). If no previously paired devices are present, connect as shown in the next step.
Operation Using a Bluetooth Device (Continued) U 5 To control your Bluetooth device from this unit, press the PLAY/ PAUSE button to start playback. Press the PLAY/PAUSE button during playback to pause the song. 6 Adjust the volume to a comfortable level using the MASTER VOLUME control on this unit as well as the volume on your Bluetooth device. 7 Connect microphone(s) and slide the ON/OFF switch on the microphone to the ON position. 8 Adjust the MIC VOLUME control as desired.
Operation Using the LINE IN Jack u 1 Connect the unit as described previously. Press the power ON/ OFF button to turn the unit on. 2 Connect the external unit to the LINE IN Jack on the front of this unit. Connecting an external unit will allow the audio to be played through your Singing Machine. LINE IN function is automatically selected once the audio cable is plugged in. v Notes: • It is highly recommended to set the volume on the auxiliary unit to 1/3 or lower to avoid distortion.
Operation Using the LINE IN Jack (Continued) 5 Adjust the MIC VOLUME control as desired. Increasing this control will increase the volume of both microphones. 6 Rotate the ECHO control to add an echo effect to your voice. Rotate towards MAX to increase the echo effect. 7 Adjust the balance between the speakers using the BALANCE control. 8 Press the power ON/OFF button to turn the unit off.
Operation Recording Singing to the USB 1 Connect the unit as described previously. Press the power ON/ OFF button to turn the unit on. RECORD CDG/CD MUSIC TO THE USB wy u w y 2 Follow the “Playing a CDG” instruction described on page E7 - page E10 to start the CDG/CD music playback. 3 Insert a USB flash drive into the USB port on the unit, press the REC button; the REC indicator will light up, the song will start over and recording begin.
Operation Recording Singing to the USB RECORDING YOUR SINGING TO THE USB U V 6 Connect microphone(s) and slide the ON/OFF switch on the microphone to the ON position. 7 Adjust the MIC VOLUME control as desired. Increasing this control will increase the volume of both microphones. 8 Insert a USB flash drive into the USB port on the unit, press the REC button; the REC indicator will light up, the song will be recording right the way. When recording is finished, press the REC button again to stop.
Operation Where to Download MP3+G Files Helpful Hints: The .mp3 and .cdg files are delivered for download in a single, compressed MP3+G.zip file. The MP3+G file cannot be played as a .zip file on a USB flash drive. To play karaoke songs using a USB flash drive, the MP3+G.zip file must be unzipped as follow: • Connect a USB flash drive to your computer. • Download the MP3+G file from your Digital Locker and save the .zip file to a folder on your computer. • Double click the .zip file to open the .
Troubleshooting Guide Should this unit exhibit a problem, check the following before seeking service: No Power • Power is not on; press the power ON/OFF button to turn power on. • Confirm that the AC adapter is connected securely to the back of the unit. • Connect the unit to a different outlet. No Sound – General • Master Volume is set to minimum; raise volume. • Correct Function was not selected; select using the CDG/USB/BT button. • If using an external device, raise the volume.
Specifications AUDIO OUTPUT POWER (MAXIMUM) ................................................................................3.5 Watts (RMS) OUTPUT IMPEDANCE ..................................................................................................................3 Ohms CD PLAYER SECTION FREQUENCY RESPONSE .............................................................................................. 100Hz - 20kHz SIGNAL-TO-NOISE RATIO ..................................................................
Advertencias PRECAUCIÓN RIESGO DE DESCARGA ELÉCTRICA NO ABRIR PRECAUCIÓN: PARA REDUCIR EL RIESGO DE DESCARGAS ELÉCTRICAS, NO QUITE LA CUBIERTA (NI LA TAPA POSTERIOR) NO HAY PIEZAS REPARABLES POR EL USUARIO DENTRO. DERIVE LAS REPARACIONES A PERSONAL DE SERVICIO CALIFICADO. Las marcas de Precaución se ubican en el panel inferior.
Se incluyen Contenido de la caja.
Ubicación de controles (delantero) al am u w y V v an x ao ap aq ar as U W bt at bl X bk bm ak bn bp bq bo br bs Pantalla 1. Botón CDG/USB/BT 2. BOTÓN DE PROGRAMAR/ REPETIR (PROGRAM/REPEAT) 3. Botón de Saltar anterior (Skip Back) 9 4. BOTÓN CONTROL DE VOZ AUTOMÁTICO (AUTO VOICE CONTROL) 5. BOTÓN DE EMPAREJAMIENTO DE BLUETOOTH 6. INDICADOR DE BLUETOOTH 7. Botón de ENCENDIDO/ APAGADO (ON/OFF) 8. Botón de SALTAR 10- (MP3) 9. Control de BALANCE 10. Puerto USB 11.
Ubicación de los controles (Superior/reverso) u v w x y U VISTA SUPERIOR 1. Tapa del CD 2. CD abierto Reverso 3. SALIDA DE VIDEO 4. SALIDA DE AUDIO (R) 5. SALIDA DE AUDIO (L) 6. Conector de entrada de CC (5.
Conexión Conexión de micrófono(s) Micrófonos: Conecte un micrófono en la entrada para micrófono 1 y el otro micrófono en la entrada para micrófono (si lo desea). Nota: No arroje o dé golpecitos al micrófono, puede dañar el micrófono o los parlantes. No gire el micrófono por el cable porque causará daños al cable interno.
Conexión Conexión de corriente Introduzca el cable de corriente de CA en un tomacorriente de CA con 120V de CA, 60 Hz. Nota: Haga todas las conexiones antes de enchufar a la corriente de CA. Conexión a entrada de línea Conecte su dispositivo externo utilizando un cable adecuado (no se incluye el cable de audio de 3,5mm) como se muestra. A Unidad Externa SALIDA DE AUDIO /AURICULARES Nota: Consulte la página S17 para seleccionar y utilizar la función de entrada de línea.
Funcionamiento Reproducción de un CDG 1 2 u Abra el compartimiento de CD e introduzca un CD o un CD+G presionándolo cuidadosamente en el husillo central. Cierre la tapa del CD. Nota: • ¿Qué es un CD+G? Un CD+G (CD+ Graphics), es el formato estándar para la mayoría de los discos de karaoke que mostrarán las letras de canciones en pantalla. • Nunca coloque nada que no sea un CD en el compartimiento, como por ejemplo objetos extraños que puedan dañar la unidad.
Funcionamiento Reproducción de un CDG (Continuación) y 5 Ajuste el volumen a un nivel conveniente, usando el control de VOLUMEN PRINCIPAL. 6 Conecte los micrófonos y ubique el interruptor de ENCENDIDO/ APAGADO (ON/OFF) del micrófono en la posición de ENCENDIDO (ON). 7 Ajuste el control de VOLUMEN DEL MICRÓFONO (MIC VOLUME) hasta el nivel deseado. Al aumentar el nivel de este control se incrementará el volumen de los dos micrófonos.
Funcionamiento Reproducción de un CDG (Continuación) ak ak 11 SALTO: Avance o retroceda una pista oprimiendo los botones de Salto 9/ :. 12 FUNCIÓN REPETIR: Durantela reproducción, presione REPETIR/ PROGRAMAR (REPEAT/ PROGRAM) una vez para que se reproduzca varias veces la canción seleccionada; el indicador Repetir (Repeat) parpadeará.
Funcionamiento Reproducción de un CDG (Continuación) pistas a la memoria. Al finalizar, presione el botón REPRODUCIR/ PAUSAR (PLAY/PAUSE ) para comenzar la reproducción. Nota: • Oprima DOS VECES DETENER (STOP <) para detener y eliminar el programa. 14 PAUSAR (PAUSE): Durante la reproducción, si desea pausar momentáneamente el disco, oprima REPRODUCIR/ PAUSAR (PLAY/PAUSE ); el indicador REPRODUCIR/PAUSAR (PLAY/ PAUSE) parpadeará. Oprima nuevamente para reanudar la reproducción normal.
Funcionamiento Reproducir canciones desde el USB u 1 Conecte la unidad como se describió previamente. Oprima ENCENDIDO/ APAGADO (ON/OFF) para encender la unidad. 2 Introduzca un dispositivo flash USB en el puerto USB de la unidad de forma tal que esté hacia arriba. Asegúrese de descargar música de la tienda de karaoke; consulte la página S21.