TM SML385U INSTRUCTION MANUAL/ MANUAL DE INSTRUCCIONES / MODE D’EMPLOI www.singingmachine.com The Singing Machine® is a registered trademark of The Singing Machine Co., Inc. The Singing Machine® es marca registrada de The Singing Machine Co., Inc. The Singing Machine® est une marque déposée de The Singing Machine Co., Inc.
Warnings WARNING: TO PREVENT FIRE OR SHOCK HAZARD, DO NOT EXPOSE THIS UNIT TO RAIN OR MOISTURE. CAUTION RISK OF ELECTRIC SHOCK DO NOT OPEN CAUTION: TO REDUCE THE RISK OF ELECTRIC SHOCK, DO NOT REMOVE COVER (OR BACK). NO USER-SERVICEABLE PARTS INSIDE. REFER SERVICING TO QUALIFIED SERVICE PERSONNEL. The Caution marking is located on the bottom panel.
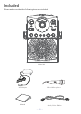
Included Please make sure that the following items are included.
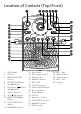
Location of Controls (Top/Front) u v w x yUV W X at ak al am ar as bt bk bl am bm bn bo bp bq br 1. LED Display 2. CD Door 3. MASTER VOLUME Control 4. CDG/BT/USB Button 5. Skip 9 Button 6. Play/Pause Button 7. Skip : Button 8. Skip +10 Button 9. Stop /Pair Button 10. REPEAT/PROGRAM Button 11. DISCO LIGHT Slide Switch 12. PROGRAM indicator an ao ap aq 13. Mic Holders 14. MIC Volume Control 15. ECHO Control 16. REPEAT indicator 17. MIC 2 Jack 18. ON/OFF indicator 19. Power ON/OFF Button 20.
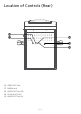
Location of Controls (Rear) bp bq br bs ct 26. 27. 28. 29. 30. VIDEO OUT Jack LINE IN Jack AUDIO OUT Jack (R) DC IN Jack (5.
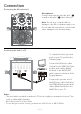
Connection Connecting the Microphone(s) Microphones: Connect a microphone into Mic jack 1 u as well as Mic jack 2 v (when desired). Note: Do not drop or tap the Mic as damage to the Mic or speakers may occur. Do not twirl the microphone cord as it will cause damage to the encased wiring.
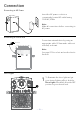
Connection Connecting to AC Power Insert the AC power cord into a conveniently located AC outlet having 120V AC, 60Hz. Note: Make all connections before connecting to AC power. Connecting to Line In Jack Connect an external device by using an appropriate cable (3.5mm audio cable not included) as shown. To External Unit AUDIO OUTPUT / HEADPHONE JACK Note: See page E13 to select and use the Line In function.
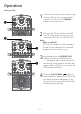
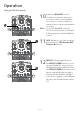
Operation Playing a CDG 1 u Connect the unit as described previously; if using a CD+G, it is recommended to connect to a TV. Press the ON/OFF button to turn the unit on. 2 v w Lift open the CD door and insert a CD or a CD+G by gently pressing it on the center spindle. Then close the CD door. Note: • What is a CD+G? A CD+G (CD+Graphics) is the standard format for most karaoke discs that will display the words on the screen.
Operation Playing a CDG (Continued) 5 y U W V Adjust the volume to a comfortable level using the MASTER VOLUME control. Notes: • Never place anything other than a CD in the compartment, as foreign objects can damage the unit. • If no disc is inserted, “No” will appear on the display. • If connected to a TV and/or other audio source, adjust the volume of the external unit using its own volume control. 6 Connect microphone(s) and slide the ON/OFF switch on the microphone to the ON position.
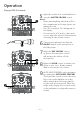
Operation Playing a CDG (Continued) 10 Rotate the BALANCE control clockwise to hear the music and recorded vocals from a multiplex recording or counterclockwise to hear the music only from a multiplex recording. Note: To use the BALANCE control, a CD+G disc must be used, otherwise it will operate as a standard Balance control. at ak 11 SKIP: Advance or go back one track by pressing the SKIP Back9/SKIP Forward : buttons.
Operation Playing a CDG (Continued) am 13 am PROGRAM: You can program up to 20 tracks on any disc for playback in any desired order. While in the Stop mode, press the REPEAT/PROG button; the Program indicator will blink and “00” will appear. Select the first track using the SKIP Back9/ SKIP Forward : buttons. Press the REPEAT/PROG button again to confirm the entry. After selecting the desired tracks the display will show 01, 02, etc.
Operation Playing a CDG (Continued) 16 aq ap RECORD YOUR SINGING: To record your singing as well as the music, press the RECORD button. Recording will begin and the record indicator will light solid. When done recording, press the RECORD button again; the record indicator will turn off. Notes: • The recorded audio file will record onto the USB drive. • See section “Playing Songs from the USB” to play back your recorded files. 17 — E11 — Press the ON/OFF button to turn the unit off.