TM SML271 INSTRUCTION MANUAL/ MANUAL DE INSTRUCCIONES/ MODE D’EMPLOI www.singingmachine.com The Singing Machine® is a registered trademark of The Singing Machine Co., Inc. The Singing Machine® es marca registrada de The Singing Machine Co., Inc. Singing Machine® est une marque déposée par The Singing Machine Co., Inc.
Warnings WARNING: TO PREVENT FIRE OR SHOCK HAZARD, DO NOT EXPOSE THIS UNIT TO RAIN OR MOISTURE. CAUTION RISK OF ELECTRIC SHOCK DO NOT OPEN CAUTION: TO REDUCE THE RISK OF ELECTRIC SHOCK, DO NOT REMOVE COVER (OR BACK). NO USER-SERVICEABLE PARTS INSIDE. REFER SERVICING TO QUALIFIED SERVICE PERSONNEL. The Caution marking is located on the rear panel.
Included What’s in the box.
Location of Controls (Front) ao ap aq ar as bt bk bl bm bn bo bp bq br u v w x y U V W X at ak al am an 1. Power indicator 2. ON/STANDBY Button 10. Button 3. FUNCTION Button 11. MASTER VOLUME Control 4. Auto Voice Control ON/ OFF Button 12. LINE IN Jack 5. SKIP 10+ Button 6. SKIP 10- Button 7. LIGHTS Button 8. Built-in loop Songs Button 9. MIC VOLUME Control 13. USB Slot 14. Speaker 19. SKIP : Button 20. STOP < Button 21. PLAY/PAUSE Button 22. Bluetooth indicator 23.
Location of Controls (Top/Rear) u v w x y U V W 1. 2. 3. 4. CD compartment Mic Holders Cradle VIDEO OUT Jack 5. 6. 7. 8. AUDIO OUT Right Jack AUDIO OUT Left Jack LINE OUT Jack DC Jack Location of Controls (Display) CDG PLAY/PAUSE 4 1 2 5 3 PROGRAM REPEAT 1. CDG Indicator 2. Display 3. Repeat Indicator 4. PLAY/PAUSE Indicator 5.
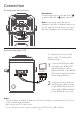
Connection Connecting the Microphone(s) Microphones: Connect a microphone into MIC jack 1 u as well as MIC jack 2 v (when desired). Note: Do not drop or tap the Mic as damage to the Mic or speakers may occur. Do not twirl the microphone by cord as it will cause damage to the encased wiring.
Connection Connecting to AC Power Insert the AC power cord into a conveniently located AC outlet having 120V AC, 60Hz. Note: Make all connections before connecting to AC power. Connecting to Line In Jack Connect an external device by using an appropriate cable (3.5mm audio cable not included) as shown. To External Unit AUDIO OUTPUT / HEADPHONE JACK Note: See page E21 to select and use the Line In function.
Connection Glowing Mood Lights 1 u When the unit is turned on, the Light mode 1 is automatically activated. The lights will light up and will synchronize with sound when you speak or sing into the microphone. Press the LIGHTS button for Light mode 2 which will display the light show but will not respond to the microphone. Press the LIGHTS button once again to turn off the Lights.
Operation Playing a CD v 1 Connect the unit as described previously; it should be connected to a TV. Press the ON/STANDBY button to turn the unit on. The power indicator will light up. 2 Lift open the CD door and insert a CD or a CD+G by gently pressing it on the center spindle. Then close the CD door. u Notes: • What is a CD+G? A CD+G (CD+Graphics) is the standard format for most karaoke discs that will display the words on the screen.
Operation Playing a CD (Continued) 5 Adjust the volume to a comfortable level using the MASTER VOLUME control. Note: If connected to a TV or other audio source, adjust the volume of the TV using its own volume control. y 6 Connect microphone(s) and slide the ON/OFF switch on the microphone to the ON position. 7 Adjust the MIC VOLUME control as desired. Increasing this control will increase the volume of both microphones.
Operation Playing a CD (Continued) 10 ak at PLAYING BUILT-IN EFFECTS , or button Press to play three different built-in sound effects. 11 AUTO VOICE CONTROL can be activated by pressing the AUTO VOICE CONTROL ON/OFF button. The vocals on a multiplex recording will be muted as soon as the singer begins singing into the microphone. When the singer stops singing, the recorded vocals on the multiplex recording will resume to normal. Note: This is only for files recorded with this multiplex feature.
Operation Playing a CD (Continued) 14 an ap ao PROGRAM: You can program up to 20 tracks for playback in any desired order. While in the Stop mode, select the first track using the SKIP 9 or SKIP : buttons. Press the REPEAT/PROG button again to confirm the entry. Repeat to set up to 20 tracks into memory. When done, press the PLAY/PAUSE /PAIR button to start playback. Program Notes: • Press the STOP < button TWICE to stop and clear the program.
Operation Playing a CD (Continued) ar 17 RECORD YOUR VOCAL PERFORMANCE: Insert a USB drive first, then press the RECORD button; the song will start over and recording will begin. The record indicator will light solid. Recording will stop when the song stop; the record indicator will turn off. 18 Press the ON/STANDBY button to turn the unit off. The power indicator will turn off.
Operation Playing Songs from the USB 1 Connect the unit as described previously; it should be connected to a TV. Press the ON/STANDBY button to turn the unit on. The power indicator will light up. 2 Insert a USB flash drive into the USB slot on the unit so it faces upward. u v 3 Repeatedly press the FUNCTION button to select the USB mode; “USb” will appear when searching the drive and then the total number of files will appear.
Operation Playing Songs from the USB (Continued) 6 Connect microphone(s) and slide the ON/OFF switch on the microphone to the ON position. 7 Adjust the MIC VOLUME control as desired. Increasing this control will increase the volume of both microphones. 8 SING-ALONG WITH BUILT-IN VOICE CHANGERS There are 6 built-in voice changers in this unit. Turn the VOICE EFFECT knob and singer’s voice will change as they sing into the microphone.
Operation Playing Songs from the USB (Continued) 11 AUTO VOICE CONTROL can be activated by pressing the AUTO VOICE CONTROL ON/OFF button. The vocals on a multiplex recording will be muted as soon as the singer begins singing into the microphone. When the singer stops singing, the vocals are automatically unmuted. Note: This is only for files recorded with this multiplex feature. ak al 12 SKIP: Advance or go back one track by pressing the SKIP 9 or SKIP : buttons.
Operation Playing Songs from the USB (Continued) 14 an PROGRAM: You can program up to 20 tracks for playback in any desired order. While in the Stop mode, press the REPEAT/PROG button; the Program indicator will blink and ”01” will appear on the display indicating the first program is ready to program. Select the first track using the SKIP 9/ SKIP :/SKIP 10+/SKIP 10buttons. Press the REPEAT/PROG button again to confirm the entry. Repeat to set up to 20 tracks into memory.
Operation Using a Bluetooth Device u v 1 Connect the unit as described previously. Press the ON/ STANDBY button to turn the unit on. The power indicator will light up. 2 Repeatedly press the FUNCTION button to select the Bluetooth; “bt” will appear in the display. The unit automatically searches for and pairs a previously paired Bluetooth device (if previously paired). If no previously paired devices are present, connect as shown in the next step.
Operation Using a Bluetooth Device (Continued) 4 The Bluetooth indicator will light solid and a chime will sound. 5 To control your Bluetooth device from this unit, press the PLAY/ PAUSE /PAIR button to start playback (music app must be open). Press the PLAY/PAUSE /PAIR button during playback to pause the song. 6 Adjust the volume to a comfortable level using the MASTER VOLUME control on this unit as well as the volume on your Bluetooth device.
Operation Using a Bluetooth Device (Continued) 9 SING-ALONG WITH BUILT-IN VOICE CHANGERS There are 6 built-in voice changers in this unit. Turn the VOICE EFFECT knob and singer’s voice will change as they sing into the microphone. EF0 - NONE, EF1 - ECHO, EF2 - FEMALE, EF3 - MALE, EF4 - CHIPMUNK, EF5 - ROBOT, or EF6 - RADIO. 10 SING-ALONG WITH BUILT-IN LOOP SONGS There are 3 built-in looped songs. To select a song, press SONGS button repeatedly.
Operation Using a Bluetooth Device (Continued) 13 an am RECORD YOUR VOCAL PERFORMANCE: To record your singing as well as the music, press the RECORD button. Recording will begin and the record indicator will light solid. When done recording, press the RECORD button again; the record indicator will turn off. Notes: • The recorded audio file will record onto the USB drive. 14 — E20 — Press the ON/STANDBY button to turn the unit off. The power indicator will turn off.
Operation Using the LINE IN Jack u 1 Connect the unit as described previously. Press the ON/STANDBY button to turn the unit on. The power indicator will light up. 2 Connect the external unit to the LINE IN Jack on the front of this unit. Connecting an external unit will allow the audio to be played through your Singing Machine. v Notes: • It is highly recommended to set the volume on the auxiliary unit to 1/3 or lower to avoid distortion.
Operation Using the LINE IN Jack (Continued) 6 U 7 V SING-ALONG WITH BUILT-IN VOICE CHANGERS There are 6 built-in voice changers in this unit. Turn the VOICE EFFECT knob and singer’s voice will change as they sing into the microphone. EF0 - NONE, EF1 - ECHO, EF2 - FEMALE, EF3 - MALE, EF4 - CHIPMUNK, EF5 - ROBOT, or EF6 - RADIO. 8 SING-ALONG WITH BUILT-IN LOOP SONGS There are 3 built-in looped songs. To select a song, press SONGS button repeatedly.
Operation Using the LINE IN Jack (Continued) 10 ak at RECORD YOUR VOCAL PERFORMANCE: To record your singing as well as the music, press the RECORD button. Recording will begin and the record indicator will light solid. When done recording, press the RECORD button again; the record indicator will turn off. Notes: • The recorded audio file will record onto the USB drive. 11 — E23 — Press the ON/STANDBY button to turn the unit off. The power indicator will turn off.
Operation Where to Download MP3+G Files Helpful Hints: The .mp3 and .cdg files are delivered for download in a single, compressed MP3+G.zip file. The MP3+G file cannot be played as a .zip file on a USB flash drive. To play karaoke songs using a USB flash drive, the MP3+G .zip file must be unzipped as follows: • Connect a USB flash drive to your computer. • Download the MP3+G file from your Digital Locker and save the .zip* file to a folder on your computer. • Double click the .zip file to open the .
Troubleshooting Guide Should this unit exhibit a problem, check the following before seeking service: No Power • Power is not on; press the ON/STANDBY button to turn power on. • Confirm the AC adapter is connected securely to the back of the unit. • Connect the unit to a different outlet. No Sound – General • MASTER VOLUME is set to minimum; raise volume. • Correct Function was not selected; select using the FUNCTION button. • If using an external device, raise the volume.
Specifications AUDIO Output Power ..................................................................................................................8 Watts (RMS) Output Impedance ........................................................................................................................4 Ohms CD SECTION Frequency Response..................................................................................................... 100Hz - 20kHz Signal-to-Noise Ratio .......................................
Mises en Garde MISE EN GARDE: AFIN D’ÉVITER TOUT RISQUE D’ÉLECTROCUTION, JUMELER LA LARGEBROCHE DE LA FICHE À LA FENTE LA PLUS LARGE ET L’INSÉRER COMPLÈTEMENT. MISE EN GARDE RISQUE DE CHOC ÉLECTRIQUE NE PAS OUVRIR MISE EN GARDE: AFIN DE RÉDUIRE LE RISQUE D’ÉLECTROCUTION, NE PAS RETIRER LE COUVERCLE (OU LE DOS DU BOÎTIER). AUCUNE PIÈCE POUVANT ÊTRE RÉPARÉE PAR L’UTILISATEUR NE SE TROUVE À L’INTÉRIEUR. POUR TOUTE RÉPARATION, CONTACTER UN TECHNICIEN COMPÉTENT.
Contenu Veuillez vous assurer que les éléments suivants sont bien inclus.
Position des commandes (face avant) ao ap aq ar as bt bk bl bm bn bo bp bq br u v w x y U V W X at ak al am an 1. 2. 3. 4. 5. 6. 7. 8. 9. Témoin d'alimentation Touche MARCHE/VEILLE (ON/STANDBY) Touche FONCTION Touche AVC (Contrôle automatique de la voix) MARCHE/ARRÊT (ON/ OFF) SAUT 10+ bouton SAUT 10- bouton Touche LUMIÈRE Touche de chansons en boucle intégrées Commande VOLUME 10. 11. 12. 13. 14. 15. 16. 17.
Position des commandes (dessus/Arrière) u v w x y U V W 1. 2. 3. 4. Compartiment de CD Supports de micro Support Jack de sortie vidéo 5. 6. 7. 8. Prise AUDIO OUT (droit) Prise AUDIO OUT (gauche) PRISE DE SORTIE Prise de sortie DC Position des commandes (Affichage) CDG PLAY/PAUSE 4 1 2 5 3 PROGRAM REPEAT 1. 2. 3. Indicateur CDG Affichage Voyant RÉPÉTER 4. 5.
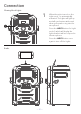
Connexion Connecter le(s) microphone(s) Microphones: Connectez un microphone au jack Mic 1 u ainsi qu’au jack Mic 2 v (si vous le souhaitez). Remarque: Ne faites pas tomber ou ne cognez pas le microphone car cela pourrait endommager le microphone ou les haut-parleurs. Ne faites pas tourner le microphone au niveau du cordon car cela abîme les câbles dans la gaine.
Connexion Connexion à l’alimentation secteur Insérez la fiche secteur dans une prise de courant située de façon appropriée, disposant de 120V, 60 Hz. Remarque: Connectez tous les éléments avant de raccorder l’appareil au secteur. Connexion au jack Line In Connectez un appareil externe en utilisant un câble adapté (câble audio 3.5 mm non inclus) tel que c’est indiqué. To External Unit AUDIO OUTPUT / HEADPHONE JACK Remarque: Voir page F21 pour sélectionner et utiliser la fonction Line In.
Connexion Lumières mode lueur Lorsque l’appareil est mis en marche, le mode Lumière 1 est automatiquement activé. Les lumières s’allument et sont synchronisées avec le son lorsque vous parlez ou chantez dans le microphone. Appuyez sur la touche MODE LUMIÈRE pour le mode Lumière 2, qui affiche le spectacle de lumière, mais ne répond pas au microphone. Appuyez de nouveau sur la touche MODE LUMIÈRE pour éteindre les lumières.
Fonctionnement Lecture d’un CD 1 v u Connectez l’appareil tel que cela a été décrit précédemment ; il devrait être connecté à un téléviseur. Appuyez sur le bouton Touche MARCHE/VEILLE (ON/STANDBY) pour allumer l’appareil. Le Témoin d'alimentation s'illuminera 2 Ouvrez la porte de CD et insérez un CD ou un CD+G en appuyant délicatement sur l’axe central. Puis fermez la porte de CD.
Fonctionnement Lire un CD (Suite) 5 y Réglez le volume à un niveau confortable en utilisant la commande VOLUME PRINCIPAL. Remarques: Lors de la connexion à un téléviseur et/ou une autre source audio, réglez le volume de l’appareil externe en utilisant sa propre commande de volume. 6 Connectez le(s) microphone(s), et faites glisser le bouton ON/OFF du microphone en position ON. 7 Réglez la commande MIC VOLUME au niveau souhaité. Le fait d’augmenter ce réglage augmente le volume du micro respectif.
Fonctionnement Lire un CD (Suite) 10 ak at ÉCOUTE DES EFFETS INTÉGRÉS , Appuyez sur les touches pour écouter les trois ou différents effets sonores intégrés. 11 L’option CONTRÔLE AUTOMATIQUE DE LA VOIX peut être activé en appuyant la touche MARCHE/ ARRÊT Contrôle de voix automatique (Auto Voice Control). Les chants de l’enregistrement multiplex sont coupés dès que vous commencez à chanter dans le micro.
Fonctionnement Lire un CD (Suite) 14 an PROGRAM: Vous pouvez programmer jusqu’à 20 pistes de n’importe quel disque pour les lire dans l’ordre que vous souhaitez. Lorsque l’appareil est en mode Stop, Sélectionnez le premier titre en utilisant les boutons SAUT 9 et :. Appuyez de nouveau sur le bouton RÉPÉTER/PROGRAMMER pour confirmer la saisie. Répétez cette opération pour programmer jusqu’à 20 titres dans la mémoire.
Fonctionnement Lire un CD (Suite) ar 17 REGISTREMENT DE VOS CHANTS : Insérez une clé USB dans un premier temps, appuyez ensuite sur la touche ENREGISTREMENT (RECORD); la chanson recommencera et l’enregistrement débutera. Indicateur d'enregistrement s'illuminera. ENR (REC) avec progression de la pièce en pourcentage s’affichera dans le coin supérieur gauche de l’écran. Pour arrêter l’enregistrement, appuyez à nouveau sur la touche ENREGISTREMENT (RECORD).
Fonctionnement Lire des titres depuis une clé USB 1 u 2 v3 Connectez l’appareil tel que cela a été décrit précédemment ; il devrait être connecté à un téléviseur. Appuyez sur le bouton MARCHE/VEILLE (ON/ STANDBY) pour allumer l’appareil. Le Témoin d'alimentation s'illuminera. Insérez une clé USB dans le port USB de l’appareil, face vers le haut.
Fonctionnement Lire des titres depuis une clé USB (suite) U V 6 Connectez le(s) microphone(s), et faites glisser le bouton ON/OFF du microphone en position ON. 7 Réglez la commande MIC VOLUME au niveau souhaité. Le fait d’augmenter ce réglage augmente le volume du micro respectif. 8 CHANTER EN SUIVANT LES PAROLES AVEC LES MODIFICATIONS DE VOIX INTÉGRÉES Il y a 6 changeur de voix intégré dans la machine.
Fonctionnement Lire des titres depuis une clé USB (suite) 11 L’option CONTRÔLE AUTOMATIQUE DE LA VOIX peut être activé en appuyant la touche MARCHE/ ARRÊT Contrôle de voix automatique (Auto Voice Control). Les chants de l’enregistrement multiplex sont coupés dès que vous commencez à chanter dans le micro. Lorsque le chanteur arrête de chanter, les voix enregistrés sur l’enregistrement multiplex se nivelleront en mode normal.
Fonctionnement Lire des titres depuis une clé USB (suite) 14 an aq PROGRAM: Vous pouvez programmer jusqu’à 20 pistes pour les lire dans l’ordre que vous souhaitez. Lorsque l’appareil est en mode Stop, appuyez sur le bouton RÉPÉTER/PROGRAMME ; le voyant de programme se met à clignoter et “01” apparait à l’écran, indiquanmt que vous pouvez programmer le premier titre. Sélectionnez le premier titre en utilisant les boutons SAUT 9/:/ SAUT 10+ et SAUT 10-.
Fonctionnement Utilisation d’un appareil Bluetooth 1 Connectez l’appareil tel que cela a été décrit précédemment ; il devrait être connecté à un téléviseur. Appuyez sur le bouton MARCHE/ VEILLE (ON/STANDBY) pour allumer l’appareil. Le Témoin d'alimentation s'illuminera. 2 Appuyez plusieurs fois sur le bouton FONCTION (FUNCTION) pour sélectionner le mode Bluetooth ;“bt” apparait alors sur l’écran.
Fonctionnement Utilisation d’un appareil Bluetooth (suite) 4 Le témoin Bluetooth s’allume et une sonnerie est audible. Remarques: • Si votre appareil Bluetooth vous demande un mot de passe lors du processus de couplage, veuillez saisir “0000” pour établir la connexion. • Sur certains appareils Bluetooth, une fois que le couplage est effectué, sélectionnez votre appareil Bluetooth en mode “Utiliser comme appareil audio” ou similaire.
Fonctionnement Utilisation d’un appareil Bluetooth (suite) 9 CHANTER EN SUIVANT LES PAROLES AVEC LES MODIFICATIONS DE VOIX INTÉGRÉES Il y a 6 changeur de voix intégré dans la machine. Tournez le cadran EFFETS VOCAUX et la voix du chanteur sera modifiée lorsqu'ils chanteront dans le micro. L’afficheur indiquera : EF0 - AUCUN (NONE), EF1 - ÉCHO, EF2 - FEMME (FEMALE), EF3 - HOMME (MALE), EF4 - CHIPMUNK, EF5 - ROBOT ou EF6 - RADIO.
Fonctionnement Utilisation d’un appareil Bluetooth (suite) an am 13 REGISTREMENT DE VOS CHANTS : Insérez une clé USB dans un premier temps, appuyez ensuite sur la touche ENREGISTREMENT (RECORD); la chanson recommencera et l’enregistrement débutera. Indicateur d'enregistrement s'illuminera. ENR (REC) avec progression de la pièce en pourcentage s’affichera dans le coin supérieur gauche de l’écran. Pour arrêter l’enregistrement, appuyez à nouveau sur la touche ENREGISTREMENT (RECORD).
Fonctionnement Utilisation du jack LINE IN 1 u Connectez l’appareil tel que cela a été décrit précédemment ; il devrait être connecté à un téléviseur. Appuyez sur le bouton MARCHE/VEILLE (ON/ STANDBY) pour allumer l’appareil. Le Témoin d'alimentation s'illuminera 2 Connectez l’appareil externe au jack LINE IN situé à l’avant de cet appareil. La connexion d’un appareil externe permettra de jouer le son à travers votre Singing Machine.
Fonctionnement Utilisation du jack LINE IN (suite) U 6 Réglez la commande MIC VOLUME au niveau souhaité. Le fait d’augmenter ce réglage augmente le volume du micro respectif. 7 CHANTER EN SUIVANT LES PAROLES AVEC LES MODIFICATIONS DE VOIX INTÉGRÉES Il y a 6 changeur de voix intégré dans la machine. Tournez le cadran EFFETS VOCAUX et la voix du chanteur sera modifiée lorsqu'ils chanteront dans le micro.
Fonctionnement Utilisation du jack LINE IN (suite) 10 ak at REGISTREMENT DE VOS CHANTS : Insérez une clé USB dans un premier temps, appuyez ensuite sur la touche ENREGISTREMENT (RECORD); la chanson recommencera et l’enregistrement débutera. Indicateur d'enregistrement s'illuminera. ENR (REC) avec progression de la pièce en pourcentage s’affichera dans le coin supérieur gauche de l’écran. Pour arrêter l’enregistrement, appuyez à nouveau sur la touche ENREGISTREMENT (RECORD).
Fonctionnement Où télécharger des fichiers MP3+G ? Conseils pratiques: Les fichiers .mp3 et .cdg sont fournis en téléchargement dans un seul fichier .zip MP3+G compressé. Il n’est pas possible d’effectuer la lecture du fichier MP3+G en tant que fichier .zip sur une mémoire flash USB. Pour effectuer la lecture de chansons de karaoké à l’aide d’une mémoire flash USB, le fichier .
Guide de dépannage Si vous rencontrez un problème avec cet appareil, vérifiez la liste suivante avant de demander de l’aide: Ne s’allume pas • L’appareil n’est pas sous tension ; appuyez sur le bouton MARCHE/VEILLE (ON/STANDBY) pour le mettre sous tension. • Assurez-vous que la prise de courant est correctement branchée à l’arrière de l’appareil. • Branchez l’appareil à une autre prise de courant. Pas de son - Général • Le régulateur du volume pour la musique est réglé au minimum ; augmentez le volume.
Spécifications AUDIO Puissance de sortie ............................................................................................ 8 Watts (RMS) 10% THD Impédance de sortie ............................................................................................................................ 4 Ohms SECTION CD Fréquence réponse ............................................................................................................ 100 Hz - 20 kHz Rapport signal-bruit .............................
Visit Our Website: www.singingmachine.com Visite nuestro sitio web: www.singingmachine.com Visitez notre site Internet au: www.singingmachine.com Copyright © 2019 - All Rights Reserved. Derechos de autor © 2019 Todos los derechos reservados. Droit d’auteur © 2019 Tous Droits Réservés. The Singing Machine Company, Inc. 4060 E Jurupa Street, Unit B Ontario, CA 91761-1413 USA U.S. Representative Company Name : The Singing Machine Company, Inc.