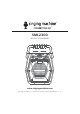
TM SML2300 INSTRUCTION MANUAL www.singingmachine.com The Singing Machine® is a registered trademark of The Singing Machine Co., Inc.
Warnings CAUTION: TO PREVENT ELECTRIC SHOCK, MATCH WIDE BLADE OF PLUG TO WIDE SLOT AND FULLY INSERT. CAUTION RISK OF ELECTRIC SHOCK DO NOT OPEN CAUTION: TO REDUCE THE RISK OF ELECTRIC SHOCK, DO NOT REMOVE COVER (OR BACK). NO USER-SERVICEABLE PARTS INSIDE. REFER SERVICING TO QUALIFIED SERVICE PERSONNEL.
Included What’s in the box.
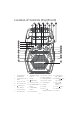
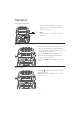
Location of Controls (Top/Front) X ak al at V W am an ao ap aq ar as bt bk 2. 6. VOICE EFFECTS UP 9. Button 10. Open/Close Tab 11. CD Compartment 12. (Navigation / Skip -)Button 13. Record indicator 7. RECORD Button 5. u v br VOICE EFFECTS DOWN Button 4. w x bl bm bn bo bp bq 1. 3. y U 8. 14. MASTER VOLUME Control 15. MIC VOL + Button 23. (Navigation / Skip +)Button 16. SKIP +10 Button Handle (Play/ 17. FUNCTION Button 24. ENTER/ Pause) Button PAIR Button 18. MIC VOL – Button 25.
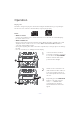
Location of Controls (Rear) y U v V u v w x W 1. 2. 3. 4. Mic 1 Jack Mic Holders Mic 2 Jack Video Out Jack 5. 6. 7. 8. Right Audio Out Jack Left Audio Out Jack DC In Jack Battery Compartment Location of Controls (Display) CDG PLAY/PAUSE 4 1 2 5 3 PROGRAM REPEAT 1. CDG Indicator 2. Display 3. Repeat Indicator 4. PLAY/PAUSE Indicator 5.
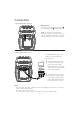
Connection Connecting the Microphone(s) Microphones: Connect a microphone into MIC jack 1 u as well as MIC jack 2 v (when desired). Note: Do not drop or tap the Mic as damage to the Mic or speakers may occur. Do not twirl the microphone by cord as it will cause damage to the encased wiring.
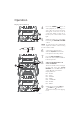
Connection Connecting to AC Power Insert the AC power cord into a conveniently located AC outlet having 120V AC, 60Hz. Note: Make all connections before connecting to AC power. Inserting Batteries 1 Slide the battery door in the direction the arrows to reveal the battery compartment. Insert eight (8) “C” size alkaline batteries (not included) as indicated on the diagram. 2 Replace cover tightly before operating. INSTALLATION OF BATTERIES ¶&· 6,=( 80 1.5V ¶&· 6,=( 80 1.5V ¶&· 6,=( 80 1.
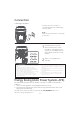
Operation Connecting to Line In Jack Connect an external device by using an appropriate cable (3.5mm audio cable not included) as shown. To External Unit AUDIO OUTPUT / HEADPHONE JACK LINE IN Note: See page E19 to select and use the Line In function. Disco Lights When the unit is turned on, the Light mode 1 is automatically activated. The lights will light up and will synchronize with sound when you speak or sing into the microphone.
Operation Playing a CD This unit is designed to play CDs and CDGs bearing the identification logo respectively. If the disc does not conform to the standard, it may not play properly. Notes: • What is a CD+G? A CD+G (CD+Graphics) is the standard format for most karaoke discs that will display the words on the screen. • What is an MP3+G? MP3+G is the newest format for karaoke music utilizing the MP3’s small file size. It will display the words on the screen.
Operation Playing a CD (Continued) 4 y x 5 Adjust the volume to a comfortable level using the MASTER VOLUME control. NOTE: If connected to a TV or other audio source, adjust the volume of the TV using its own volume control. 6 Connect microphone(s) and slide the ON/OFF switch on the microphone to the ON position. 7 Press the MIC VOLUME + or – button as desired, which will affect both microphones. 8 SING-ALONG WITH BUILT-IN VOICE CHANGERS There are 6 built-in voice changers in this unit.
Operation Playing a CD (Continued) 10 SKIP: Advance or go back one track by pressing the (Navigation / Skip -) button or (Navigation / Skip +) button respectively. 11 REPEAT: During playback, press the PROG/REP button once to repeatedly play the selected song; the Repeat indicator will blink. Press the PROG/REP button a second time to repeatedly play the whole CD; the Repeat indicator will light solid. Press it again to cancel Repeat function, the Repeat indicator will turn off.
Operation Playing a CD (Continued) Program Notes: • Press the STOP button TWICE to stop and clear the program. • If more than 20 tracks are attempted to be programmed, “FUL” will appear in the display. ao an 14 PAUSE: During playback, if you wish to pause the disc momentarily, press the ENTER/ button; the PLAY/PAUSE indicator will blink. Press again to resume normal playback. 15 Press the STOP playback.
Operation Playing Songs from the USB u v 1 Connect the unit as described previously; it should be connected to a TV. Press the ON/STANDBY button to turn the unit on; the power indicator will turn on. 2 Insert a USB flash drive into the USB slot on the unit so it faces upward. 3 Repeatedly press the FUNCTION button to select the USB mode; “USb” will appear when searching the drive and then the total number of files will appear.
Operation Playing Songs from the USB (Continued) 6 Connect microphone(s) and slide the ON/OFF switch on the microphone to the ON position. 7 Press the MIC VOLUME + or – button as desired, which will affect both microphones. 8 SING-ALONG WITH BUILT-IN VOICE CHANGERS There are 6 built-in voice changers in this unit. Press the VOICE EFFECTS UP or DOWN button to select different vocal effects.
ak Operation Playing Songs from the USB (Continued) 11 ak al al 12 REPEAT: During playback, press the PROG/REP button once to repeatedly play the selected song; the repeat indicator will blink slowly. Press the PROG/REP button a second time to repeatedly play the selected folder; the repeat indicator will blink rapidly. Press a third time to repeatedly play the USB; the repeat indicator will light solid. Press it again to cancel Repeat function; the indicator will turn off.
Operation Playing Songs from the USB (Continued) ao 13 PAUSE: During playback, if you wish to pause the music momentarily, press the ENTER/ button; the Play/Pause indicator will blink. Press again to resume normal playback. 14 Press the STOP playback. 15 Press the ON/STANDBY button to turn the unit off.
Operation Using a Bluetooth Device 1 Connect the unit as described previously. Press the ON/ STANDBY button to turn the unit on. 2 Repeatedly press the FUNCTION button to select the Bluetooth; “bt” will appear in the display. The unit automatically searches for and pairs a previously paired Bluetooth device (if previously paired). If no previously paired devices are present, you cannot find this unit on your bluetooth compatible device’s search list, connect as shown in the next step.
Operation Using a Bluetooth Device (Continued) 4 The Bluetooth indicator will light solid blue and a chime will sound. 5 U Start playback of your bluetooth device. Press the ENTER/ button during playback to pause the song. Notes: • If your Bluetooth prompts you for a passcode during the pairing process, please enter “0000” to connect. • On some Bluetooth devices, once pairing is complete, select your Bluetooth device as “Use as Audio Device” or similar.
Operation Using a Bluetooth Device (Continued) 9 SING-ALONG WITH BUILT-IN VOICE CHANGERS There are 6 built-in voice changers in this unit. Press the VOICE EFFECTS UP or DOWN button to select different vocal effects. Display will show: EF0 - NONE EF1 - ECHO EF2 - FEMALE EF3 - MALE EF4 - CHIPMUNK EF5 - ROBOT EF6 - RADIO 10 SKIP: Advance or go back one track by pressing the (Navigation / Skip -) button or (Navigation / Skip +) button respectively.
Operation Using the LINE IN Jack 1 Connect the unit as described previously. Press the ON/ STANDBY button to turn the unit on. 2 Connect the external unit to the LINE IN Jack on the front of this unit. Connecting an external unit will allow the audio to be played through your Singing Machine. u v Notes: • It is highly recommended to set the volume on the auxiliary unit to 1/3 or lower to avoid distortion. • Skipping files/tracks is not possible in this unit when using an external device.
Operation Using the LINE IN Jack (Continued) 6 Press the MIC VOLUME + or – button as desired, which will affect both microphones. V7 SING-ALONG WITH BUILT-IN VOICE CHANGERS There are 6 built-in voice changers in this unit. Press the VOICE EFFECTS UP or DOWN button to select different vocal effects.
Operation Where to Download MP3+G Files Helpful Hints: The .mp3 and .cdg files are delivered for download in a single, compressed MP3+G.zip file. The MP3+G file cannot be played as a .zip file on a USB flash drive. To play karaoke songs using a USB flash drive, the MP3+G .zip file must be unzipped as follows: • Connect a USB flash drive to your computer. • Download the MP3+G file from your Digital Locker and save the .zip* file to a folder on your computer. • Double click the .zip file to open the .
Troubleshooting Guide Should this unit exhibit a problem, check the following before seeking service: No Power • Power is not on; press the ON/STANDBY button to turn power on. • Confirm the AC adapter is connected securely to the back of the unit. • Connect the unit to a different outlet. • If using batteries, replace with new ones. • The normal function of the product may be disturbed by strong Electro-Magnetic Interference.
Specifications AUDIO Output Power .............................................................................................. 8 Watts (RMS) 10% THD Output Impedance ........................................................................................................................8 Ohms CD SECTION Frequency Response..................................................................................................... 100Hz - 20kHz Signal-to-Noise Ratio ..................................................
Visit Our Website: www.singingmachine.com Copyright © 2020 - All Rights Reserved. The Singing Machine Company, Inc. 4060 E Jurupa Street, Unit B Ontario, CA 91761-1413 USA U.S. Representative Company Name : The Singing Machine Company, Inc. Address : 6301 NW 5th Way, Suite 2900, Fort Lauderdale, FL33309, USA Telephone : 954 -596-1000 Website : www.singingmachine.