SINGER Jeatherweightn INSTRUCTION MANUAL MANUAL DE INSTRUCCIONES
"IMPORTANT SAFETY INSTRUCTIONS" "When using an electrical appliance, basic safety precautions should always be followed, including the following." "Read all instructions before using this sewing machine." ’’DANGER — To reduce the risk of electric shock:" 1. "This sewing machine should never be left unattended when plugged in. Always unplug this sewing machine from the electric outlet immediately after using and before cleaning." 2. "Always unplug before replacing light bulb.
FOOT CONTROL (USA only) Use Matsushita Electric, Model 4C-316B with this sewing machine. POLARIZED PLUGS CAUTION This appliance has a polarized plug (one blade wider than the other). To reduce the risk of electric shock, this plug is intended to fit in a polarized outlet only one way. If the plug does not fit fully in the outlet, reverse the plug. If it still does not fit, contact a qualified electrician to install the proper outlet. Do not modify the plug in any way.
IMPORTANTES INSTRUCCIONES DE SEGOURIDAD Cuando se usa un aparato eléctrico, debe seguirse unas precauciones básicas y que vienen incluidas a continuación. "Leer las instrucciones antes de usar la máquina de coser." PELIGRO — Para reducir el riesgo de una descarga eléctrica. 1. La máquina no debe dejarse nunca desatendida mientras esté conectada. Desconectar la máquina de la red eléctrica inmediatamente después de su uso y antes de limpiarla. 2. Desconectar la máquina de la red antes de cambiar la bombilla.
TABLE OF CONTENTS Machine identification---------------- -------------- -------------------- 4 - 6 Setting up your machine......................................................... 7 Foot control, Power/light switch Accessories.......................................................... ..................... - 8 Winding bobbin......................................... ............................ — 9 Threading the bobbin thread------------------------------------------- 10 Threading top thread..................
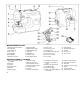
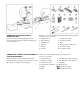
MACHINE IDENTIFICATION 1. Bobbin winder tension disc 2. Thread guide 3. Thread take-up 4. Face cover 5. Thread guide 6. Needle plate 7. Bobbin cover plate 8. Extensión table 9. Bobbin winder shaft 10. Bobbin winder stop 11. Spool pin 12. Hand wheel 13. Stitch selector 14. Power/light switch 15. Plug socket 16. Presser foot lever 17. Thread cutter 18. Automatic needle threader 19. Foot release lever 20. Presser foot screw 21. Feed dogs 22. 23. 24. 25. 26.
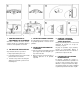
1- ADJUSTING TOP THREAD TENSION 3. STITCH WIDTH/NEEDLE POSITION CONTROL Decrease or increase the tension of the top thread by using this control. The higher the number, the tighter the tension. The width of all the stitches produced on this machine can be made narrower or wider by adjusting the stitch width control. 2. PRESSER FOOT LEVER When sewing straight stitching, you can select one of three needle positions - left, middle or right - with the same control dial.
1. CONTROLADOR DE LA TENSION DEL HILO SUPERIOR Aumentar o disminuir la tensión del hilo superior usando este controlador. Mayor es el número, más apretada es la tensión. 2. PALANCA PIE PRENSATELAS Su prénsatelas tiene tres posiciones. 1. Bajar el prénsatelas para coser. 2. Levantar la palanca a la posición media para insertar o mover la tela. 3. Levantar a la posición más alta para cambiar el prénsatelas o para mover el material grueso. 3.
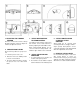
Power/light switch Interruptor corriente/luz SETTING UP YOUR MACHINE Be sure to wipe off any surplus oil from needle plate area before using your machine the first time. FOOT CONTROL Connect the plug of the foot control Into the machine socket ® and your wall outlet (D as illustrated. POWER/LIGHT SWITCH Your machine will not operate until the power/light switch Is turned on. The same switch controls both the power and the light. When servicing the machine, or changing needles or lamps, etc.
REMOVING THE EXTENSION TABLE/ ACCESSORY BOX Open the accessory box by lifting the lid up and backward and you will find a variety of accessories inside. Remove the extension table by pulling it to the left. 1. Straight stitch foot 7. Spool pin cap (small) To attach, slide the table back until the pin (§) fits into the hole on the machine. 2. Overcasting foot 8. 3. Buttonhole foot Spool pin cap (large) 9. Oiler 4. Zipper foot 1 0. Buttonhole opener with brush 5. Bobbins 1 1.
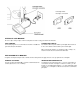
WINDING BOBBIN 1. Place a spool of thread on the spool pin. Secure it with the 4. Push bobbin winder shaft to far left position, if it is not already there. Place bobbin onto shaft with end of thread conning from spool cap to ensure smooth flow of thread. top of bobbin. Push bobbin winder shaft to right until It clicks. 2 . Pass thread from spool through thread guides as shown. Hold onto end of thread. 3. Pull end of thread through hole in bobbin as shown. 5. Start machine.
THREADING THE BOBBIN THREAD 1. Raise the needle to its highest position by rotating the hand wheel towards you. 2. Remove the bobbin cover plate. 3. Insert the bobbin making sure the bobbin rotates counter clockwise. 4. Pull thread through the slot @ and then to the left. With a finger held gently on top of the bobbin, pull thread through the slot (B) until you hear a clicking sound, and then leave about 6 " (15 cm) of thread. 5. Replace the bobbin cover plate onto the needle plate.
THREADING THE TOP THREAD 1. Raise the presser foot lever. 2. Raise the needle to Its highest position by rotating the hand wheel towards you. 3. Thread the machine in the order as Illustrated. ENHEBRADO DEL HILO SUPERIOR 1. ELevantar la palanca prénsatelas. 2. Levantar la aguja a la posición más elevada girando el volante de la máquina hacia usted. 3. Enhebrar la máquina siguiendo el orden de la ilustración.
USING AUTOMATIC NEEDLE THREADER Raise the needle to its highest position by rotating the hand wheel towards you. 1 . Pull down lever and hook thread to 2 . Guide thread into hooked end and pull thread guide as illustrated. Continue to it upward, push lever until the hooked end passes through the need^e eye. 3. Release the lever and needle will be threaded automatically. NOTE: For smooth threading it is recommended to set the machine at straight stitching (middle position) when using needle threader.
PICKING UP BOBBIN THREAD 1. Raise the presser foot lever. 2. Lightly pull up the top thread, and pick up bobbin thread, which will appear through the needle plate slot. 3. Pull both top and bobbin threads together towards back of machine under the presser foot, leaving about 6 ” (15 cm) clear. 2. Tirar ligeramente del hilo superior y recoger el hilo de la canilla, que aparecerá a través de la abertura de la plancha de aguja. 3.
CHANGING PRESSER FEET Be sure needle is in the up position. Raise presser foot lever. 1 . Push foot release lever to remove the foot. 2. Place the desired foot on the needle plate aligning the presser foot needle slot with the needle plate needle slot. 3. Lower the presser foot lever so that the foot holder snaps on the foot. CAMBIO DEL PIE PRENSATELAS Asegurarse de que la aguja está en la posición superior. Alzar la palanca del pie prénsatelas. 1.
CONVERTING TO FREE-ARM SEWING Your machine can be used either as a flat- bed, or as a free-arm model. With the extension table in position, it provides you with a large working surface as a standard flat-bed model. By removing the extension table (just pull it off to the left as shown), the machine converts into a free-arm model. CONVERSION PARA LA COSTURA CON BRAZO La máquina tanto se puede utilizar como base plana o una máquina de brazo libre.
MACHINE SETTING CHART VINDICATOR 1. INDICATOR STITCH QTQAir^UT O 1 riMIVjiri 1 Ai 1 ZIGZAG /«aamw/WVWW^WM 2. LENGTH CONTROL 2. 3. LENGTH STITCH CONTROL WIDTH CON TROL M 1-4 L. R 0.5-4 \ 4. PRESSER FOOT A, B B TYWYT BLIND FJ SHELL AAAAAA. 1-4 MULTI-STITCH ZIGZAG / V » V V , s 3. STITCH WIDTH CONTROL 1 -5 B M LR A, B B E? G^ DOUBLE ACTION WWW FAGGOTING VVvWV ill ^A I•" II TRIPLE STRAIGHT III Ric-RAc mmm 4. PRESSER FOOT STRETCH ON'EPLQCYJIflllllllllllllll OVERLOOK A. B. C.
ESQUEMA DE AJUSTE DE LA MAQUINA 1. SEÑALIZADOR 1. SEÑALIZADOR PUNTADA RECTA 2. CONTROL LONGITUD A! 1 ZIG-ZAG TVYWT IIN V loIDL-CZ 2, 3. 4. CONTROL SELEC PIE TOR LONGITUD ANCHO PRENSA1EÜ\S PUNTADA A. В M 1-4 В L. R 0.5 - 4 «5 F^ LENCERIA AAÁAÁA. ° ZIG ZAG TRES ААДААЛ PUNTADAS / V V V V V X DOBLE ACCION WWW 3. SELECTOR ANCHO PUNTADA Î 1-4 1-5 В M L, R А, в В G^ FAGOTING vWWV III Д^ III PUNTADA TRIPLE 4.
STRAIGHT STITCHES / Straight stitch is most frequently used for every aspect of sewing. Learn the correct method of your machine following the steps below. 1. 2 . Pull both threads under the 5. a. Start to sew stepping on SETTINGS the foot control. presser foot toward the back Stitch indicator - a j of the machine. Stitch length - 2 - 3 b. Guide the fabric gently Thread tension - 3 with your hand. 3. Place the fabric under the Raise the take-up lever to its presser foot and lower the c.
PUNTADA RECTA Punto recto se usa más frecuentemente para coser cualquier cosa. Aprenda el uso correcto de su máquina. 1. FIJACION Indicador de puntadas - a | Longitud del punto - 2 - 3 Tensión del hilo - 3 Levantar la palanca de tirahilos a la posición más alta girando el volante hacia Ud.
SECURING SEAMS INSERTING ZIPPERS PIPING Secure your seams by taking the first few stitches in reverse. Then allow the machine to go forward. This is called back tacking. Reverse the machine at the end of your seams as well. Lower the reverse lever for back tacking. To sew down the right side, attach left side of zipper foot to presser foot holder so that the needle passes through the opening on the left side of the foot.
Well balanced Bien equilibarada Top side Cara Top thread Parte delantera ^r Under side Reverso Top stitch too tight Threads lock on the top side. Decrease tension Puntada superior demasiado apretada Los hilos enredan sobre la parte delantera. Disminuir tensión Top stitch too loose Threads lock on the under side. Increase tension Puntada superior demasiado floja Los hilos enredan sobre el revés.
NEEDLE, THREAD AND FABRIC CHART TABLA DE HILO, AGUJA Y MATERIALS Your fabric will determine the choice of a needle and thread. The following table is a practical guide to needle and thread selection. Always refer to It before a new sewing project. And be sure to use the same size and type of thread in the bobbin as in the top thread supply. For best results always use Singer Brand Needles. Su material determinará el selecctión de aguja y hilo.
SATIN STITCH This is a closely spaced attractive stitch used for appliqué, bar-tacking, etc. Slightly loosen top thread tension for satin stitching. Use a backing of tissue paper or Interfacing for the sheer materials to avoid puckering. ZIGZAG STITCHING PUNTO DE ZIGZAG Thread tension control Controlador de la tensión del hilo Stitch indicator Indicador de puntadas PUNTADA DE RELLENO Esta es una puntada atractiva compactamente espaciada, usada para aplicaciones, atacados, etc..
First finish the raw edge. Do this by turning it under on fine fabrics and overcasting it on medium to heavyweight ones. Then turn the hem up the required depth, press and pin in place. Now fold the fabric as illustrated. C ^ - Regular blind stitch for normal fabrics Place the fabric under the foot with the fold of the fabric positioned so that the needle just pierces the fold when the needle swings to the left. Use stitch width control to fine tune exact position of needle.
SHELL STITCH D ^ Shell stitch is for seaming and overcasting sheer, soft fabrics in one operation. It also produces a delicate shell hem on lingerie and other fine garments. SEAM AND OVERCAST IN ONE Place the right sides of the fabric to gether and position under the presser foot so that the zig-zag part of the stitch sews just over the raw edge. SHELL TUCKS Turn under the raw edge and press.
MULTI-STITCH ZIGZAG e | This is a strong stitch because as its name implies, it makes multiple It is also Ideal for mending tears, patching, sewing towelling, patchshort stitches where the normal zigzag makes only one. work and attaching flat elastic. At 0 stitch length the Multi-stitch Zigzag makes an excellent bartack. For this reason it is highly recommended for overcasting all types of fabrics.
DOUBLE-ACTION STITCH g FAGGOTING h ^ Double-action stitch is ideal for producing flat overlapped seams on almost any type of fabric and a bolder effect will result from sewing with contrasting thread. This is a popular decorative stitch (used in sleeves or fronts of blouses and dresses). To attach two separate pieces of fabric together, leave a little space inbetween. To prepare the fabric: Fold under the seam allowances on the cut edges, and press.
©TRIPLE STRAIGHT ©RIC-RAC ©STRETCH OVERLOOK ©OVERLOOK ©FEATHER ©ELASTIC OVERLOOK ©DOUBLE OVERLOOK ©HERRINGBONE ©PUNTADA TRIPLE ©ZIG-ZAG ©OVERLOOK ELASTICO ©OVERLOOK ©PLUMA ©OVERLOOK ELASTICO ©OVERLOOK DOBLE ©ESPIGA STRETCH STITCHES Stretch stitches are mainly for use on knit, or stretchable fabrics, but can also be used on ordinary materials.
RIC-RAC STITCH B | Ric-rac is a quick method of finishing a raw edge and providing a decorative top-stitch in one operation. It is ideal for edging neck bands, armholes, sleeves and hems. PUNTADA ZIG-ZAG A DOS AGUJAS Bi El zig-zag es un método rápido de acabado de un borde y proporciona una sobrecóstura decorativa en una operación. Es ideal para escotes, sisas, mangas y dobladillos.
FEATHER STITCH E The pleasing appearance of this stitch enables it to be used for top stitching, or attaching lace or inset panels when making lingerie or girdles. ELASTIC OVERLOCK STITCH F ^ Use this stitch in preference to regular overlock stitch for overcasting stretch or knit fabrics where strength and flexibility are required. It is also ideal for quilting application and faggoting.
DOUBLE OVERLOOK STITCH G Double overlook has a number of uses. It is perfect for attaching flat elastic when making or repairing lingerie. It Is Ideal for overcasting a single layer of fabric or seaming and overcasting in one step on slightly stretch fabric and non-stretch fabrics such as linen, tweed and medium to heavy-weight cotton. It may also be used for couching over narrow ribbon or yarn or for drawn thread work.
BUTTONHOLE MAKING Change the presser foot to buttonhole foot. Slide the buttonhole guide forward. Loosen screw (A). Place the button between support (B) and support (C). Fix the button tight ening screw (A). Remove the button. Then you can obtain exact size of buttonhole. Carefully mark the buttonhole length on your garment. Place the fabric with the buttonhole marked under the buttonhole foot. Slide the foot foHA/ard so that the needle pierces the fabric at the beginning of the buttonhole.
1 0 (D PROCEDIMIENTO 1. 1. Coser hacia adelante hasta el final de la marca del ojal. Parar de coser a la izquierda y elevar la aguja. Stitch forward to the end of buttonhole mark. Stop sewing at the left stitch and raise needle. [f nu 2. 24 3 nÜ 2-4 V PROCEDURE 1 r; Bartack 4 or 5 stitches. Stop sewing at the left stitch and raise needle to its highest position. 2. Atacar 4 ó 5 puntadas. Parar de coser a la izquierda y levantar la aguja hasta la posición más alta. 3.
Less density Menos densidad 0 More density Más densidad CORDED BUTTONHOLES Hook filler cord (crochet thread or buttonhole twist) to the spur and pull both ends of the cord forward under the foot. Sew buttonhole so that zigzag stitches cover the cord. When completed, release the cord from foot, pull ends of cord forward and snip off extra length. OJALES CON CORDON Enganchar el cordón de relleno al saliente del pie prénsatelas y estirar ambos extremos del cordón hacia adelante, por debajo de la guía.
CARING FOR YOUR MACHINE To ensure the best possible operation of your machine, it is necessary to keep the essential parts clean at all times. Always disconnect the machine from power supply by removing the plug from the socket-outlet. Cleaning the feed dogs and hook area Changing light bulb 1. Raise the needle to Its highest position. 1. Remove the face cover. Push up the bulb slightly and turn clockwise. 2. Remove the needle plate (1). 3. Remove the bobbin case (2). 4.
CHECK CHART FOR PERFORMANCE PROBLEMS CUADRO DE EXAMEN PARA LOS PROBLEMAS DE EJECUCION GENERAL PROBLEMS Machine does not sew. * Foot control is not connected. - See page 7. * Power switch is turned off. - Turn on the switch. Machine iams/knocks. * Thread is caught in hook.- Clean hook (see page 35). * Needle is damaged.- Replace needle (see page 22). Fabric does not move. * Presser foot is not lowered - lower presser foot. * Stitch length is set at 0. - Set it at 1 to 4.
KB0000001 8/99