
User's Manual


Chapter 2. Installing and Set Up
2-3
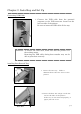
Parts Name and Function
N
o.
Name Function
①
Operation Panel
Control buttons, LCD and printer status display lamps are
located on the panel.
②
Front Cover
Open the front cover when replacing an ink ribbon or paper, or
when performing maintenance.
③
Handle (R) When moving the printer, hold this handle and the rear handle.
④
Side Upper Cover (R)
Open this cover when inspecting and cleaning the thermal head
and cleaning roller and when removing a jamming paper portion.
⑤
Side Upper Cover (L)
Open this cover when inspecting and cleaning the thermal head
and cleaning roller and when removing a jamming paper portion.
⑥
Power Switch
This switch turns on/off the power of the printer. When the “|”
marked side of the switch is pressed, the power is turned on.
When the “○” marked side of the switch is pressed, the power is
turned off.
<Caution> Once the printer is turned off, wait at least 3 seconds
before turning it on again.
⑦
Handle (L) When moving the printer, hold this handle and the rear handle.
⑧
Power Connector To be used to connect the power cord.
⑨
USB Connector To be used to connect the USB cable.
⑩
Tray To be used to catch printed papers.
⑪
Dust box
To be used to keep trimmed papers.
⑧
⑨
⑥
⑦
⑤
⑩
⑪
①
②
③
④