
Technical data


13
Filling and Bleeding The System
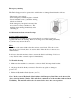
Turn the clutch adjustment screw #2 (2mm Allen screw, located in the handle behind the lever
of the master cylinder #7) counterclockwise as far as it will go.
Insert the straight barbed adapter into the top end of the clear tubing and insert the tip of the
syringe into the bottom end of the tube.
Fully depress the syringe’s plunger to expel all air, dip it in the fluid and draw the plunger back
slowly to fill the syringe at least half way.
Remove the bleeder screw #3 from the slave cylinder #8 at the rear of the machine and attach
the syringe assembly in its place.
Remove the bleed screw #4 (plug) from the master cylinder and depress the syringe’s plunger
to force fluid through the system. Allow enough fluid to flow from the master cylinder, to
ensure that no air remains in the system. If desired, the master cylinder can be removed from
the machine’s handle and placed in a rag. Care must be taken, however, to maintain adequate
altitude between the cylinders, to ensure the absence of air. Always fill from bottom to top.
In the following order:
1. Replace and tighten the plug in the master cylinder #4;
2. Remove the syringe assembly from the slave cylinder; and
3. Reinstall the bleeder screw #3, using a fresh compression washer.
Wipe clean any excess fluid. Mount the master cylinder on the handle, if necessary, and test
the function of the hydraulics.
Adjustments can then be made by tightening the adjustment screw on the master cylinder #2.
If the master cylinder is too tight, you can allow some fluid to escape by loosening the master
cylinder bleeder plug #4, and gently squeezing the lever very slightly to allow a few drops of
fluid out. To avoid allowing the cylinder to suck in air, be sure to tighten the bleeder plug
securely before releasing any pressure applied to the lever #5. The adjustment can then be
made using the adjustment screw #2. The clutch must engage fully and remain engaged when
you set the lever lock #6.