
Instruction manual

SIMTECH
Phone: 877-777-2467 • Fax: 215-547-3410
www.SimtechUSA.com
16
WeldTech - MiniPlast Instruction Manual
1.060606
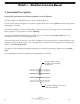
• Switch on heating element and set the required welding temperature (standard value PE-HD:
210° C) on the adjustment screw on the handle.
• As soon as the control light blinks, the nominal temperature has been reached and is
maintained at a constant level by a pulse-position ratio.
• Screw in reduction inserts according to the outer diameter of the pipes to be welded, if
necessary set the angle.
• Attach the basic frame at the table support, if required fix the table support at the support
surface or insert machine without table support directly into the pipe system.
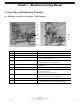
Machine working directly in the pipe system
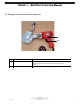
• Put the work pieces into the clamping device, fasten clamping nuts tightly and align the work
pieces with respect to one another.
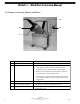
• Insert the manual planer between the ends of the work pieces, lock it by turning the star grip on
the guide bar and plane with low force.
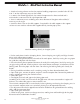
• Insert the electric planer (optional) between the ends of the work pieces, lock it by turning the
star grip at the guide rod. Switch on planer at the on/off button and keep it switched on with the
locking knob. Plane the pipes with low force. For releasing the locking knob, push shortly the
button.
• Planing should be carried out until a revolving cutting has been formed on both sides.
• Open slide again, remove the planer and put it into the reception box. Remove the produced
cuttings without contacting the worked surfaces.
• Close slide again.
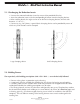
• Check pipe mismatch and gap on the joining pipe ends.
According to DVS 2207, the mismatch on the pipe outer side must not exceed 0.1 x pipe wall
thickness, the admissible gap must not exceed 0.5 mm.
The mismatch compensation is carried out by further tightening or releasing the clamping nuts. In
case mismatch compensation was carried out, planing must be repeated afterwards.
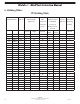
• The adjustment force for the pipe dimension to be welded can be gathered from the welding
table. Add the movement force.
• Open slide again somewhat.
• Gather heating time, maximum change over time, cooling time and bead height for the pipe
dimension to be welded from the table.