www.SimtechUSA.com WeldTech MiniPlast OPERATION MANUAL Corrosion Resistant Fluid and Air Handling Systems.
WeldTech - MiniPlast Instruction Manual Table of Contents 1. DESCRIPTION OF THE PRODUCT...................................................................................................... 3 1.1 Usage and Purpose-oriented Use............................................................................................. 3 1.2 Overview............................................................................................................................... 3 1.3 Safety Measures.............................
WeldTech - MiniPlast Instruction Manual 6. WELDING TABLES............................................................................................................................. 18 7. MAINTENANCE AND REPAIR ............................................................................................................20 7.1 General .................................................................................................................................20 7.2 Clamping Elements .......................
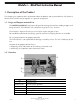
WeldTech - MiniPlast Instruction Manual 1. Description of the Product This chapter gives important basic information about the product and its prescribed use. All technical details of the machine are put together as a general arrangement. 1.1. Usage and Purpose-oriented Use The SIMTECH MINIPLAST 2 has been designed for heating element butt welding of pipes and fittings out of PE, PP and PVDF with a diameter range of Ø = 20 - 110 mm.
WeldTech - MiniPlast Instruction Manual 1.3. Safety Measures In case of wrong use, wrong operation or wrong maintenance, the machine itself or products standing nearby can be damaged or destroyed. Persons being in the endangered area may be injured. Therefore these working instructions have to be thoroughly read and the corresponding safety regulations must be necessarily adhered to. 1.4.
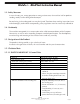
WeldTech - MiniPlast Instruction Manual 1.5.1.2 Heating Element 0OWER 6OLTAGE #URRENT &REQUENCY /UTSIDE 3URFACE !TTACHED ELEMENTS 7ATT 6 Õ ! Õ (Z MM NONSTICK COATED ELECTRONIC TEMPERATURE CONTROL CONTROL LAMP CONNECTING CABLE WITH PLUG APPR KG 7EIGHT 1.5.1.3 Manual Planer 7EIGHT APPR KG 1.5.1.4 Basic Machine and Table Support -ATERIAL FRAME AND CLAMPING DEVICES -AX FORCE 1.5.1.5 !LUMINIUM .
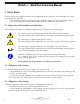
WeldTech - MiniPlast Instruction Manual 2. Safety Rules The base for the safe handling and the fault-free operation of this machine is the knowledge of the basic safety indications and rules. • These working instructions contain the most important indications to run the machine safely. • The safety indications are to be followed by all persons working on the machine. 2.1.
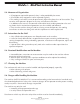
WeldTech - MiniPlast Instruction Manual 2.4. Measures of Organisation • All equipment required for personal safety is to be provided by the owner. • All available safety equipment is to be inspected regularly. • The working instructions have to be permanently kept at the place of use of the machine. They are to be at the operator‘s disposal at any time and without much effort.
WeldTech - MiniPlast Instruction Manual 2.9. Dangers caused by Electric Energy Only skilled persons are allowed to work at electrical appliances. • The electrical equipment of the machine has to be checked regularly. Loose connections and damaged cables have to be replaced immediately. • The heating element has to be protected from rain and dropping water, if need be use a welding tent. • According to VDE 0100, the use on construction sites is only allowed with a power distributor with a FI-safety switch.
WeldTech - MiniPlast Instruction Manual 2.11. Warranty and Liability Fundamentally our “General Sales and Delivery Conditions” are valid. They are at the owner’s disposal latest when signing the contract. Guarantee and liability demands referring to personal injuries or damages on objects are excluded if they are caused by one or several of the following reasons: • Not using the machine according to the prescriptions. • Inexpert transport, mounting, starting , operating and maintenance of the machine.
WeldTech - MiniPlast Instruction Manual 3. Functional Description Basically the international and national guidelines are to be followed. The plastic pipes are clamped by means of the clamping devices. Then the front sides of the pipes are cut plane and parallel by means of the planer and the misalignment of the pipes is checked. The heating element is inserted and the pipes are pressed against the heating element under defined adjusting pressure. This process is called “adjusting”.
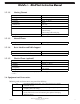
WeldTech - MiniPlast Instruction Manual 4. Operating and Indicating Elements 4.1. Elements on the Basic Machine / Table Support 6 7 8 9 10 11 13 14 15 12 .O $ENOMINATION 4IGHTENING NUT 5PPER GUIDE BAR 3CALE (ANDWHEEL 3TAR GRIP FOR BASIC MACHINE 3PINDLE ,OWER GUIDE BAR 3CREWS FOR VERTICAL OFFSET (EXAGON SCREW X 3CREWS FOR HORIZONTAL OFFSET 1.
WeldTech - MiniPlast Instruction Manual 4.2. Elements at Heating Element and Planer 18 19 16 17 .
WeldTech - MiniPlast Instruction Manual 4.3. Elements at the Electric Planer (optional) 21 20 .O .AME "UTTON ON OFF ,OCKING KNOB 1.060606 &UNCTION 4HE BUTTON MUST BE PUSHED FOR PLANING 4HE PLANER HAS TO BE SWITCHED OFF AFTER EACH PLANING PROCESS +EEPS THE ON OFF BUTTON IN POSITION /. SIMTECH Phone: 877-777-2467 • Fax: 215-547-3410 www.SimtechUSA.
WeldTech - MiniPlast Instruction Manual 5. Starting and Operating The instructions of this chapter are supposed to initiate in the operation of the machine and lead during the appropriate starting of the machine. This includes • The safe operation of the machine • Using all the possible options of the machine • Economic operation of the machine 5.1. Starting The machine may only be operated by initiated and authorized persons.
WeldTech - MiniPlast Instruction Manual 5.1.1 Exchanging the Reduction Inserts • Unscrew the mounted reduction inserts by means of the provided Allan key. • Screw the reduction inserts with the corresponding diameter into the clamping devices. • When welding bends, the angle can be set on the basic clamping devices (on each side between -15° to +15°). • If necessary (e.g. for T-pieces) a special basic clamping device can be provided by means of which very short sections can be clamped.
WeldTech - MiniPlast Instruction Manual • Switch on heating element and set the required welding temperature (standard value PE-HD: 210° C) on the adjustment screw on the handle. • As soon as the control light blinks, the nominal temperature has been reached and is maintained at a constant level by a pulse-position ratio. • Screw in reduction inserts according to the outer diameter of the pipes to be welded, if necessary set the angle.
WeldTech - MiniPlast Instruction Manual • Move the heating element which has been cleaned and brought to desired temperature between the pipes with the handle facing downwards (hang into guide bar). • Close the slide smoothly with the determined adjustment force. The applied force can be read at the force scale on the hand wheel. When the prescribed revolving bead height is reached, reduce the force (Heating force = approx. 10 % of the adjustment force). • The heating time starts now.
WeldTech - MiniPlast Instruction Manual 6. Welding Tables PP Welding Table Diameter Weld Beginning Melt Pressure Heating Change Over Time Weld Cooling & Wall Thickness Temp °C & Bead Height Time (Remove Heater Pressure Time Before (Kg./Force) (Pressure at & Gradually (Kg./Force) Removing Near 0 Lbs. Increase to Force) Weld Pressure) Clamps Seconds Pressure Height Seconds Change Bring To Over Pressure Minutes ½” PN3.
WeldTech - MiniPlast Instruction Manual PVDF Welding Table Diameter Weld Beginning Melt Pressure Heating Change Over Time Weld Cooling & Wall Thickness Temp °C & Bead Height Time (Remove Heater Pressure Time Before (Kg./Force) (Pressure at & Gradually (Kg./Force) Removing Near 0 Lbs. Increase to Force) Weld Pressure) Clamps Seconds Pressure Height Seconds Change Bring To Over Pressure Minutes ½” PN16 230 1.36 1/32” 25 4 5 1.36 3 ¾” PN16 230 2.
WeldTech - MiniPlast Instruction Manual 7. Maintenance and Repair 7.1. General I Replace damaged parts immediately, be particularly care full with electrical parts. Dirt and wetness are very good current conductors. Prescribed maintenance and inspection works should be performed in time. The DVS gives the advice of inspection works after 1 year. For machines with a specially high usage percentage the testing cycle should be shortened .
WeldTech - MiniPlast Instruction Manual 8. Transport • Protect the machine from heavy chocs. • Handle the machine carefully. • Make sure that the case is closed correctly. The machine is transported in a sheet steel carrying case. Gibs for the box of the reduction inserts Placing the single elements in the steel sheet carrying case: • There is a rectangular shape inside of the box, in which the planer is inserted. • Put in the table support and the basic machine next to it (see picture).
WeldTech - MiniPlast Instruction Manual 9. Wiring Diagrams 22 SIMTECH Phone: 877-777-2467 • Fax: 215-547-3410 www.SimtechUSA.com 1.
WeldTech - MiniPlast Instruction Manual 10. Spare Parts List 10.1. Basic Machine with Clamping Devices and Reduction Inserts 1.060606 SIMTECH Phone: 877-777-2467 • Fax: 215-547-3410 www.SimtechUSA.
WeldTech - MiniPlast Instruction Manual Basic Machine with Clamping Devices and Reduction Inserts Miniplast 2 Pos.
WeldTech - MiniPlast Instruction Manual Basic Machine with Clamping Devices and Reduction Inserts Miniplast 2 1.
WeldTech - MiniPlast Instruction Manual 10.2. Basic Machine 3 2 6 4 5 1 Pos. 26 Name Piece Order no. 1 Basic frame 1 450101 2 Hexagon nut M 8 DIN 934 2 0934H 3 Fixing bolt 2 450116 4 Star grip DIN 6336-KU-M8-K 1 on request 5 Headless pin M 8x40S DIN 6332 1 on request 6 Threaded insert M 8x12 1 GEW-M8 SIMTECH Phone: 877-777-2467 • Fax: 215-547-3410 www.SimtechUSA.com 1.
WeldTech - MiniPlast Instruction Manual 10.3. Clamping Devices for Fittings Pos. 1.060606 Name Piece Order no. 46 Left-hand clamping device for fittings 1 45081 10L 47 Right-hand clamping device for fitting 1 45081 10R 48 Draw bar 2 S0115067 49 Hinge 2 S0112 50 Knurled screw 2 S0113 51 Handle 2 S0114-1 52 Rivet 2 S0110 53 Straight pin 4 M 6 DIN 6325 4 6325D012 54 Flat-head screw M 6x12 DIN 7991 4 7991F012 SIMTECH Phone: 877-777-2467 • Fax: 215-547-3410 www.
WeldTech - MiniPlast Instruction Manual 10.4 Manual Planer 28 SIMTECH Phone: 877-777-2467 • Fax: 215-547-3410 www.SimtechUSA.com 1.
WeldTech - MiniPlast Instruction Manual 10.4 Manual Planer Pos. 1.060606 Name Piece Order no.
WeldTech - MiniPlast Instruction Manual 10.5. Electric Planer (optional) 7 6 19 16 11 / 12 1 22 20 / 21 25 23 / 24 26 28 / 29 32 27 30 / 31 2 5 9 14 17 18 4 3 30 8 10 13 15 / 16 SIMTECH Phone: 877-777-2467 • Fax: 215-547-3410 www.SimtechUSA.com 1.
WeldTech - MiniPlast Instruction Manual 10.5. Electric Planer (optional) Pos. 1.060606 Name Piece Order no.
WeldTech - MiniPlast Instruction Manual 10.6. Heating Element 10 11 1 12 2 3-5 13 6 14 15 7/8 16 - 18 19 20 9 21 32 SIMTECH Phone: 877-777-2467 • Fax: 215-547-3410 www.SimtechUSA.com 1.
WeldTech - MiniPlast Instruction Manual 10.6. Heating Element 1.060606 Pos. Name Piece Order no.
WeldTech - MiniPlast Instruction Manual 10.7. Protection Box Pos. 34 Name Piece Order no.
WeldTech - MiniPlast Instruction Manual NOTES: 1.060606 SIMTECH Phone: 877-777-2467 • Fax: 215-547-3410 www.SimtechUSA.
WeldTech - MiniPlast Instruction Manual NOTES: 36 SIMTECH Phone: 877-777-2467 • Fax: 215-547-3410 www.SimtechUSA.com 1.
WeldTech - MiniPlast Instruction Manual NOTES: 1.060606 SIMTECH Phone: 877-777-2467 • Fax: 215-547-3410 www.SimtechUSA.
WeldTech - MiniPlast Instruction Manual Simtech Industrial Products, Inc. 47-A Runway Road, Levittown, PA 19057 Phone: 215-547-0444 Fax: 215-547-9129 E-mail: info@SimtechUSA.com Web site: www.SimtechUSA.com WARRANTY Simtech Industrial Products, Inc. products are warranted to be free from defects in materials and workmanship for one (1) year from date of shipment. No claim shall be permitted under this warranty unless Buyer gives Simtech Industrial Products, Inc.