
Installation manual


Transducer installation
31
851-165187 / Rev.A
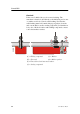
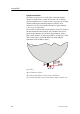
Common guidelines
The best performance is obtained with a blister height of 40 cm
or more. A streamlined shape and rounded edges reduce the
flow noise. A vertical leading edge or front will guide the
aerated water to the sides of the blister. The orientation of the
blister should follow the water flow.
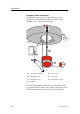
The interior of the blister must be filled with sea water. Use
drainage holes in the bottom and an air outlet on the top. The
water pressure behind the transducer will then compensate for
the outside pressure during vessel movements in rough sea.
Large diameter transducers must be fitted with a horizontal
U-shaped support bar. This bar can then be secured to the
mounting ring using threaded rods.
The transducer cable penetrates the hull in a stuffing tube. Leave
an adequate loop of the cable behind the transducer for easy
mounting or removal of the transducer.
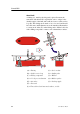
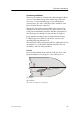
Toe-in
On a conventional hull shape, without a bulb, the front of the
blister should have a few degrees toe-in towards the bow.
(A) = Keel
(B) = Blister
(C) = Toe-in angle 5 to 8 degrees