
Installation Guide

© 2019 Simpson Strong-Tie Company Inc. • P.O. Box 10789, Pleasanton, CA 94588
DIY-CSOCS19 1/19 exp. 6/23
(
800
)
999-5099
strongtie.com/diy
The construction plan for this project is designed to be completed by people with basic carpentry skills in standard
situations. If your situation is unique, talk with someone with detailed carpentry or construction experience before
starting your project. Particular attention was paid to the steps and details in this plan, but they cannot be guaranteed
to be error free. Simpson Strong-Tie shall not be responsible for any possible loss, damage or injury resulting directly
or indirectly from the information contained here.
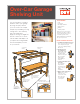
Over-Car Garage Shelving Unit
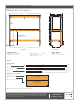
Materials and Cut Diagram
Front View Side View
24"
17"
12"
10
7
⁄
16
"
34
1
⁄
2
"
25"
34"
96"
93"
72"
(shown)
Change this dimension
(floor to first front rail) as needed
to accomodate your vehicle
Front
corner
post
End
rail
Front
rail
72" 17"
93"
(5x)
(4x)
(1x)
24" x 96" top shelf
24" x 96" lower shelf
(notch all corners)
17" 17"
Note: Verify vehicle width and hood height before finalizing design.
Hardware Needed
•
(10) Rigid Tie
®
RTC2Z connectors
•
(2) Rigid Tie RTA2Z connectors
•
(2) Boxes Simpson Strong-Tie
®
#8 x 1
¼
"
wafer-head screws
•
(60) #6 x 1
¼
" flat-head screws
Lumber Needed
•
(10) Pieces 2x4 x 8'
•
(1) 4' x 8' sheet of
" plywood
Cut List
Cut from 2x4 x 8'
(5) 93” rails
(4) 72” corner posts and
17” end rails
(2) 17” end rails
Cut from 4' x 8' " plywood
(1) 24” x 96” top shelf
(1) 24” x 96” lower shelf
Attach with #6 x 1¼” flat-head screws