
Installation Guide

Inst
allation Steps:
FIG. 1
FIG. 2
Socket
Bracket
Option cut and
wire cut connect
Orange Quick-
Connector
(INCLUDED)
For hardwire, cut
wire and attach
wire nuts. (NOT
INCLUDED)
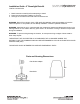
1. Select the Correlated Color Temperature (CCT) and wattage.
2. Unscrew the wing nut inside the can to remove socket bracket from
can. Disengage the socket from the socket bracket by pressing in on
the two spring clips on the socket (Fig. 1).
3. Thread the socket adapter into the socket (Fig. 2).
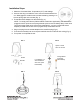
4. Plug in the plug from the socket adapter to the retrofit kit plug (Fig.3).
5. Tuck all wires carefully into can and push retrofit kit into can until flush with ceiling (Fig. 4).
6. Turn power on to operate the unit.
FIG. 3
FIG. 4
NOTE: To comply with Title 24 (California New Construction Application), the unit must be
plugged in with a quick-connect (orange female quick-connect included). Many newer cans
come with orange male quick-connect plug. Alternatively, you may cut the E26 socket
adapter provided and use wire nuts or pig tail crimps to hardwire the unit.