TM TM /36
TM TM /36
/36
/36
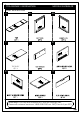
PRE-ASSEMBLY INFORMATION . PART DESCRIPTION A . MODEL # AXCBAN-08 . . BL BR . . C EL D TOP SHELF QTY 1 . . ER . F G NEED HELP? For help with assembly or if you are missing a part, Please call customer service at 1-866-518-0120 ext.
PRE-ASSEMBLY INFORMATION . PART DESCRIPTION HL . MODEL # AXCBAN-08 . . HR I . . J L K BOTTOM SHELF QTY 1 . . ML MR . N NEED HELP? For help with assembly or if you are missing a part, Please call customer service at 1-866-518-0120 ext.
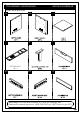
PRE-ASSEMBLY INFORMATION PART DESCRIPTION OI . . . . . . I PL . . O QL . . . . . O RL I R1 Warning Label . . . S PR O QR . RR MODEL # AXCBAN-08 R2 . T U NEED HELP? For help with assembly or if you are missing a part, Please call customer service at 1-866-518-0120 ext.
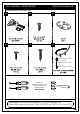
PRE-ASSEMBLY INFORMATION . HARDWARE DESCRIPTION 1 2 . . . 4 . 3 5 7 6 . 8 . 10 . . . . MODEL # AXCBAN-08 9 . 11 12 NEED HELP? For help with assembly or if you are missing a part, Please call customer service at 1-866-518-0120 ext.
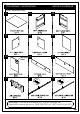
PRE-ASSEMBLY INFORMATION . HARDWARE DESCRIPTION 13 14 . . . 15 . 16 MODEL # AXCBAN-08 . 17 18 a. b. M4 X 25mm - QTY 2 ( 1 is extra ) M4 X 15mm - QTY 1 c. M4 X 25mm - QTY 1 Required Flathead screwdriver Phillips screwdriver Rubber mallet Not Included NEED HELP? For help with assembly or if you are missing a part, Please call customer service at 1-866-518-0120 ext.
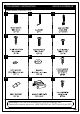
A RL R1 RR D R2 HR C HL BL QL I ER F I PL BR PR QR EL J G N O L T S S U /36
3 3 L 3 L MR MR ML L ML 3 3 MR L ML 3 /36
L L O O L L O O N N 4 2 /36
1 F 1 3 3 1 1 3 EL 1 ER /36
ER F EL 3 ER F F ER EL /36
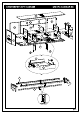
STEP-8 1 1 STEP-9 D C D 4 2 4 C 2. Use three Allen Key Screws 4 to attach Top Divider D through guide holes from Top Shelf C to pre-drilled holes of Top Divider D . 3. Use Allen Key 2 to tighten Screws and Bolts. Do not over-tighten.
ER C EL 4 2 EL ER ER C C EL 2. Use three Allen Key Screws 4 to attach each Middle Divider EL , ER through guide holes from Middle Dividers EL , ER to pre-drilled holes of Top Shelf C . 3. Use Allen Key 2 to tighten Screws and Bolts. Do not over-tighten.
1 HL 1 BL 1 3 /36
HR ER C EL HL 4 2 HL C HR C HR HL 2. Use six Allen Key Screws 4 to attach each Divider HL , HR through guide holes from Top Shelf C to pre-drilled holes of Dividers HL , HR . 3. Use Allen Key 2 to tighten Screws and Bolts. Do not over-tighten.
HR J EL HL HR J ER 4 EL HL 4 4 4 4 2 2. Use three Allen Key Screws 4 to attach each part HL , HR , EL , ER through guide holes from Bottom Shelf J to pre-drilled holes of parts HL , HR , EL , ER . 3. Use Allen Key 2 to tighten Screws and Bolts. Do not over-tighten.
BR 5 BL J 2. Use three Allen Key Bolts 5 to attach Sides BL , BR through guide holes from Bottom Shelf J to Sides BL , BR . 3. Use Allen Key 2 to tighten Screws and Bolts. Do not over-tighten.
BL D A HL HR J BR 4 5 3 2 2 BL HL A D 4 2 BR 5 2 /36
S T U T 2 6 7 8 S 8 7 6 2 /36
S T S 2 2 6 6 7 7 8 T 8 /36
2 6 7 8 /36
9 8 /36
Warning Label RR R1 R2 RL R1 RL RR R2 9 /36
14 13 QL QR /36
HR BR PR HL QR BL PL QL 13 14 PL BL QL QR PR BR /36
/36
16 F 15 G 11 12 ER EL /36
11 12 ER HR HL PR PL QR QL EL 12 12 11 HR PL QL QR PR ER /36
I I I I /36
/36
18 18 /36
/36
TM TM WARRANTY /36