
Installation guide


13
Overview
Both assemblies are designed for different systems.
•
The 4100/4120-0155 Serial DACT mounts into a non-4100U/4100ES systems (with 2975-
91xx Back Boxes).
•
The 4100-6052 DACT mounts into a 4100U/4100ES systems (with 2975-94xx Back Boxes).
This section describes how to mount the cards into both types of bays.
Mounting Serial
DACT 4100/4120-
0155
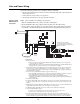
Use the instructions and figure below to mount a 4100/4120-0155 Serial DACT bracket into a
4100 Back Box (PID series 2975-91xx). The directions are the same regardless of whether you’re
installing the DACT into a CPU bay or an expansion bay. See Figure 8.
1. Secure the DACT assembly to the chassis. Secure the bracket to the chassis using four #6
screws.
2. (If applicable) Disconnect one of the two battery terminals, and then remove AC power at the
power source.
3. (If applicable) Disconnect and remove the optional city card(s). Tie off and remove the city
circuit wiring.
4. Place the DACT assembly into any open slot in the CPU bay or an expansion bay, but if the bay
has relay cards, the relay cards must be installed in the far right of the bay.
Note: It is recommended that the Serial DACT be installed in the far left or far right slot. This
module does not have a J1 or P1 connector (which are used to distribute power and
communications to adjacent modules.)
Figure 8. Installing the motherboard into a 4100 back box
2%')342!4)/.,!"%,
##$!#4"2!#+%4
#/5,$!,3/'/(%2%
##$!#4
Mounting