
Installation Guide

13
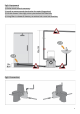
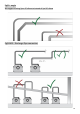
3d CONNECTION TO THE ELECTRICAL SUPPLY
The electrical installation should be carried by a qualified person.
The unit should be connected to a fully earthed electrical supply.
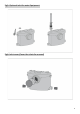
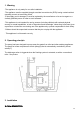
4 COMMISSIONING THE UNIT
Once electrical and pipe connections have been made, flush the toilet once. The motor should run
from 5 to 10 seconds to clear the waste (depending on the height of the pipe run). If it runs for
more than 20 seconds, check that the pipework is clear, and that the discharge hose is not kinked.
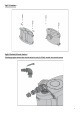
Flush the toilet checking that all seals, and connections are watertight. Check both the discharge
pipework from the unit and the other sanitary appliances connections.
The electrical installation should be carried by a qualified person.
The unit should be connected to a fully earthed electrical supply.
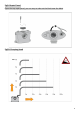
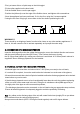
5 USAGE AND WARNING
WARNING !!!
If away for a long periods (eg holidays) we recommend that you turn off the water supply to
the WC served by the unit.
Toilet connected to this unit can be used like any normal toilet, and requires minimum
maintenance. The unit will operate automatically as soon as the required level of water enters the
case.
The motor thermal protector will operated once the motor is overheat, unplug the plug from the
socket-outlet, then plug again, the appliance will work normal after waiting about 30-60minutes.
WARNING !!!
Only the disposal of toilet papers, faecal matter, and waste water will be under guarantee.
Any damage due to foreign bodies such as cotton, condoms, sanitary towels, wet wipes,
food, hair, metal, wood or plastic objects, will not be under guarantee. Solvents, acids and
other chemicals can also cause damage to the unit, and will invalidate the guarantee.
6 MAINTENANCE
DISCONNECT THE ELECTRICAL POWER SUPPLY, BEFORE ATTEMPTING ANY
WORK ON THE UNIT.
No need of any particular maintenance.
This unit is fitted with an active carbon filter, and requires no external venting.