ADAPTABLE WASTE PUMP FOR TOILET MACERATOR PUMP HEBEANLAGE Installation and Utilization Instructions 1
WARNING!!! 1.Please read the manual carefully before installation 2.Avoid chemical solvents, strong acids and alkali entering the machine 3.Only toilet paper, fecal matter and waste water can be disposed Do not throw any other kinds of waste into the toilet 4.Shower waste can be disposed without a cutter 5.Avoid too much hair into the machine 6.When installing the device, placing a check valve is necessary 7.Make sure that waste water flowing from equipment automatically enters the pump 8.
Technical Power: Horizontal discharge: Max. Water temperature: Max.
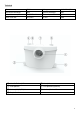
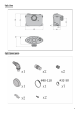
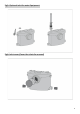
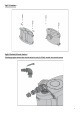
Fig1: Size Fig2: Spare parts 4
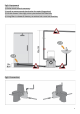
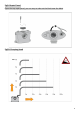
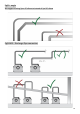
Fig3: Equipment 1, Outlet check valve is necessary 2, Install an extra manual check valve for repair (Suggestion) 3, Lift the shower 14cm high, when you connect the side inlet 4, Using filter in shower & lavatory to reduce hair come into machine Fig4: Connection 5
Fig5: Optional inlet for extra Equipment Fig6: Inlet cover (Cover the inlets for unused) 6
Fig7: Fixation Fig8: Outlet (Check Valve) Discharge pipe insert the check valve is only 1~2CM, avoid too much insert 7
Fig9: Repair Panel Open the top repair panel, you can easy to take out the block near the blade Fig10: Pumping head 8
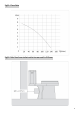
Fig11: Flow Rate Fig12: Min Size from toilet outlet to rear wall is 245mm 9
Fig13: angle We suggest to using 2pcs 45’ elbow to instead of 1pc 90’ elbow Fig14&15: Discharge Pipe connection 10
1. Warning -The appliance is only ready for use after installation. -The appliance must be supplied through a residual current device (RCD) having a rated residual operating current not exceeding 30mA. -If the supply cord is damaged, it must be replaced by the manufacture or its service agent or a similarly qualified person in order to avoid a hazard.
•First, put some silicon or liquid soap on the toilet spigot •Fit the collar supplied on the bowl outlet •Pull the flexible sleeve over the pan spigot •Position the jubilee clip over the edge of the flexible sleeve, and tighten with a screwdriver •Once the appliance has been positioned, fix it to the floor using the 2 screws supplied. If using the two floor fixing lugs, secure them to the floor before positioning the unit.
3d CONNECTION TO THE ELECTRICAL SUPPLY The electrical installation should be carried by a qualified person. The unit should be connected to a fully earthed electrical supply. 4 COMMISSIONING THE UNIT Once electrical and pipe connections have been made, flush the toilet once. The motor should run from 5 to 10 seconds to clear the waste (depending on the height of the pipe run). If it runs for more than 20 seconds, check that the pipework is clear, and that the discharge hose is not kinked.
Correct disposal of this product This marking shown on the product or its literature, indicates that it should not be disposed with other household wastes at the end of its working life. To prevent possible harm to the environment or human health from uncontrolled waste disposal, please separate this from other types of wastes and recycle it responsibly to promote the sustainable reuse of material resources.