
User Manual

SV1C Cylindrical RF Lock
Page 8
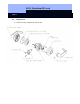
Replace the battery cap by aligning it so that it slides on easily and then twist a few
degrees in the clockwise direction until it locks in place.
If the inner rose was removed, replace it so the access hole is lined up to allow the
replacement of the set-screw. Use a 7/32 Hex key to replace the set-screw being
careful to hold the inner handle so that it does not fall off.
When the set-screw has been tightened down (finger pressure), rotate the inner rose
so that the access hole is facing down concealing the set-screw..
You must reprogram the lock after the battery change because the clock does
not work without power (Software Operating Instructions: Programming >
Setting the Clock on the Lock).
5.0 Installation Instructions
5.1 General Information
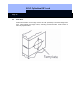
When installing the SimonsVoss RF Lock, make sure that there are no sources of RF
interference in the vicinity. You should install these locks at least 1.5 feet (0.5 m)
from other RF locks or SmartRelays at a distance of at least 5 feet (1.5 m).
Attention Installer
If Installation instructions are not followed this may result in damage to the lock and
void the factory warranty.
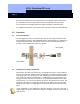
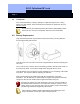
The SimonsVoss SV1 Cylindrical RF Lock is designed to fit the ANSI/BHMA A156.2-
1996 door preparation standard. If the door has not been prepared you will need the
following tools:
2 1/8” (54mm) hole saw for the main cylindrical hole
1” (25mm) boring bit for the latch
5/16” (8mm) drill bit for the lock through-bolt screws
7/64” (2.5mm) drill bit for the latch mounting screws
Chisel and hammer to create the inset for the latch
32 Phillips screw driver to mount the lock
3/8” or ½” drill
Important: The accuracy of the door preparation is critical for the proper
function and security of this lever handle lock. Misalignment can cause pre-
mature wear and tear and a lessening of security.