
Unit installation
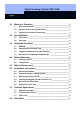

Digital Locking Cylinder 3061 VdS
Page 7
Fix the lock nut in position with the special tool and press it against the flange. Now
turn the inner knob onto the screw thread until the stop and tighten the locknut firmly.
Now operate an authorised transponder and test the function.
& Please dispose of discharged lithium batteries immediately. Store away from
children, do not open and do not throw into fire.
& You must reset the time of day after the battery change because the clock
does not work without current (Software Operating Instructions: Programming
Æ Setting the Clock on the Locking).
6.0 Installation Instructions
6.1 General Information
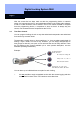
When installing the Digital Locking Cylinder, make sure that there are no sources of
interference in the vicinity. You should install locking cylinders at least 0.5 m
(approximately 1.5 feet) from one another and control units or Smart Relays at a
distance of at least 1.5 m (approximately 5 feet). The PC housing of the half cylinder
is not allowed to stick out into the exterior area more than 3 mm. If necessary, attach
a profile cylinder rosette. Furthermore, you must ensure that no water can penetrate
the cylinder in the area of the catch
6.2 Programming the Locking Cylinder
You must program the Digital Locking Cylinder and accompanying transponders in
the locking plan before you install them. Please refer to the Software Operating
Instructions for more detailed information.
& The locking cylinders are delivered in so-called storage mode, which means
that no communication is possible with the transponder (exception:
programming transponder). You can also use software and the programming
device to remove the storage mode. Please refer to the Software Operating
Instructions for more detailed information.
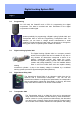
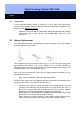
6.3 Removing the Outer Knob
Loosen the setscrew on the outer knob (short knob) with a
1.5 mm Allan key (do not screw the whole way off). Operate an
authorised transponder and hold the inner knob still. The
locking cylinder couples and you can unscrew the outer knob
by turning it counterclockwise.