
Operating instructions


Manual – LDB 1.5
Page 121
121
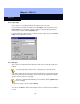
15.3 Registering a network node
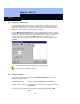
You must tell the software which nodes are installed in the network. Lock Nodes all
belong to particular groups. For example, all of the nodes on the first floor belong to
Group 001, and those on the second floor to Group 002. The Lock Nodes also have a
‘Member ID’. Both numbers are printed on the Lock Nodes.
Click the Manage network nodes button. Next to Network group, select the relevant
group. Under Add new nodes to area:, enter the Member IDs. In the case of individual
numbers, enter the same number in the from: and to: boxes; otherwise, enter the
numbers of the area concerned. Click Add, until you have registered all of the
network nodes. Once you have entered all of the nodes in all of the groups, confirm
with Exit.
Network nodes that are not registered cannot be contacted.
New nodes can be added at any time.
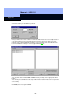
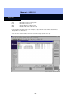
15.4 Testing Lock Nodes
Next, test the Lock Nodes by pressing the Test Network Nodes button. You can
make the following settings:
Test individual nodes: Enter their Group and Member ID and click OK.
All of the nodes in a group: Enter the group concerned and click All nodes, then click
the OK button.
All of the nodes in a network: Click All groups and All nodes, followed by the OK
button.