
Unit installation

Manual – Digital Half Cylinder 3061
Page 14
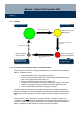
5.3.1 Perform a function test
1. Engage the half cylinder using the transponder; with the door open, turn
the knob in both directions for opening and locking. The knob should
turn freely in both directions.
2. Close the door and repeat the test. If the knob is difficult to turn, you will
need to adjust the door or the striking plate.
The same applies to installation in a key-operated switch.
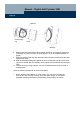
5.4 Removing the multistage half cylinder
Pease follow these steps if you need to remove the half cylinder:
1. Insert a suitable tool (e.g. a screwdriver) into both grooves of the plastic plate be-
tween knob and profile cylinder housing and turn it using gentle pressure. This will
destroy the plate.
2. Remove the rest of the plastic plate.
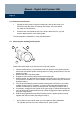
3. Engage the half cylinder using an authorised transponder.
4. When engaged, turn the knob anti-clockwise until it will not turn any further (e.g. up
to the lock if it is installed; if it is not installed, hold the actuator with your hand; see
illustration step 1).
5. Turn the knob towards the profile cylinder housing until it will not turn any further
(audible clicking noise! If necessary, move the knob forwards and backwards a
number of times until you hear the clicking sound; see image for steps 2 and 4).
6. If necessary, engage the half cylinder once again using an authorised transponder.
7. Turn the knob anti-clockwise with the half cylinder engaged and hold it against the
stop (see image step 3).
8. Hold the knob against the stop and pull it away from the profile cylinder housing
together with the inner tube (see image for step 4).
& Do not strike or hit the knob under any circumstances during installation.
The cylinder must not come into contact with oil, paint or acids.
1
4
3 2