
Unit installation

Manual – Digital locking cylinder 3061
Page 26
& Please dispose of discharged lithium batteries immediately. Keep out of
reach of children. Do not open. Do not throw into a fire.
Always replace both batteries together at the same time.
Please also see the safety notes in chapter 1.1.
8.2 Procedure
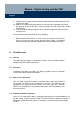
1. Hold the assembly/battery tool against the knob so that both nibs fit into the
openings on the ratchet disk (if necessary rotate the knob until the nibs slot into the
openings).
Attention: The assembly/battery tool must be held flush against the inner surface of
the recessed grip ring to fit into the ratchet disk.
2. Hold the knob and carefully turn the assembly/battery tool 30° in a clockwise
direction (until you hear a clicking noise).
3. Remove the assembly/battery tool from the knob.
4. Slide the recessed grip ring back towards the door until it slips off the knob.
5. Hold the recessed grip ring, rotate the knob approx. 10° anti-clockwise and
remove.
6. Carefully remove both batteries from their bracket.
7. Hold the two new batteries with plus poles facing each other and slide them into
the bracket (please replace the batteries as quickly as possible). Make sure you
wear clean, grease-free gloves when handling new batteries.
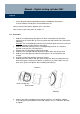
8. Replace the knob (according to the triangular markings, see drawing), hold the
recessed grip ring and rotate the inner knob (approx. 10°) in a clockwise direction
to tighten.
Internal knob
Markings
Batteries
Recessed grip ring