
Unit installation

Manual – Digital locking cylinder 3061
Page 18
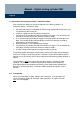
5.3 Installing twin-knob cylinders (except Type .AP)
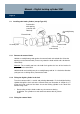
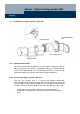
5.3.1 Remove the external knob
Hold the assembly/battery tool against the external knob so that both nibs fit into the
openings on the external knob (if necessary rotate the knob until the nibs slot into the
ratchet disk).
Attention: The assembly tool must be held flush against the face of the knob to fit
properly into the ratchet disk.
Hold the knob and carefully turn the assembly/battery tool 30° in a clockwise direction
(until you hear a clicking noise). Remove the knob.
5.3.2 Fitting the digital cylinder in the lock
Turn the actuator until it is vertical and pointing downwards. Push the digital locking
cylinder through the lock so that the internal knob (see illustration in chapter 5.3) is
facing the inside surface of the door. Secure the locking cylinder in the slot-in lock
with the fixing screw.
& Do not strike or hit the knobs under any circumstances during
installation. The cylinder must not come into contact with oil, paint or
acids.
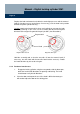
5.3.3 Fitting the external knob
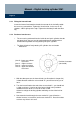
Assembly tool
Recessed grip ring
Side marking
Internal knob
External knob
Ratchet disk
with opening
(external side
identical)
Assembly/battery
tool